How to Do iOS Unit Testing: Ultimate Guide Part - 2
Introduction
This is part 2 of the ongoing series of articles where we keep adding new screen with more complexity.
Checkout part 1 if you haven’t already!
Part 2 — This article covers implementation of Add task screen with unit tests. We will also see how we can navigate back and forth very easily with UIPilot and how to write tests for navigation.
We will have basic app ready at the end of this part.
Alright, let’s get started.
Sponsored
We are what we repeatedly do. Excellence, then, is not an act, but a habit. Try out Justly and start building your habits today!
I have divided this posts into 6 small steps to make explanation easier.
- Make UIPilot available in ViewModel
- Add button on list screen
- Implement Add Task screen UI
- Implement Add Task ViewModel
- Write tests for Add Task ViewModel
- Refresh list screen after task is added
Feel free to jump/skip steps you are already familiar with.
1. Make UIPilot available in ViewModel
We will put navigation logic inside ViewModel, so that we can write unit tests to verify the behavior. UIPilot allows us to do just that and more!
To make the dependency available in the ViewModel, we will have to put it in our DI graph. We already have Assembly for data layer called DataAssembly . Let’s add one for UI layer as well where we can put UI dependencies.
import Swinject
import UIPilot
class UIAssembly: Assembly {
    func assemble(container: Container) {
        container.register(UIPilot<AppRoute>.self) { _ in
            return UIPilot(initial: AppRoute.List)
        }.inObjectScope(.container)
    }
}
We moved UIPilot instance creation from ContentView to here. Now let’s update TodoApp class to add this assembly in the DI graph.
@main
struct TodoAppApp: App {

    init() {
        Injector.initGraph([DataAssembly(), UIAssembly()])
    }
    ...
}
Pretty straightforward! Now let’s update ContentView to use UIPilot from DI instead of creating a new one.
struct ContentView: View {

    private let pilot: UIPilot<AppRoute>

    init() {
        pilot = Injector.assembler.resolver.resolve(UIPilot<AppRoute>.self)!
    }

    ...
}
That’s it. Now we can ask Injector for the UIPilot just like any other dependency and thus we are ready to navigate!
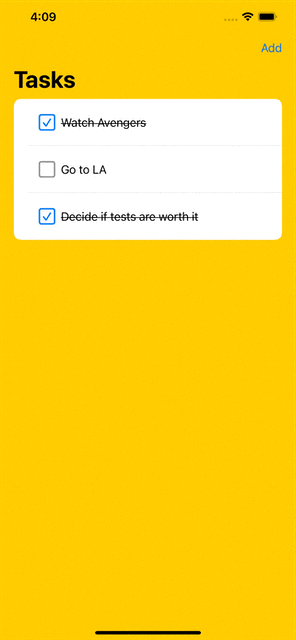
2. Add button on list screen
Now let’s add button on List screen to direct to Add Task screen. We will use NavigationBarItem .
struct TaskListView: View {

    @StateObject var viewModel = TaskListVM()

    var body: some View {
        ...
        .navigationTitle("Tasks")
        .navigationBarItems(trailing: Button("Add", action: {
            self.viewModel.onAdd()
        }))
        ...
    }
}
On the button click, we are notifying ViewModel with function onAdd . We haven’t defined it yet, let’s do it now.
class TaskListVM: ObservableObject {

    private let taskRepository: TaskRepository
    private let pilot: UIPilot<AppRoute>
    ...
    init() {
        taskRepository = Injector.assembler.resolver.resolve(TaskRepository.self)!
        pilot = Injector.assembler.resolver.resolve(UIPilot<AppRoute>.self)!
    }

    func onAdd() {
        pilot.push(.Add)
    }
}
Let’s understand the change here
- In
init, we are gettingUIPilotfrom DI and storing it locally, just likeTaskRepository. - We have added function
onAdd, which simply pushesAddscreen to navigation stack.
That’s all changes we needed on list screen in order to show Add task screen. Now let’s go ahead and implement Add Task screen UI.
3. Implement Add Task screen UI
Before we add the view, let’s update our ContentView to map it with actual screen for Add route.
struct ContentView: View {
    ...
    var body: some View {
        UIPilotHost(pilot) { route in
            switch route {
                case .List: return AnyView(TaskListView())
                case .Add: return AnyView(AddTaskView())
            }
        }
    }
}
Now let’s define AddTaskView
struct AddTaskView: View {

    @StateObject var viewModel = AddTaskVM()

    var body: some View {
        VStack {
            TextField("What's on your mind?", text: $viewModel.title)
                .padding()
            HStack {
                Button("Save", action: {
                    viewModel.onSave()
                })
                Spacer()
            }.padding()
            Spacer()
        }
        .background(Color.orange)
        .navigationTitle("Add task")
    }
}
Let’s understand above snippets
- We have defined
AddTaskVMvariable as viewModel, which we will define shortly. - View contains a
TextFieldwhich we will allow user to type task title. We havebindedit toViewModel.titleso when user types something,titlevariable will be automatically updated. - View contains a
Buttonwhich we will use to save task. On click, we simply callonSavefunction.
That’s all needed for AddTaskView. Now let’s go ahead and implement ViewModel .
4. Implement Add Task ViewModel
In ViewModel, the main logic is going to be saving task to TaskRepository and then redirecting user back to List screen. We will do this inside onSave function that view will call when user clicks Save button.
class AddTaskVM: ObservableObject {

    private let taskRepository: TaskRepository
    private let pilot: UIPilot<AppRoute>

    @Published var title: String = ""

    init() {
        taskRepository = Injector.assembler.resolver.resolve(TaskRepository.self)!
        pilot = Injector.assembler.resolver.resolve(UIPilot<AppRoute>.self)!
    }

    func onSave() {
        let newTask = Task(id: UUID().uuidString, title: title, isCompleted: false)
        taskRepository.addTask(task: newTask)
        pilot.pop()
    }
}
Let’s understand above snippet
- We have two
privatevariablesTaskRepositoryandUIPilot, both of them are initialized ininitconstructor as usual. - We have
titlevariable thatViewwill use to bindTextField. It will store Task’s title. - In
onSavefunction, which is called by View on Save button click, we first create a newTaskand then callTaskRepository.addfunction to store it. - Later we call
UIPilot.popfunction to pop the current route, that is add screen. User will see List once they are done with adding tasks.
TaskViewModel implementation is complete now. It’s time to add some unit tests!
5. Write tests for Add Task ViewModel
The main behavior we want to verify here is of onSave function. We will check two things
- onSave function adds task in
TaskRepositorywith correct title - onSave function redirects back to List route.
Let’s start by adding basic test class and defining common variables.
import XCTest
import UIPilot
@testable import TodoApp

class AddTaskVMTest: XCTestCase {

    var viewModel: AddTaskVM!
    var taskRepository: TaskRepository!
    var uipilot: UIPilot<AppRoute>!

    override func setUpWithError() throws {
        viewModel = AddTaskVM()
        taskRepository = Injector.assembler.resolver.resolve(TaskRepository.self)!
        uipilot = Injector.assembler.resolver.resolve(UIPilot<AppRoute>.self)!
        uipilot.push(.Add)
    }
}
We are already familiar with the setup as it’s the same as TaskListVMTest .
Now let’s add test to verify add task behavior.
func testAddTask_OnSaveClick() {
    viewModel.title = "I'm new task"
    viewModel.onSave()

    let task = taskRepository.getTasks().last!

    XCTAssertEqual("I'm new task", task.title)
    XCTAssertFalse(task.isCompleted)
}
This function
- Sets title to something we know, so that we can verify it later
- Calls
ViewModel.onSaveto add the task - Gets last task from
TaskRepository - Verifies title of the added task is
I’m new Task - Verifies task is not complete
Pretty simple assertions!
Now let’s verify navigating behavior
func testPopRoute_OnSaveClick() {
    XCTAssertEqual(AppRoute.Add, uipilot.stack.last)
    viewModel.onSave()
    XCTAssertEqual(AppRoute.List, uipilot.stack.last)
}
Could it be any easier?
Here 1. we verify that initial current route is Add screen and then 2. we call onSave to add task. Later 3. we verify that current route is List screen.
That’s all tests we need!
Conclusion
Hope you have basic idea of how unit testing is done in iOS. It’s pretty easy thing to do but most of the time we are scared as a beginner by the new terms thrown at us.
Stay tuned for the next parts of this series where we will write more complex tests for View and Edit screens. Let me know your valuable suggestions and feedback in the comment section below.
Full application source code is available on Github.
Thanks for your support!
Related Useful Article