How To Add Multiple Modules In The Swift Package Manager
What is SPM?
Swift Package Manager, is Apple’s tool for easily adding libraries and frameworks to your project. Introduced in 2015, it’s loved for its simplicity.
Compared to CocoaPods, SPM’s integration is straightforward, and it’s widely adopted, supporting many popular libraries. With ongoing improvements, SPM keeps simplifying development.
Its user-friendly interface and strong capabilities make it vital for modern Swift development.
Whether you’re a seasoned developer or new to Swift, SPM empowers you to build projects efficiently and contribute to Swift’s vibrant ecosystem.
Sponsored
Stop the habit of wishful thinking and start the habit of thoughtful wishes with Justly.
How to Create a Swift Package
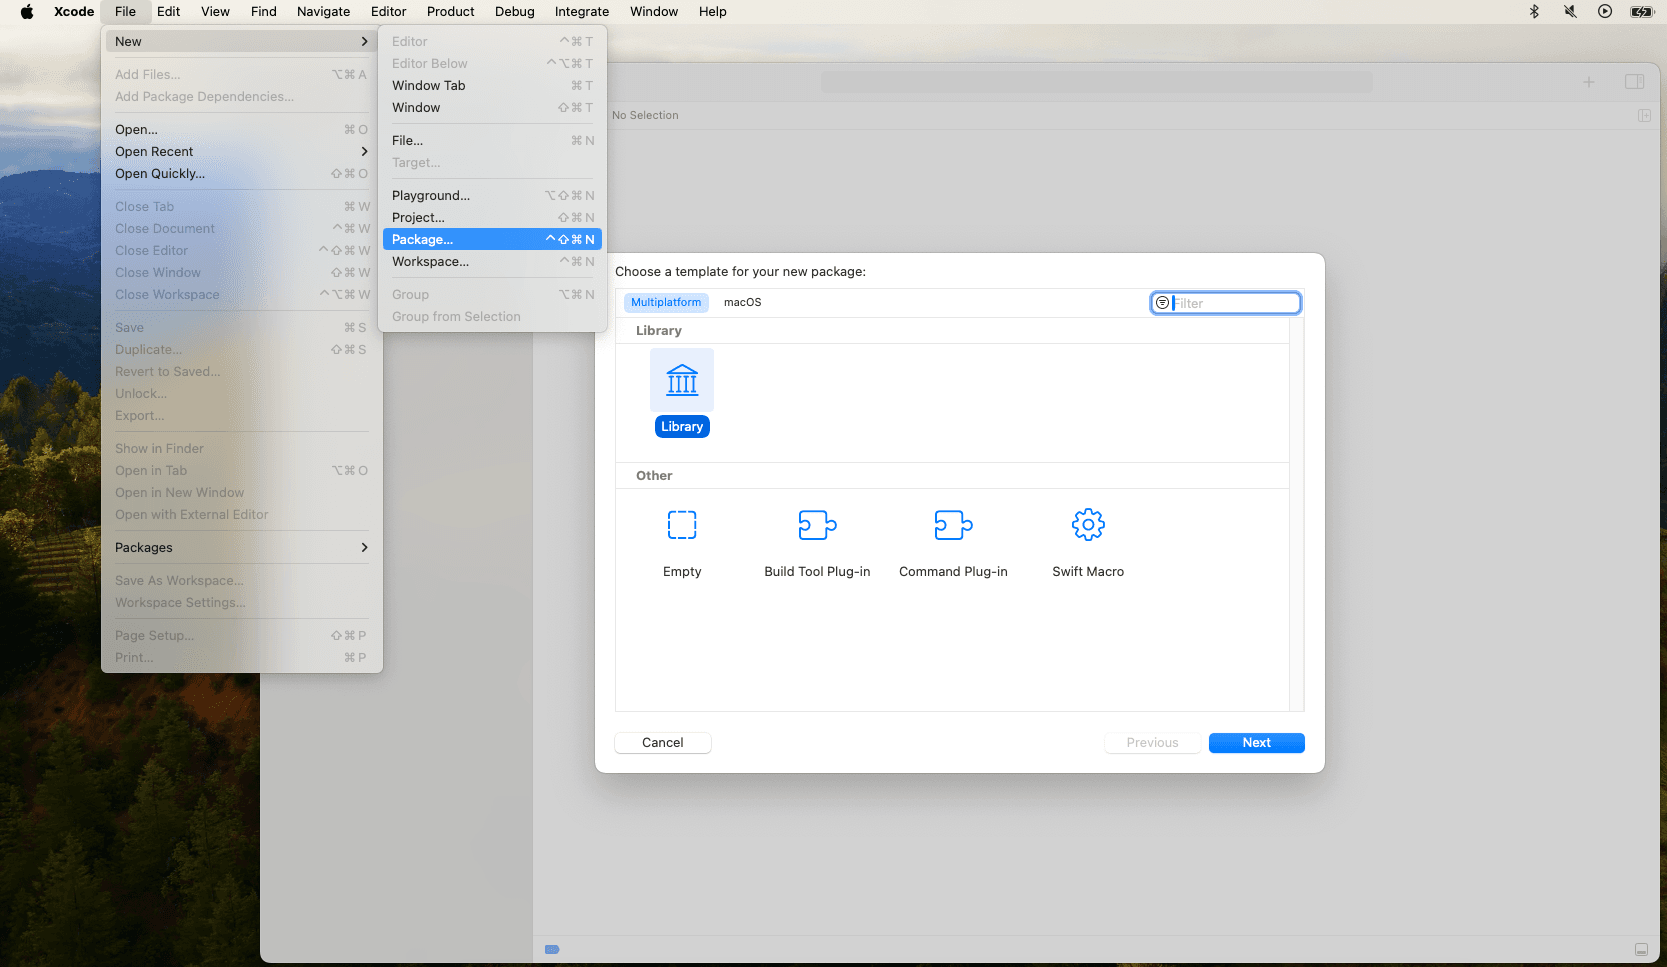
Creating a Swift Package is as easy as starting a new project.
Open Xcode, go to File, select New, then choose Package. This will create your package.
The Package.swift file within it is crucial and serves as the heart of the package, to manage products, targets, dependencies, and important details like supported platforms and Swift versions.
How to create Submodules/Libraries in Package
Have you ever wondered how a single package can be a house of multiple libraries?
Recently, I encountered Firebase, which contains numerous submodules, and that prompted me to explore how they effectively manage such complexity.
Inspired by this exploration, I decided to further investigate the topic and share my findings in this blog post.
In your added package, you'll notice the Sources directory holds all the code. By default, a directory is created with your package name.
To create a submodule, simply add another directory and a file within Sources.
For example,
- If we have a package named
MultiProductPackageand we want to create a submodule calledData, we would create a directory namedData.
However, an empty directory won't create a target, so ensure you add at least one file to the directory.
- Next, create a target for the submodule by adding the following line to the "targets" section in the
Package.swift.
.target(name: "Data")This will create a new target from our directory inside the Sources.
- To make the submodule a library, include the following in the "products" array inside
Package.swift.
.library(name: "Data", targets: ["Data"])Now, your Data module, defined as a target in the MultiProductPackage, becomes usable within the package.
- To use it, add the Data module to the targets of the library where it's intended to be used. That involves modifying the Package.swift file.
This process ensures that the MultiProductPackage can effectively manage and utilize multiple libraries, providing a modular and organized structure.
Now our Package.swift file looks like this.
// swift-tools-version: 5.9
// The swift-tools-version declares the minimum version of Swift required to build this package.

import PackageDescription

let package = Package(
    name: "MultiProductPackage",
//    platforms: [
//        Add Patforms(iOS, Mac, tv, watch) and os version which you package is support
//        .iOS(.v17)
//    ],
    products: [
        // Products define the executables and libraries a package produces, making them visible to other packages.
        .library(
            name: "MultiProductPackage",
            targets: [
                "MultiProductPackage",
            ]),
        .library(name: "Data",
                 targets: [
                    "Data"
                 ])
    ],
    targets: [
        // Targets are the basic building blocks of a package, defining a module or a test suite.
        // Targets can depend on other targets in this package and products from dependencies.
        .target(
            name: "MultiProductPackage"),
        .target(name: "Data"),

        // Test tragets comes here
        .testTarget(
            name: "MultiProductPackageTests",
            dependencies: [
                "MultiProductPackage",
                "Data"
            ]),
    ]
)
Once you included the Data module in the targets of the MultiProductPackage library within the Package.swift file, you can import and utilize the publicly available code and resources from the Data module directly within the MultiProductPackage.
This successful integration ensures seamless access to the functionality provided by the Data module within the package.
Here is a GIF, that shows how we can create a Data module.
How to Add External Dependency in Swift Package
To enhance the capabilities of our 'MultiProductPackage', we can easily integrate external dependencies. Let's explore the process using Alamofire as an example.
Modify Package.swift file:
After defining the products in the Package.swift file, insert the following code snippet to specify details about the Alamofire dependency, such as its name and version.
dependencies: [
    .package(url: "https://github.com/Alamofire/Alamofire.git", .upToNextMajor(from: "5.8.1")),
]
Include Dependency in Target:
To utilize it, we also need to include the dependency in the corresponding target.
So for utilizing Alamofire within the MultiProductPackage, add it to the MultiProductPackage target's dependencies in the Package.swift file.
.target(
    name: "MultiProductPackage",
    dependencies: [
        .product(name: "Alamofire", package: "Alamofire")
    ]),
After this step, Alamofire will become accessible within the MultiProductPackage and you can import there.
Keep in mind that if you want to use Alamofire in other targets like Data, you'll need to repeat this process for each target individually otherwise it will be only accessible within that specific target.
How to Manage Dependency with Plugins
Here we'll explore how to use plugins to address a missing functionality in Swift Package Manager related to build phase scripts, which are commonly used in Xcode projects.
The example involves integrating the SwiftLint library as an external dependency.
Introduction to Plugins:
Plugins serve as alternatives to build phase scripts, which are scripts executed before building an Xcode project.
However, this functionality is missing in Swift Package Manager. To address this gap, plugins have been introduced to run scripts before the build process with Swift packages.
Adding SwiftLint Dependency:
To add SwiftLint as a dependency, follow the standard process. Additionally, create a swiftlint.yml file with linting rules in the root directory.
As the linting process occurs before building, we need to add a bit of extra work to integrate 'SwiftLint' seamlessly.
Including SwiftLint Plugin:
After adding the swiftlint.yml file, include the SwiftLint plugin in the targets where linting is required.
For instance, if linting is needed in both the Data and MultiProductPackage modules, add the following code to both target's plugins.
plugins: [.plugin(name: "SwiftLintPlugin", package: "SwiftLint")]Finalizing Package.swift:
Update the Package.swift file with the added dependencies, targets, and plugins. The final file will contain information about the MultiProductPackage, Data, and their dependencies, including SwiftLint.
After adding all the things to our Package.swift file it will look like this.
// swift-tools-version: 5.9
// The swift-tools-version declares the minimum version of Swift required to build this package.

import PackageDescription

let package = Package(
    name: "MultiProductPackage",
    platforms: [
        .iOS(.v15)
    ],
    products: [
        // Products define the executables and libraries a package produces, making them visible to other packages.
        .library(
            name: "MultiProductPackage",
            targets: [
                "MultiProductPackage"
            ]),
        .library(
            name: "Data",
            targets: [
                "Data"
            ])
    ],
    dependencies: [
        .package(url: "https://github.com/Alamofire/Alamofire.git", .upToNextMajor(from: "5.8.1")),
        .package(url: "https://github.com/realm/SwiftLint.git", .upToNextMajor(from: "0.54.0"))
    ],
    targets: [
        // Targets are the basic building blocks of a package, defining a module or a test suite.
        // Targets can depend on other targets in this package and products from dependencies.
        .target(
            name: "MultiProductPackage",
            dependencies: [
                "Alamofire",
                "Data"
            ],
            plugins: [.plugin(name: "SwiftLintPlugin", package: "SwiftLint")]
        ),

        .target(
            name: "Data",
            plugins: [.plugin(name: "SwiftLintPlugin", package: "SwiftLint")]
        ),

        // Test tragets comes here
        .testTarget(
            name: "MultiProductPackageTests",
            dependencies: [
                "MultiProductPackage",
                "Data"
            ]),
    ]
)
Experience the Magic:
Build the project to start receiving warnings and errors based on the linting rules in the swiftlint.yml file. If you don't see any issues, intentionally break a rule and rebuild to witness the plugin's impact.
With these steps, you can efficiently manage dependencies and enhance your Swift Package with the help of plugins.
The full source code is available in this GitHub Repo.
Conclusion
Swift packages with multiple modules provide a robust framework for streamlining software development, offering improved organization and scalability. This approach, emphasizing modularization, not only enhances code clarity but also fosters reusability, a cornerstone of efficient development.
In this comprehensive guide, we navigated through fundamental processes, from initializing a package to incorporating dependencies, creating submodules, and harnessing the power of plugins for dependency management.
Remember to follow best practices, document your code thoroughly, and engage with the Swift community for support and collaboration.
That's it for today.
Happy coding…Happy moduling… 🤖
Related Articles


Get started today
Let's build the next
big thing!
Let's improve your business's digital strategy and implement robust mobile apps to achieve your business objectives. Schedule Your Free Consultation Now.
Get Free Consultation
Get started today
Let's build the next big thing!
Let's improve your business's digital strategy and implement robust mobile apps to achieve your business objectives. Schedule Your Free Consultation Now.
Get Free Consultation