How to Do iOS Unit Testing: Ultimate Guide Part - 1
What and Why of unit tests?
Let’s not waste time on what is unit test and what are their benefits. I think you all know it but want to learn how to write those tests! In case you want to know more about unit tests, check out this lovely article by X-team.
In essence, with unit tests, we write code to check the behavior of the smallest unit of our code, and that’s in Swift — Class.
Once we have tests for all classes, we automate them on CI and have a lovely weekend with friends and family without worrying about any regressions!
Don’t worry if you don’t understand the concept yet, you will get it as we develop the app and add a couple of tests.
Interested in the video instead of the post? We’ve got you covered.
What’s our goal?
We will develop a TODO app with a list screen in this part using:
- SwiftUI with UIPilot navigation
- MVVM architecture
- Swinject for dependency injection
We will have the basic todo app ready at the end of this part.
Sponsored
We are what we repeatedly do. Excellence, then, is not an act, but a habit. Try out Justly and start building your habits today!
Update: Here’s the second part of this series that you’ll find useful.
I have divided this post into 7 small steps to make the explanation easier.
- Create a new SwiftUI Project in Xcode
- Integrate Swinject and UIPilot
- Add Task and TaskRepository
- Configure dependency Injection
- Add TaskList UI
- Add TaskList ViewModel
- Write tests for TaskList ViewModel
Feel free to jump/skip steps you are already familiar with.
Let’s get started!
1. Create a new SwiftUI Project in Xcode
Create a new project in Xcode and name it whatever you like! I will name it MyTodo.
You will have something like this when you are done with the process.
import SwiftUI

struct ContentView: View {
    var body: some View {
        Text("Hello, world!")
            .padding()
    }
}
Well, we are done with the first step!
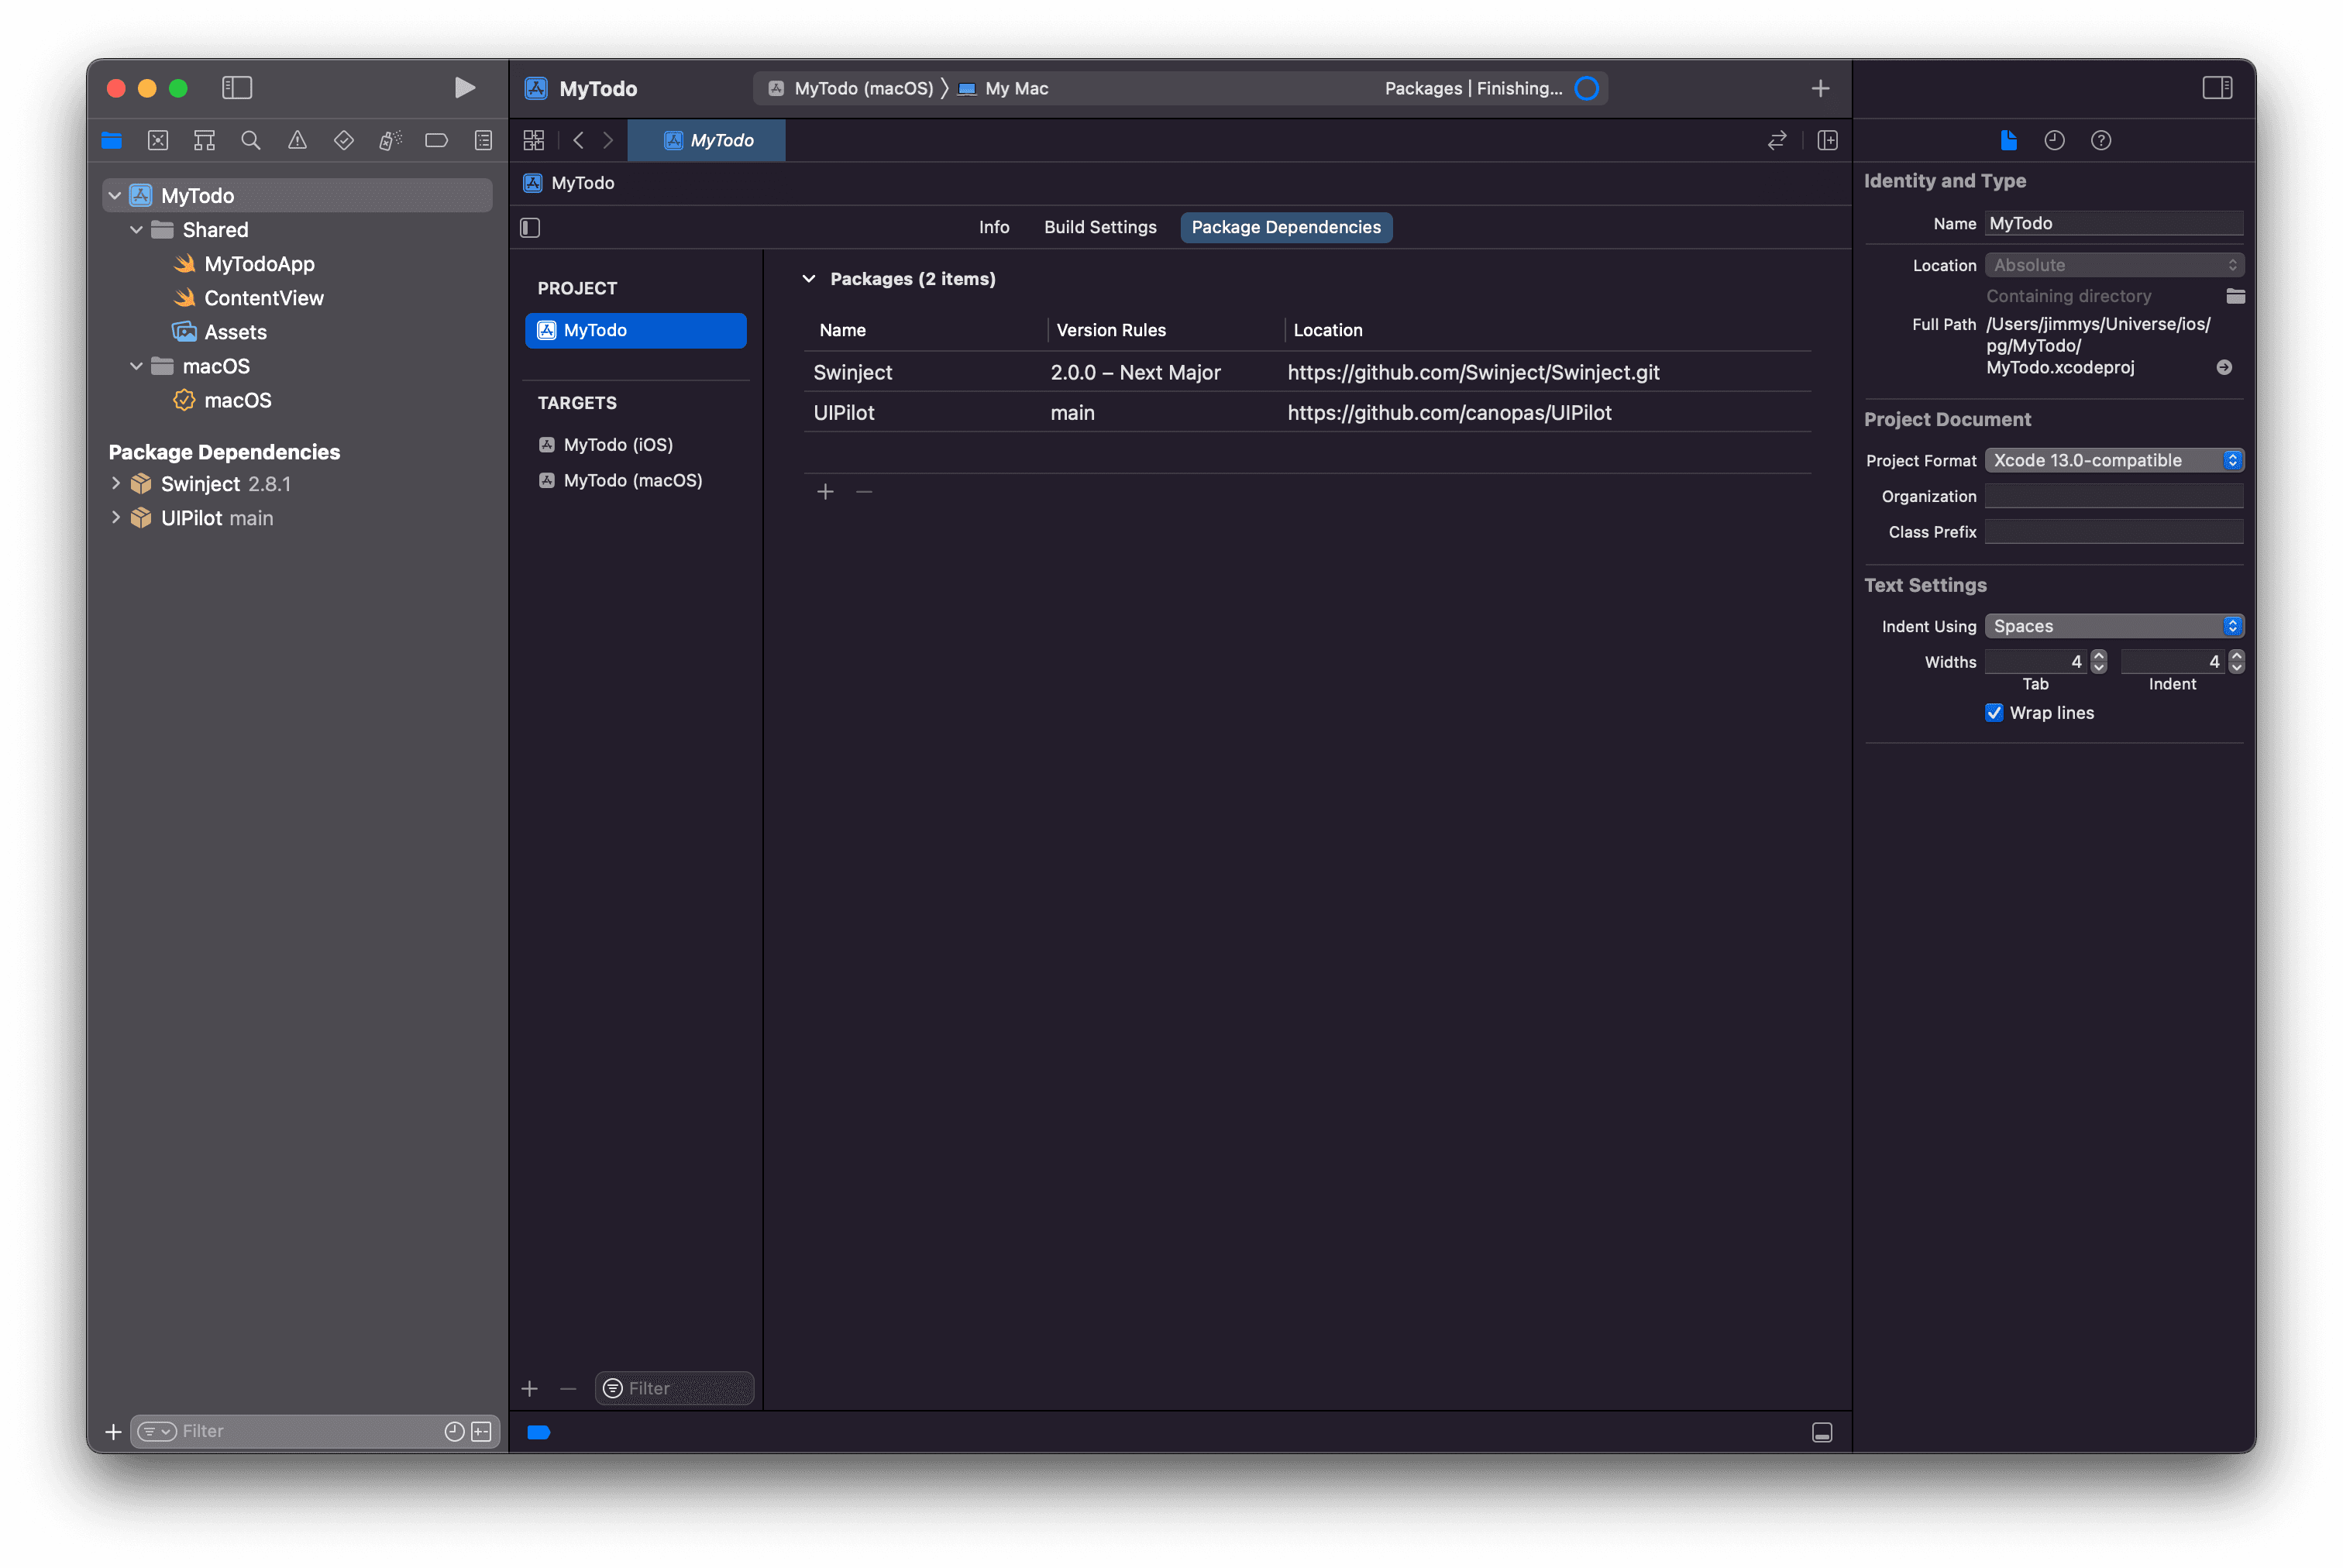
2. Integrate Swinject and UIPilot
Now let’s add library dependencies that we will need.
UIPilot is optional. Feel free to use native navigation if you like.
Okay, now we are ready to add the data layer of the app.
3. Add Task and TaskRepository
I like to divide the app into the Data layer and the UI layer. Basically Data layer contains the state of the app as data, everything that’s not UI should be in this package.
UI layer is just a reflection of the data layer that shows some beautiful UI and changes data when the user interacts with it.
Here, in the Todo app, we will create a TaskRepository that will hold task list for us. We will also create Task struct to store a single Task detail.
struct Task: Equatable, Identifiable {
    let id: String
    let title: String
    let isCompleted: Bool

    static func ==(lhs: Task, rhs: Task) -> Bool {
        return lhs.id == rhs.id
    }
}
Pretty simple! We will have a basic Task definition with just id, title, and isCompleted fields. We will implement Equatable and Identifiable protocols to make tasks easy to compare and identify.
Now let’s add TaskRepository. We will abstract out the definition as a protocol and will implement it in a separate class called TaskRepositoryImpl.
protocol TaskRepository {
    func getTasks() -> [Task]
    func getTask(id: String) -> Task?
    func updateTask(task: Task)
}
We will need 3 functions for now and all of them are pretty self-explanatory. Here’s the implementation of the protocol.
class TaskRepositoryImpl: TaskRepository {

    private var tasks = [Task]()

    func getTasks() -> [Task] {
        return tasks
    }

    func getTask(id: String) -> Task? {
        return tasks.first(where: { $0.id == id})
    }

    func updateTask(task: Task) {
        if let index = tasks.firstIndex(where: { $0.id == task.id}) {
            tasks[index] = task
        }
    }
}
We are storing everything in memory for now. In later parts, we will replace it with real DB implementation like SQLite or Coredata.
Let’s also add a few dummy tasks in TaskRepositoryImpl to get started as we haven’t added task functionality yet.
init() {
    addTask(task: Task(id: "123", title: "Watch Avengers", isCompleted: false))
    addTask(task: Task(id: "345", title: "Go to LA", isCompleted: true))
    addTask(task: Task(id: "456", title: "Decide if tests are worth it", isCompleted: false))
}

func addTask(task: Task) {
    tasks.append(task)
}
4. Configure dependency Injection
As we now have TaskRepository ready, it’s time to make it available where it’s needed. In our case, we will need it in TaskList ViewModel and in tests.
We will use Swinject to handle DI for us. If you are not familiar with dependency injection, that’s fine. Have a look at this Stackoverflow answer to get started. You don’t need to be an expert in it as we are going to have its basic usage.
Basically, Swinject allows us to organize our dependencies in Assembly. Let’s create a DataAssembly that’s responsible for providing all objects of the data layer.
class DataAssembly: Assembly {
    func assemble(container: Container) {
        container.register(TaskRepository.self) { _ in
            return TaskRepositoryImpl()
        }.inObjectScope(.container)
    }
}
This is simpler than it looks. We are basically saying that if anyone asks for an instance of TaskRepository , provide the object of TaskRepositoryImpl . That way, UI layer will not have to worry about how to get/create instance of TaskRepository , it can just ask Swinject.
We will also add an Injector class that will create and hold our dependencies for us.
class Injector {

    private(set) static var assembler: Assembler!

    static func initGraph(_ assemblies: [Assembly]) {
        Injector.assembler = Assembler(assemblies)
    }
}
Pretty simple, right? Here we have created an assembler that is made of multiple Assembly and can provide instances if anyone asks for it.
Let’s initialize this in App
struct MyTodoApp: App {

    init() {
        Injector.initGraph([DataAssembly()])
    }

    var body: some Scene {
      ...
    }
}
That’s it! We are done with DI configuration. Here we have initialized the Graph with just one Assembly, but if you have lots of dependencies, you have keep them in a separate assemblies and provide the list here.
Now let’s start adding some UI!
5. Add TaskList UI
We are going to use UIPilot for navigation. Let’s start by defining app routes.
enum AppRoute: Equatable {
    case List
    case Add
    case View(task: Task)
}
We will have 3 routes in app. I have listed Add and View but we will not need them in part 1.
Now let’s update ContentView to make use of those routes.
struct ContentView: View {
    @StateObject var pilot = UIPilot(initial: AppRoute.List)

    var body: some View {
        UIPilotHost(pilot) { route in
            switch route {
                case .List: return AnyView(TaskListView())
                case .View: return AnyView(EmptyView())
                case .Add: return AnyView(EmptyView())
            }
        }
    }
}
We will provide TaskListView for List route and empty view for other routes as we don’t have anything yet.
Now let’s add TaskListView
struct TaskListView: View {

    @StateObject var viewModel = TaskListVM()

    var body: some View {
        List(viewModel.tasks) { (task: Task) in
            TaskItemView(isChecked: task.isCompleted, task: task, onToggleComplete: {
                viewModel.toggleComplete(task: task)
            })

        }
        .navigationTitle("Tasks")
    }
}
Here we are adding TaskListVM to hold our state. We will define it later. We are also using TaskItemView that basically renders out the Task item for us.
struct TaskItemView: View {

    @State var isChecked: Bool

    let task: Task
    let onToggleComplete: () -> Void

    var body: some View {
        HStack {
            Toggle(isOn: $isChecked) {
                Text(task.title).strikethrough(task.isCompleted)
            }
            .onChange(of: isChecked) { newValue in
                onToggleComplete()
            }
        }.padding()
    }
}
The only important thing here is onChange callback where we are calling closure provided to us by TaskListView , which will ultimately call ViewModel to toggle the complete status of an item.
Alright, we are done with the UI!
Please note I have skipped a few styling codes here to keep this focused on basics, I will include the full source code repository at the end of this article.
6. Add TaskList ViewModel
Now let’s add ViewModel to hold the View state for us.
class TaskListVM: ObservableObject {

    private let taskRepository: TaskRepository

    @Published var tasks = [Task]()

    init() {
        taskRepository = Injector.assembler.resolver.resolve(TaskRepository.self)!

        refreshTasks()
    }

    func toggleComplete(task: Task) {
        let newTask = Task(id: task.id, title: task.title, isCompleted: !task.isCompleted)
        taskRepository.updateTask(task: newTask)
        refreshTasks()
    }

    func refreshTasks() {
        tasks = taskRepository.getTasks()
    }
}
Important highlights from the snippet
- Notice how we get instance of
TaskRepository. With swinject, we just need to ask resolver to get the instance for us. We don’t need to care about actual implementation or how that instance is created. initwill get tasks from the repository and will set intasksvariable which is observed by the UItoggleCompletewill change the complete status of the Task and will update the repository as well. Later it will again fetch updated tasks from the repository.
That’s it. Now let’s add some tests to verify the business logic of this ViewModel to make sure we don’t regress in the future!
7. Write tests for TaskList ViewModel
Let’s first add our test target.
- Click on the Test navigator button and click on
+button to add a new target. - Select “New Unit Test target” from the menu.
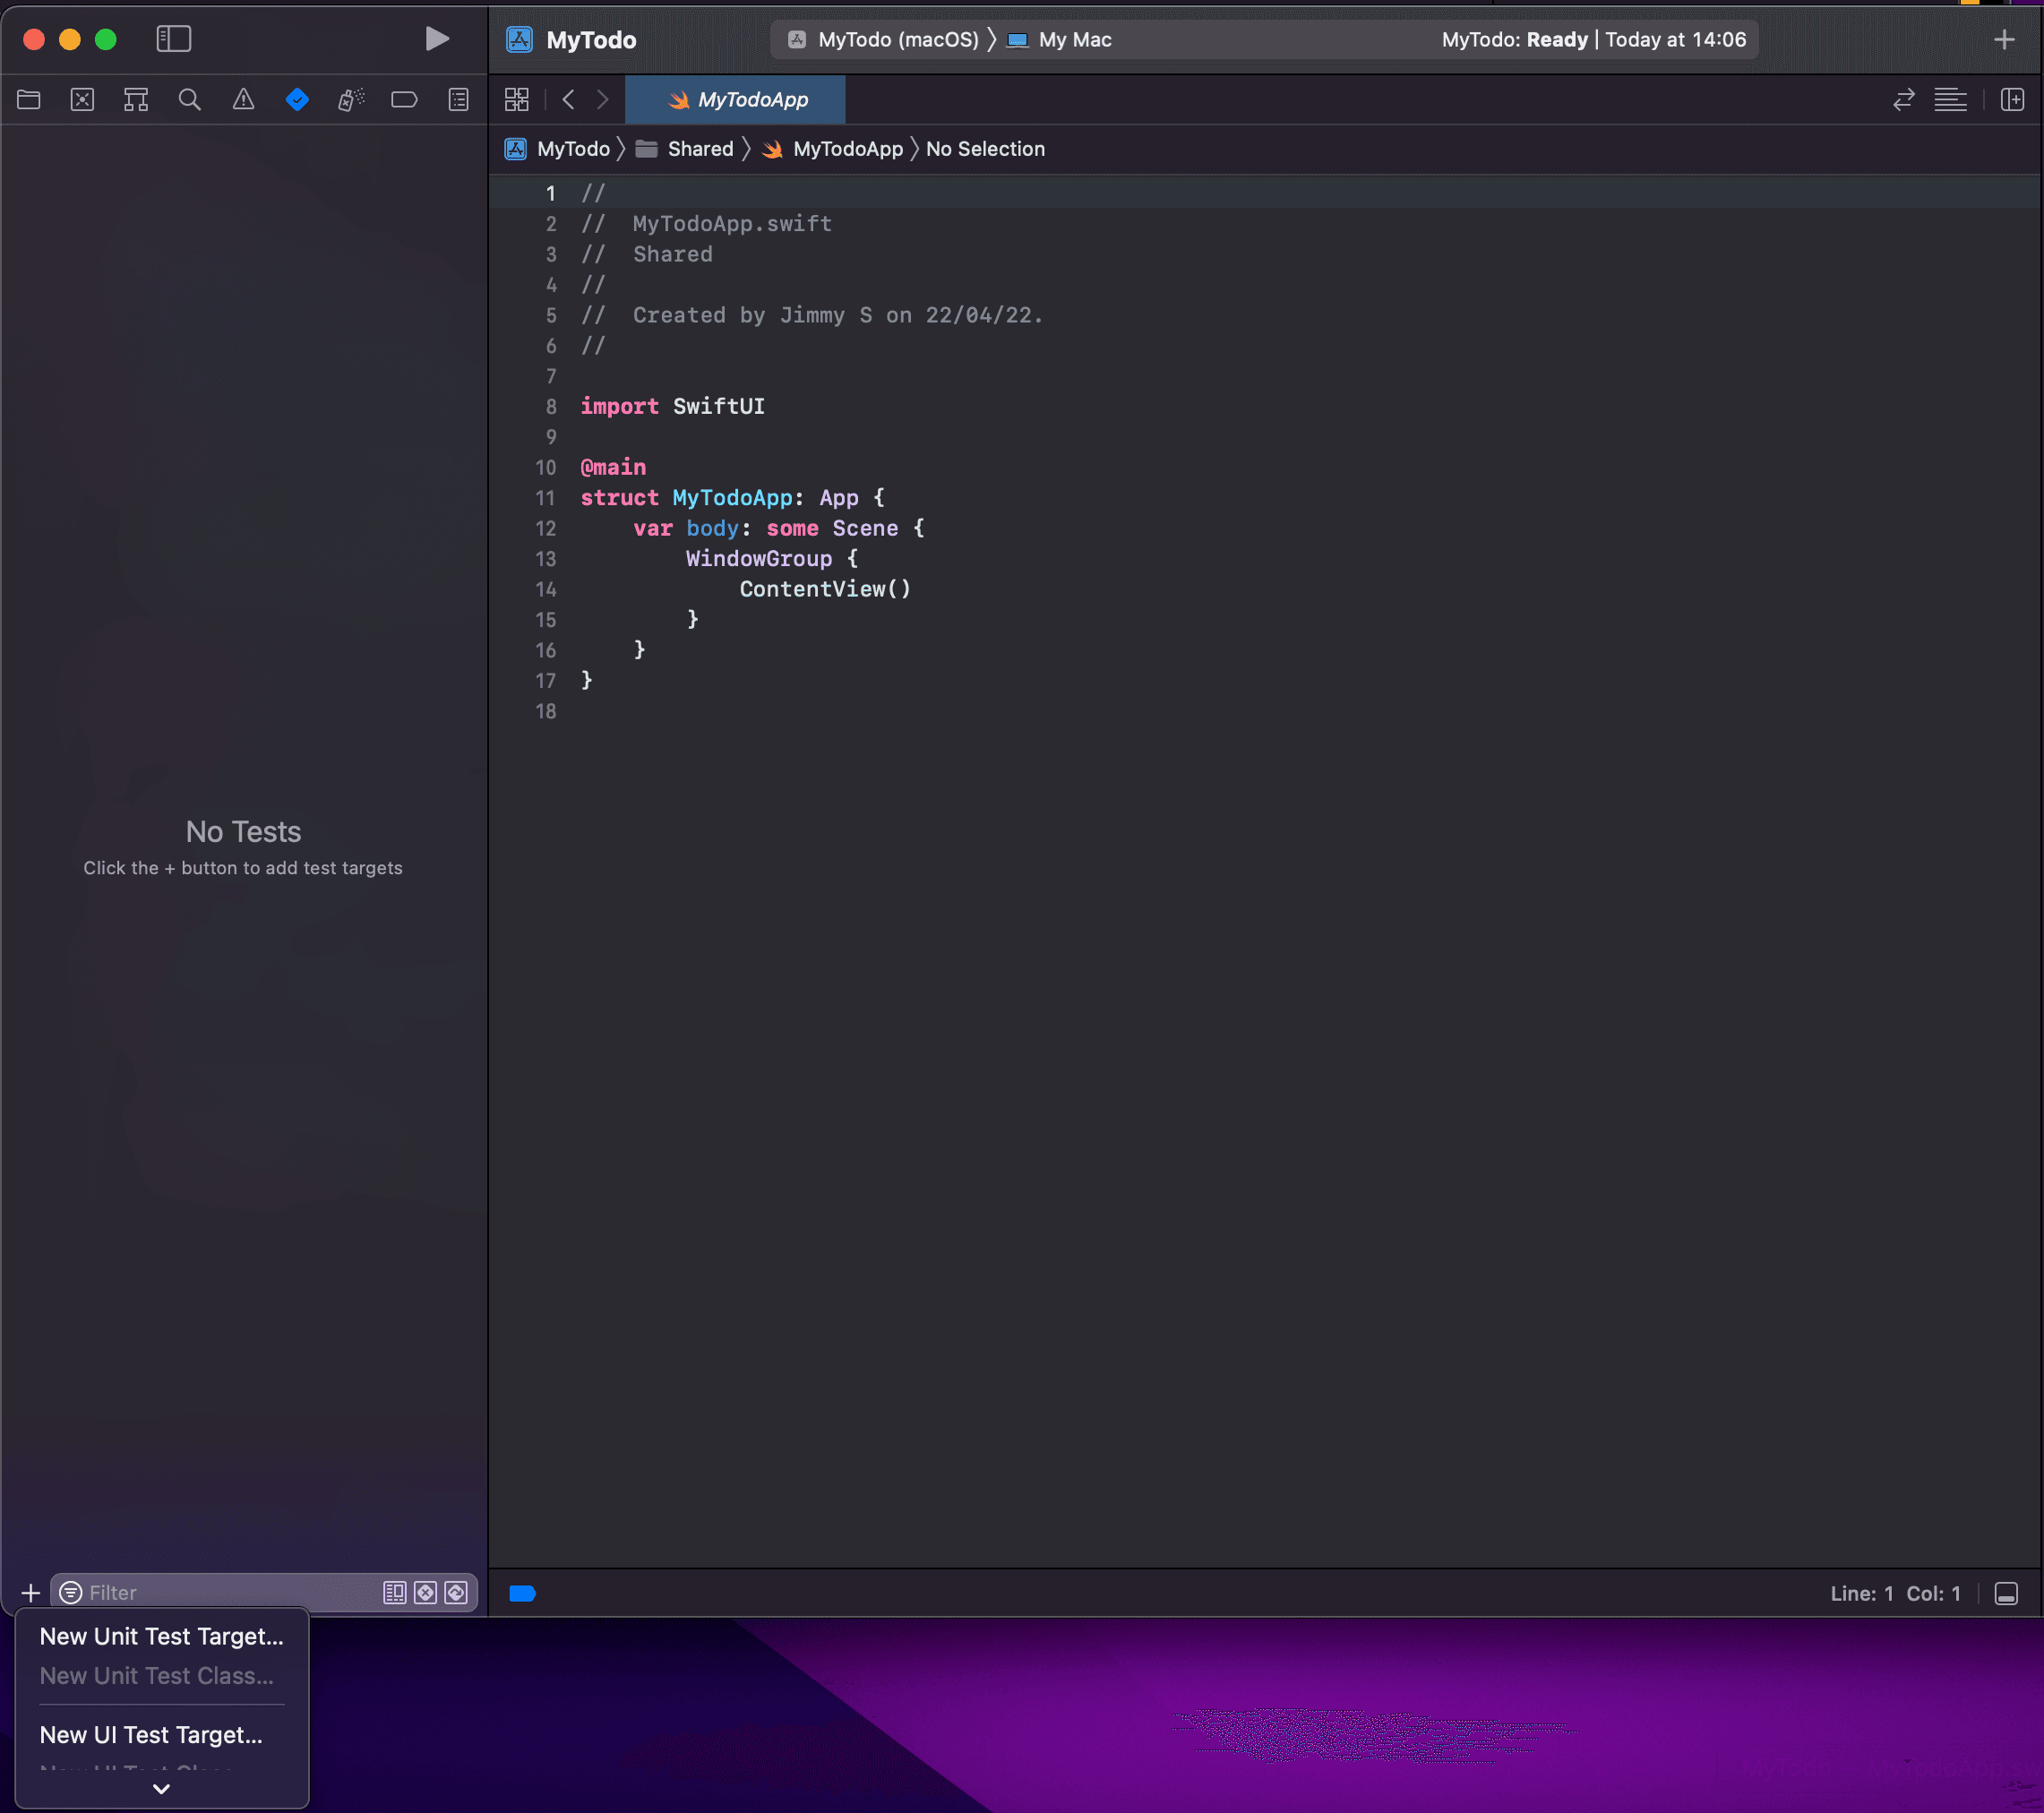
That should give you a new target and a sample test case class as well.
As we want to test for our ViewModel class, click on the plus button again and select “New Unit Test Class” option. Enter the Test class name TaskListVMTest and complete the wizard.
Now you will a class with a few placeholder tests. Clean the class and keep only setUpWithError function.
setUpWithError function is called before every tests of this class, that means it’s a very good place for setup.
@testable import MyTodo

class TaskListVMTest: XCTestCase {

    var viewModel: TaskListVM!
    var taskRepository: TaskRepository!

    override func setUpWithError() throws {
        viewModel = TaskListVM()
        taskRepository = Injector.assembler.resolver.resolve(TaskRepository.self)!
    }
}
Here, we have created an instance of the class we want to test, and that is TaskListVM . We also stored instance of TaskRepository from DI to make assertions.
- Now let’s add our first test to verify that view model loads tasks on initialization from repository.
func testLoadsTasks_OnInit() {
    XCTAssertEqual(taskRepository.getTasks(), viewModel.tasks)
}
Very simple right? We just check that tasks we get from TaskRepository equals to tasks that are stored in ViewModel.tasks
2. Let’s add another test to verify that toggle complete works fine
func testUpdateTask_OnToggleComplete() {
    let task = taskRepository.getTasks().first!

    viewModel.toggleComplete(task: task)

    let updatedTask = taskRepository.getTask(id: task.id)!

    XCTAssertEqual(task.isCompleted, !updatedTask.isCompleted)
}
Here we take the first task from the repository and ask ViewModel to toggle the complete state of that task. Later we get tasks from TaskRepository and verify that the complete state is the opposite of what it was before.
That’s how you write unit tests for ViewModels!
Conclusion
Hope you have a basic idea of how unit testing is done in iOS. It’s a pretty easy thing to do but most of the time we are scared as a beginner by the new terms thrown at us.
Stay tuned for the next parts of this series where we will write more complex tests for add and view screens.
The full application source code is available on GitHub.
Related Useful Article