
Animations in SwiftUI with examples
Introduction
Hi guys, today we are going to explore how we can implement animations in SwiftUI. The full source code of this project is available on Github, feel free to fork or directly use required animations in your applications.
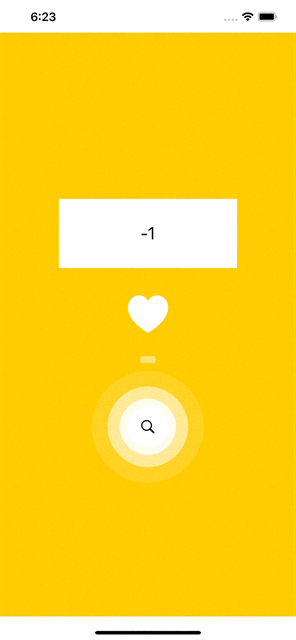
This post consists of 3 animations:
- Stepper animation — Card that will flip right or left depending on where you tap
- Heart animation — Heart jumping animation with shadow
- Wave animation — Search button with infinite waves
The final implementation will look like this…
Sponsored
We are what we repeatedly do. Excellence, then, is not an act, but a habit. Try out Justly and start building your habits today!
Let’s begin with the animations!
1. Stepper animation
We will first design static UI with tap functionality, which we will later animate.
Let’s add the following code to implement stepper UI
struct StepperAnimation: View {
@State var number: Int = 0

    var body: some View {
        ZStack {
            Color.white
            ZStack {
                Text("\(number)")
                    .font(.system(size: 25))
HStack {
                    VStack {
                    }
                    .frame(width: 125, height: 100, alignment: .leading)
                    .contentShape(Rectangle())
                    .onTapGesture {
                        onFlipPrevious()
                    }
                    VStack {
                    }
                    .frame(width: 125, height: 100, alignment: .trailing)
                    .contentShape(Rectangle())
                    .onTapGesture {
                        onFlipNext()
                    }
                }
            }
        }
        .frame(width: 250, height: 100, alignment: .center)
    }

    func onFlipPrevious() {
        number -= 1
    }

    func onFlipNext() {
        number += 1
    }
}
This snippet —
- Adds a
numbervariable that keeps track of the current number - Designs stepper UI with the help of
ZstackandVstackand shows current number in thecenterwhile adding two tap detectors for handling previous and next step click - Calls
onFlipPreviousandonFlipNextfunctions onpreviousandnexttaps respectively. These functions just updates number without any animation.
Pretty clear and easy right?
Now let’s add animation when stepper changes the number. We will use Animation.linear API for the animation.
We will start by adding a current rotation angle variable and then we will bind it to stepper view to rotate it with animation.
@State private var animatedAngle = 0.0Now let’s bind it to the view
var body: some View {
        ZStack {
            ...
        }
        .frame(width: 250, height: 100, alignment: .center)
        .rotation3DEffect(Angle(degrees: animatedAngle), axis: (x: 0.0, y: 1.0, z: 0.0))
        .animation(Animation.linear(duration: 0.6), value: animatedAngle)
}
Here we have used .animation API which takes two parameter.
- Animation — It is used to provide type of the animation. Here we will use linear animation with 0.6 seconds of duration.
- value — The variable we provide here is monitored by Swift and will animate views whenever it changes.
We also used rotation3DEffect to rotate the views with respect to animatedAngle .
Now on button clicks, we need to update the animatedAngle with +180 and -180 degrees.
func onFlipPrevious() {
    number -= 1
    animatedAngle -= 180.0
}
func onFlipNext() {
    number += 1
    animatedAngle += 180.0
}
That’s it. If you run the app now, animation will work but number will be updated instantly, we need to update it exactly when stepper reaches at half of the progress.
To fix that, we will have to keep two separate variables for front and back of the stepper. We will also add another variable isFront to keep track of which side of the stepper is shown currently.
@State var front: Int = 0
@State var back: Int = 0
@State var isFront = true
Let’s update view to use front and back variable instead of number
Text("\(isFront ? front : back)")Now we will have to update our previous and next functions to update front and back variable depending on the current side.
func onFlipPrevious() {
    if(isFront) {
        back = front - 1
    } else {
        front = back - 1
    }
    animatedAngle -= 180.0
    DispatchQueue.main.asyncAfter(deadline: .now() + 0.3) {
        isFront = !isFront
    }
}
func onFlipNext() {
    if(isFront) {
        back = front + 1
    } else {
        front = back + 1
    }
    animatedAngle += 180.0
    DispatchQueue.main.asyncAfter(deadline:  .now() + 0.3) {
        isFront = !isFront
    }
}
Here, we have updated isFront variable exactly after half progress, that is 0.3 seconds.
The last thing we need to do is rotate stepper view by 180 degree again to remove mirroring effect when back view is facing the user.
ZStack {
    Text("\(isFront ? front : back)")
    ...
}
.rotation3DEffect(Angle(degrees : isFront ? 0 : 180), axis: (x: 0.0, y: 1.0, z: 0.0))
That’s it, run the app now and stepper should work completely fine.
struct HeartAnimation: View {

    var body: some View {
        VStack {
            Image(systemName: "heart.fill")
                .font(.system(size: 60))
                .foregroundColor(Color.white)
    }
}
2. Heart animation
This animation consists of two views, heart jumping up and down, and a shadow.
We will first focus on creating heart view.
Let’s see basic code to add heart view without animation
struct HeartAnimation: View {

    var body: some View {
        VStack {
            Image(systemName: "heart.fill")
                .font(.system(size: 60))
                .foregroundColor(Color.white)
    }
}
Pretty simple, right?
Now let’s add some animation! Add following variables to the view struct.
@State var transY: CGFloat = 0
var foreverAnimation =
        Animation.linear.speed(0.3)
.repeatForever(autoreverses: true)transYvariable will keep track of the jump translation on Y axis.foreverAnimationdefines animation as linear with speed0.3andrepeatForevermakes it repeat forever.autoReversesflag determines how animation should repeated when it ends. As we are providing it true here, it will reverse the animation when it finishes.
Now let’s bind these variables into View.
Image(systemName: "heart.fill")
  ...
  .offset(x: 0, y: transY)
  .onAppear {
      withAnimation(foreverAnimation) {
          transY = -25
      }
  }
We start animation in onAppear callback where we change value of transY variable with animation. That will keep animating transY forever between it’s initial value 0 and new value -25 .
Now let’s implement shadow. We will start by adding a new variable that we will bind to shadow view.
@State var alpha: CGFloat = 1.0Initial value of the alpha will be 1.0 and we will animate it to 0.4 .
Now let’s add shadow view.
VStack {
  Image(systemName: "heart.fill")
  ...

  VStack{
  }.frame(width: 50, height: 10, alignment: .center)
      .background(Color.white)
      .cornerRadius(10.0)
      .opacity(alpha)
      .scaleEffect(x: alpha, y: 1.0, anchor: UnitPoint.center)
      .onAppear {
          withAnimation(foreverAnimation) {
              alpha = 0.4
          }
      }
}
Pretty much the same as heart view except that here we bind new variable alpha to opacity and scaleEffect fields.
That’s it! Run the app and Heart animation should work amazingly well.
3. Wave animation
For wave animation, we have 3 waves. We will start by adding and animating 1 wave and later we will add other 2 waves.
Let’s add initial UI for 1 wave
struct WaveAnimation: View {

    var body: some View {

        ZStack {
            Image(systemName: "circle.fill")
                .font(.system(size: 60))
                .foregroundColor(Color.white)

            Image(systemName: "magnifyingglass")
                .frame(width: 60, height: 60, alignment: .center)
                .font(.system(size: 20))
                .foregroundColor(Color.black)
                .background(Color.white)
                .cornerRadius(30)
        }
    }
}
Pretty simple! We have a ZStack with a circle and a search icon on top of it.
Alright, now let’s animate it. We will start by adding required binding and animation variables — same as heart animation.
@State var scale1: CGFloat = 0
var foreverAnimation =
    Animation.linear.speed(0.2)
        .repeatForever(autoreverses: false)
If you notice, we have set autoreverses to false here as we want wave to start again from initial position when it ends!
Let’s bind it to the views.
var body: some View {
    ZStack {
        Image(systemName: "circle.fill")
            .font(.system(size: 60))
            .foregroundColor(Color.white)
            .opacity(1 - scale1)
            .scaleEffect(1 + (scale1 * 2))
            .onAppear {
                withAnimation(foreverAnimation) {
                    scale1 = 1
                }
            }
        ...
    }
}
This snippet —
- Changes value of
scale1to 1 from initial 0 inwithAnimationblock. That means that variable will change value with animation instead of static change. - Binds
scale1variable toscaleEffectattribute of the wave. We have used equation1 + (scale1 * 2)— That meansscaleEffectwill animate from1to3. - Binds
scale1variable toopacityattribute of the wave. We have used equation1 — scale1— That meansopacitywill animate from1to0.
That’s it! If you run the app, you will see 1 wave animating just fine!
Now let’s add other two waves.
var body: some View {
    ZStack {
        ...
        Image(systemName: "circle.fill")
            .font(.system(size: 60))
            .foregroundColor(Color.white)
            .opacity(1 - scale2)
            .scaleEffect(1 + (scale2 * 2))
            .onAppear {
                DispatchQueue.main.asyncAfter(deadline: .now() + 0.5) {
                    withAnimation(foreverAnimation) {
                        scale2 = 1
                    }
                }
            }
        Image(systemName: "circle.fill")
            .font(.system(size: 60))
            .foregroundColor(Color.white)
            .opacity(1 - scale3)
            .scaleEffect(1 + (scale3 * 2))
            .onAppear {
                DispatchQueue.main.asyncAfter(deadline: .now() + 1.0) {
                    withAnimation(foreverAnimation) {
                        scale3 = 1
                    }
                }
            }
        ...
    }
}
The trick here is to delay the animation for the other two waves by 0.5 second and 1 second respectively. The delay will keep waves separated enough time so that they look infinite when repeated.
Run the app now and enjoy the unlimited waves!
Here’s the 2nd part of this series.
Conclusion
That’s it for today, hope you learned something new! This article will give you enough knowledge to start digging into SwiftUI animation.
But by any means, this is not it! I will keep adding new animations in the github repository and planning to write at least 2–3 articles.
As always, suggestions and feedback are more than welcome.
Thanks for your support!
Related Useful Article