iOS — Animations in SwiftUI with Examples — Part 2
Introduction
Hi guys, today we are going to explore how we can implement animations in SwiftUI. The full source code of this project is available on Github, feel free to fork or directly use required animations in your applications.
This is the second part of the series of SwiftUI animation articles. If you haven’t already, please read the first article.
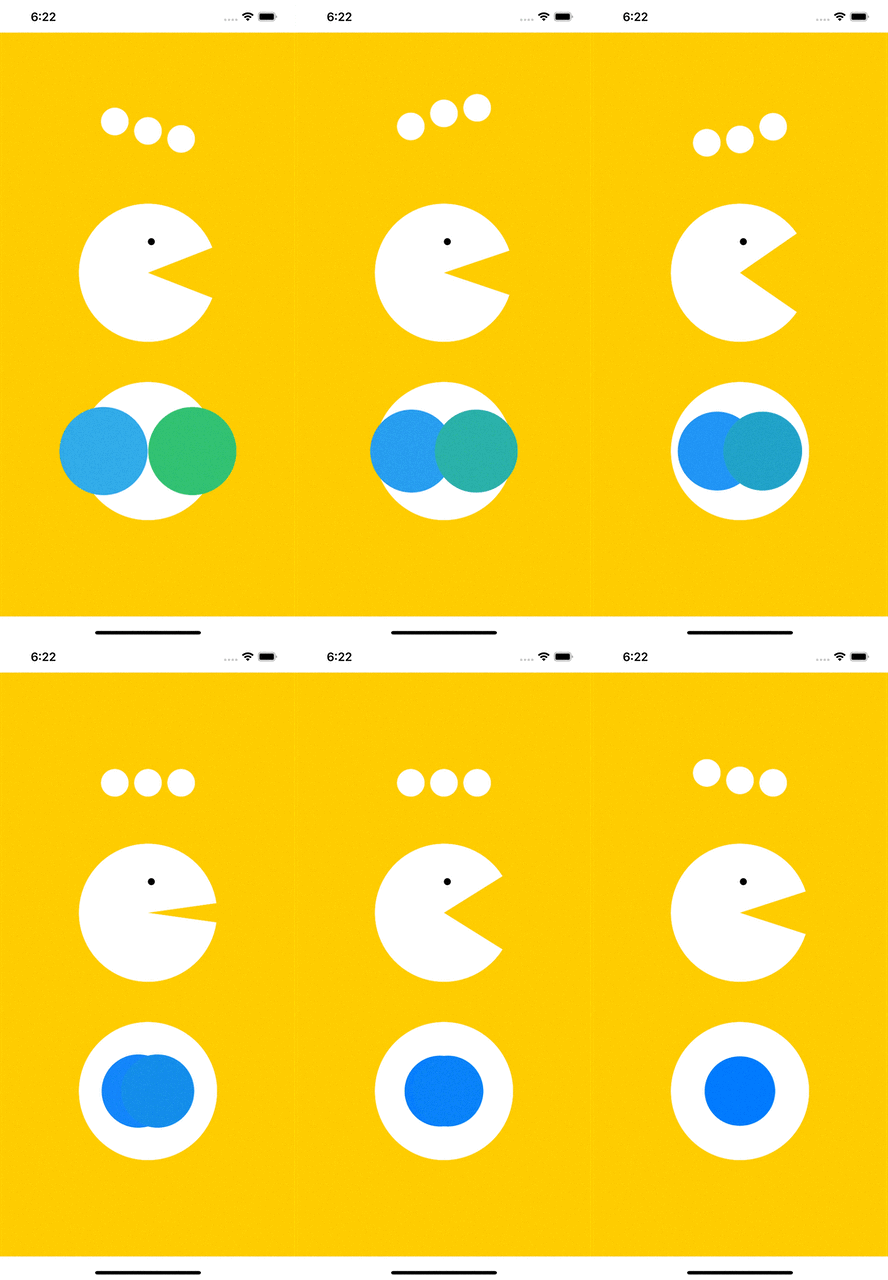
This post consists of 3 animations:
- Progress Dots animation — 3 dots that go up and down in a rhythm
- Pacman animation —We all know and love Pacman right?
- TwinCircle animation —Two circles animates horizontally while changing size and colors and kind of merge into one.
The final implementation will look like this:

Sponsored
We are what we repeatedly do. Excellence, then, is not an act, but a habit. Try out Justly and start building your habits today!
Let’s Get Started!
1. Progress Dots Animation
This animation has 3 dots.
Let’s first start with adding DotView , that will be responsible for drawing a single dot.
struct DotView: View {
    @Binding var transY: CGFloat
    var body: some View {
            VStack{}.frame(width: 40, height: 40, alignment: .center)
                .background(Color.white)
                .cornerRadius(20.0)
                .offset(x: 0, y: transY)
    }
}
Here, we have added transY as binding as we are going to change that property to animate dots vertically.
Now let’s see how we can animate those dots!
If you observe animation, we have two properties that are different for each dot — Delay and Vertical Translation.
The second and third dots are delayed to look like chain reactions. Also, they translate a little bit more compared to the first dot.
Let’s add a struct and an array of struct data to store this information.
struct AnimationData {
        var delay: TimeInterval
        var ty: CGFloat
    }
static let ITEMS = [
        AnimationData(delay: 0.0, ty: -50),
        AnimationData(delay: 0.1, ty: -60),
        AnimationData(delay: 0.2, ty: -70),
    ]
Now let’s have a look at the root view.
struct DotsAnimation: View {

    @State var transY: [CGFloat] = DATA.map { _ in return 0 }

    var animation = Animation.easeInOut.speed(0.6)
    var body: some View {
        HStack {
            DotView(transY: $transY[0])
            DotView(transY: $transY[1])
            DotView(transY: $transY[2])
        }
        .onAppear {
            animateDots() // Not defined yet
        }
    }
}
Here we have added —
transYfor each dot and set it to 0. This variable is responsible for animating dots vertically as we have binded it to Y offset inDotView.Hstackto place dots horizontallyanimateDotsfunction to start animation as soon as the view is visible.
If you comment out animateDots call and run the code, it will show 3 static dots. Now let’s implement the animation function.
func animateDots() {
    // Go through animation data and start each
    // animation delayed as per data
    for (index, data) in DotsAnimation.DATA.enumerated() {
        DispatchQueue.main.asyncAfter(deadline: .now() + data.delay) {
            animateDot(binding: $transY[index], animationData: data)
        }
    }

    //Repeat main loop
    DispatchQueue.main.asyncAfter(deadline: .now() + 1.5) {
        animateDots()
    }
}
func animateDot(binding: Binding<CGFloat>, animationData: AnimationData) {
    withAnimation(animation) {
        binding.wrappedValue = animationData.ty
    }

    DispatchQueue.main.asyncAfter(deadline: .now() + 0.3) {
        withAnimation(animation) {
            binding.wrappedValue = 0
        }
    }
}
Here, animateDots is responsible for the main loop and animateDot is responsible for the animation of a single dot.
As we can see, animateDots calls animateDot with delay for each view as per AnimationData. That means the second and third dot will start animating late for each iteration.
After 1.5 seconds, animateDots calls itself to repeat the animation.
That’s it! Run the code and you will see beautiful dots bouncing in rhythm!
2. Pacman Animation
This one is an interesting animation as the animation can not be achieved through views and components provided by SwiftUI.
Instead, we will use Canvas to get full control of Math and Geometry and will draw the Pacman ourselves.
Don’t worry if you don’t understand Canvas, think of it as a plain drawing sheet where you can draw whatever shapes you want.
Let’s add some code to draw static Pacman!
struct PacmanAnimation: View {

    var body: some View {
        Canvas { context, size in
            let center = CGPoint(x: size.width/2, y: size.height/2)

            var path = Path()
            path.addArc(center: center, radius: size.width/2,
                startAngle: Angle(degrees: 50), endAngle: Angle(degrees: 310), clockwise: false)
            path.addLine(to: center)

            // Draw background circle
            context.fill(path, with: .color(.white))

            // Draw eyes
            context.fill(Path(ellipseIn: CGRect(x: size.width / 2, y: size.height / 4,
                width: 10, height: 10)), with: .color(.black))
        }
        .frame(width: 200, height: 200)
    }
}
Here we have —
- Used
Canvasview, a SwiftUI view provided by apple for interacting with Canvas. We have set its frame to 200x200. - The drawing consists of two parts, the first is Pacman's white background and the second is a black eye.
- Canvas provides us
sizeandcontextparameters.contextallows us to invoke various functions to draw shapes. Here, we have usedcontext.fillfunction to draw shapes with filled colors. We can also usestrokefunction if we just want to draw the border. fillfunction requiresPath. Think ofPathas a route to some place, which will consist of some intermediate destinations. Basically,Pathprovides data about where to draw!- Here, we have used
Path’saddArcfunction to draw an arc from 50 to 310 degrees. This will draw Pacman’s background. - To draw the eye, we have used
ellipseInfunction, which will draw a circle if the width and height are the same.
If you run the app now, you will see a static Pacman!
Now, to animate the background, we will need to animate the arc angle from the range (50, 310) to (0, 360), a full circle.
Canvas can be animated through TimelineView , which provides a current timeline Date and based on that we can animate our views. Let’s add some code to see how we are going to animate our angle.
var body: some View {
    TimelineView(.animation) { timeline in
        Canvas { context, size in
            let timenow  = timeline.date.timeIntervalSince1970 * 200
            let delta = abs(timenow.remainder(dividingBy: 50))

            path.addArc(center: center, radius: size.width/2,
                        startAngle: Angle(degrees: delta),
                        endAngle: Angle(degrees: 360 - delta),
                        clockwise: false
            )
            ...
        }
    }
}
Here —
- We wrap
CanvaswithTimelineViewand thus we get access totimelinevariable which provides current date. - We get
timenowvariable from the date. Here, we have multiplied interval with200, you can change the value of 200 to change the speed of the animation. - Later, we convert those seconds to the delta angle that we want by dividing it by 50 and getting the reminder.
- Once we have a delta, we use it to change
startAngleandendAngledynamically.
That’s it, run the View and see Pacman running everywhere!
3. TwinCircle Animation
This animation is easier compared to the first two. Here, we have total 3 circles, out of which 2 move horizontally and unify.
Let’s first add 3 static circles.
struct TwinCircleAnimation: View {
    var body: some View {
        ZStack {
            VStack{}.frame(width: 200, height: 200, alignment: .center)
                .background(Color.white)
                .cornerRadius(100.0)
            VStack{}.frame(width: 100, height: 100, alignment: .center)
                .background(color1)
                .cornerRadius(50)

            VStack{}.frame(width: 100, height: 100, alignment: .center)
                .background(color2)
                .cornerRadius(50)

        }.frame(width: 200, height: 200)
    }
 }
Nothing to explain here. We have Zstack which contains 3 circles — one big and two small.
Now let’s start with animating small circles horizontally.
struct TwinCircleAnimation: View {
    @State var factor: CGFloat = 0

    var body: some View {
        ZStack {
            ...
            VStack{}...
                .offset(x: factor * 70, y: 0)

            VStack{}...
                .offset(x: -factor * 70, y: 0)
        }
        .frame(width: 200, height: 200)
        .onAppear {
          animate()
        }
    }

    func animate() {
        withAnimation(.linear(duration: 0.15)) {
            factor = 1
        }

        DispatchQueue.main.asyncAfter(deadline: .now() + 0.15) {
            withAnimation(.linear(duration: 0.3)) {
                factor = -1
            }
        }
        DispatchQueue.main.asyncAfter(deadline: .now() + 0.45) {
            withAnimation(.easeOut(duration: 1.0)) {
                factor = 0
            }
        }
        DispatchQueue.main.asyncAfter(deadline: .now() + 1.55) {
            animate()
        }
    }
}
Here, we have —
- Added a factor variable, which we will animate between 0 and 1. All the animations will depend on this variable. For example, to get translateX for circles, we will multiply the
factorwith70. - Set
offsetXfor small circles. Notice the offset is negative for the second circle to move it in opposite direction. - Now let’s understand the
animatefunction — If you look carefully, animate consists of 3 parts:
a. Circles go out
b. Circles go in the opposite direction
c. Circles unify. In short, they are back where they began.
Inanimatefunction, we have defined 1 animation for each part.factor‘s value animates like 0 => 1 => -1 => 0. - At last in
animatefunction, we callanimatefunction again for the next animation loop.
If you run the app now, you will see circles moving horizontally but they will not change colors and scale. Let’s add it as well.
struct TwinCircleAnimation: View {
    @State var factor: CGFloat = 0

    @State private var color1 = Color.blue
    @State private var color2 = Color.blue

    var body: some View {
        ZStack {
            ...
            VStack{}...
                .background(color1)
                .scaleEffect(abs(factor) * 0.3 + 1)

            VStack{}...
                .background(color2)
                .scaleEffect(abs(factor) * 0.3 + 1)
        }.frame(width: 200, height: 200)
        .onAppear {
            animate()
        }
    }

    func animate() {
        withAnimation(.linear(duration: 0.15)) {
            factor = 1
            color1 = Color.cyan
            color2 = Color.green
        }

        DispatchQueue.main.asyncAfter(deadline: .now() + 0.15) {
            withAnimation(.linear(duration: 0.3)) {
                factor = -1
            }
        }
        DispatchQueue.main.asyncAfter(deadline: .now() + 0.45) {
            withAnimation(.easeOut(duration: 1.0)) {
                factor = 0
                color1 = Color.blue
                color2 = Color.blue
            }
        }
        DispatchQueue.main.asyncAfter(deadline: .now() + 1.55) {
            animate()
        }
    }
}
Here, we have added two new variables to animate the colors of two circles. Also, we have applied scaleEffect to both circles that’s 0.3 times of the factor variable. You can use factor variable similarly for other animations as well, like offsetY etc. depending on your needs.
We are done! Run the app and you will see complete twin circle animation.
To Conclude
That’s it for today. Hope you learned something new!
This just touches the base of the SwiftUI animations. It’s possible to design much more complex animations using Canvas, animations API and Math.
Your suggestions and feedbacks give me fuel to keep writing, add them in the comment section below.
Stay tuned for part 3!
Related popular articles


Get started today
Let's build the next
big thing!
Let's improve your business's digital strategy and implement robust mobile apps to achieve your business objectives. Schedule Your Free Consultation Now.
Get Free Consultation
Get started today
Let's build the next big thing!
Let's improve your business's digital strategy and implement robust mobile apps to achieve your business objectives. Schedule Your Free Consultation Now.
Get Free Consultation