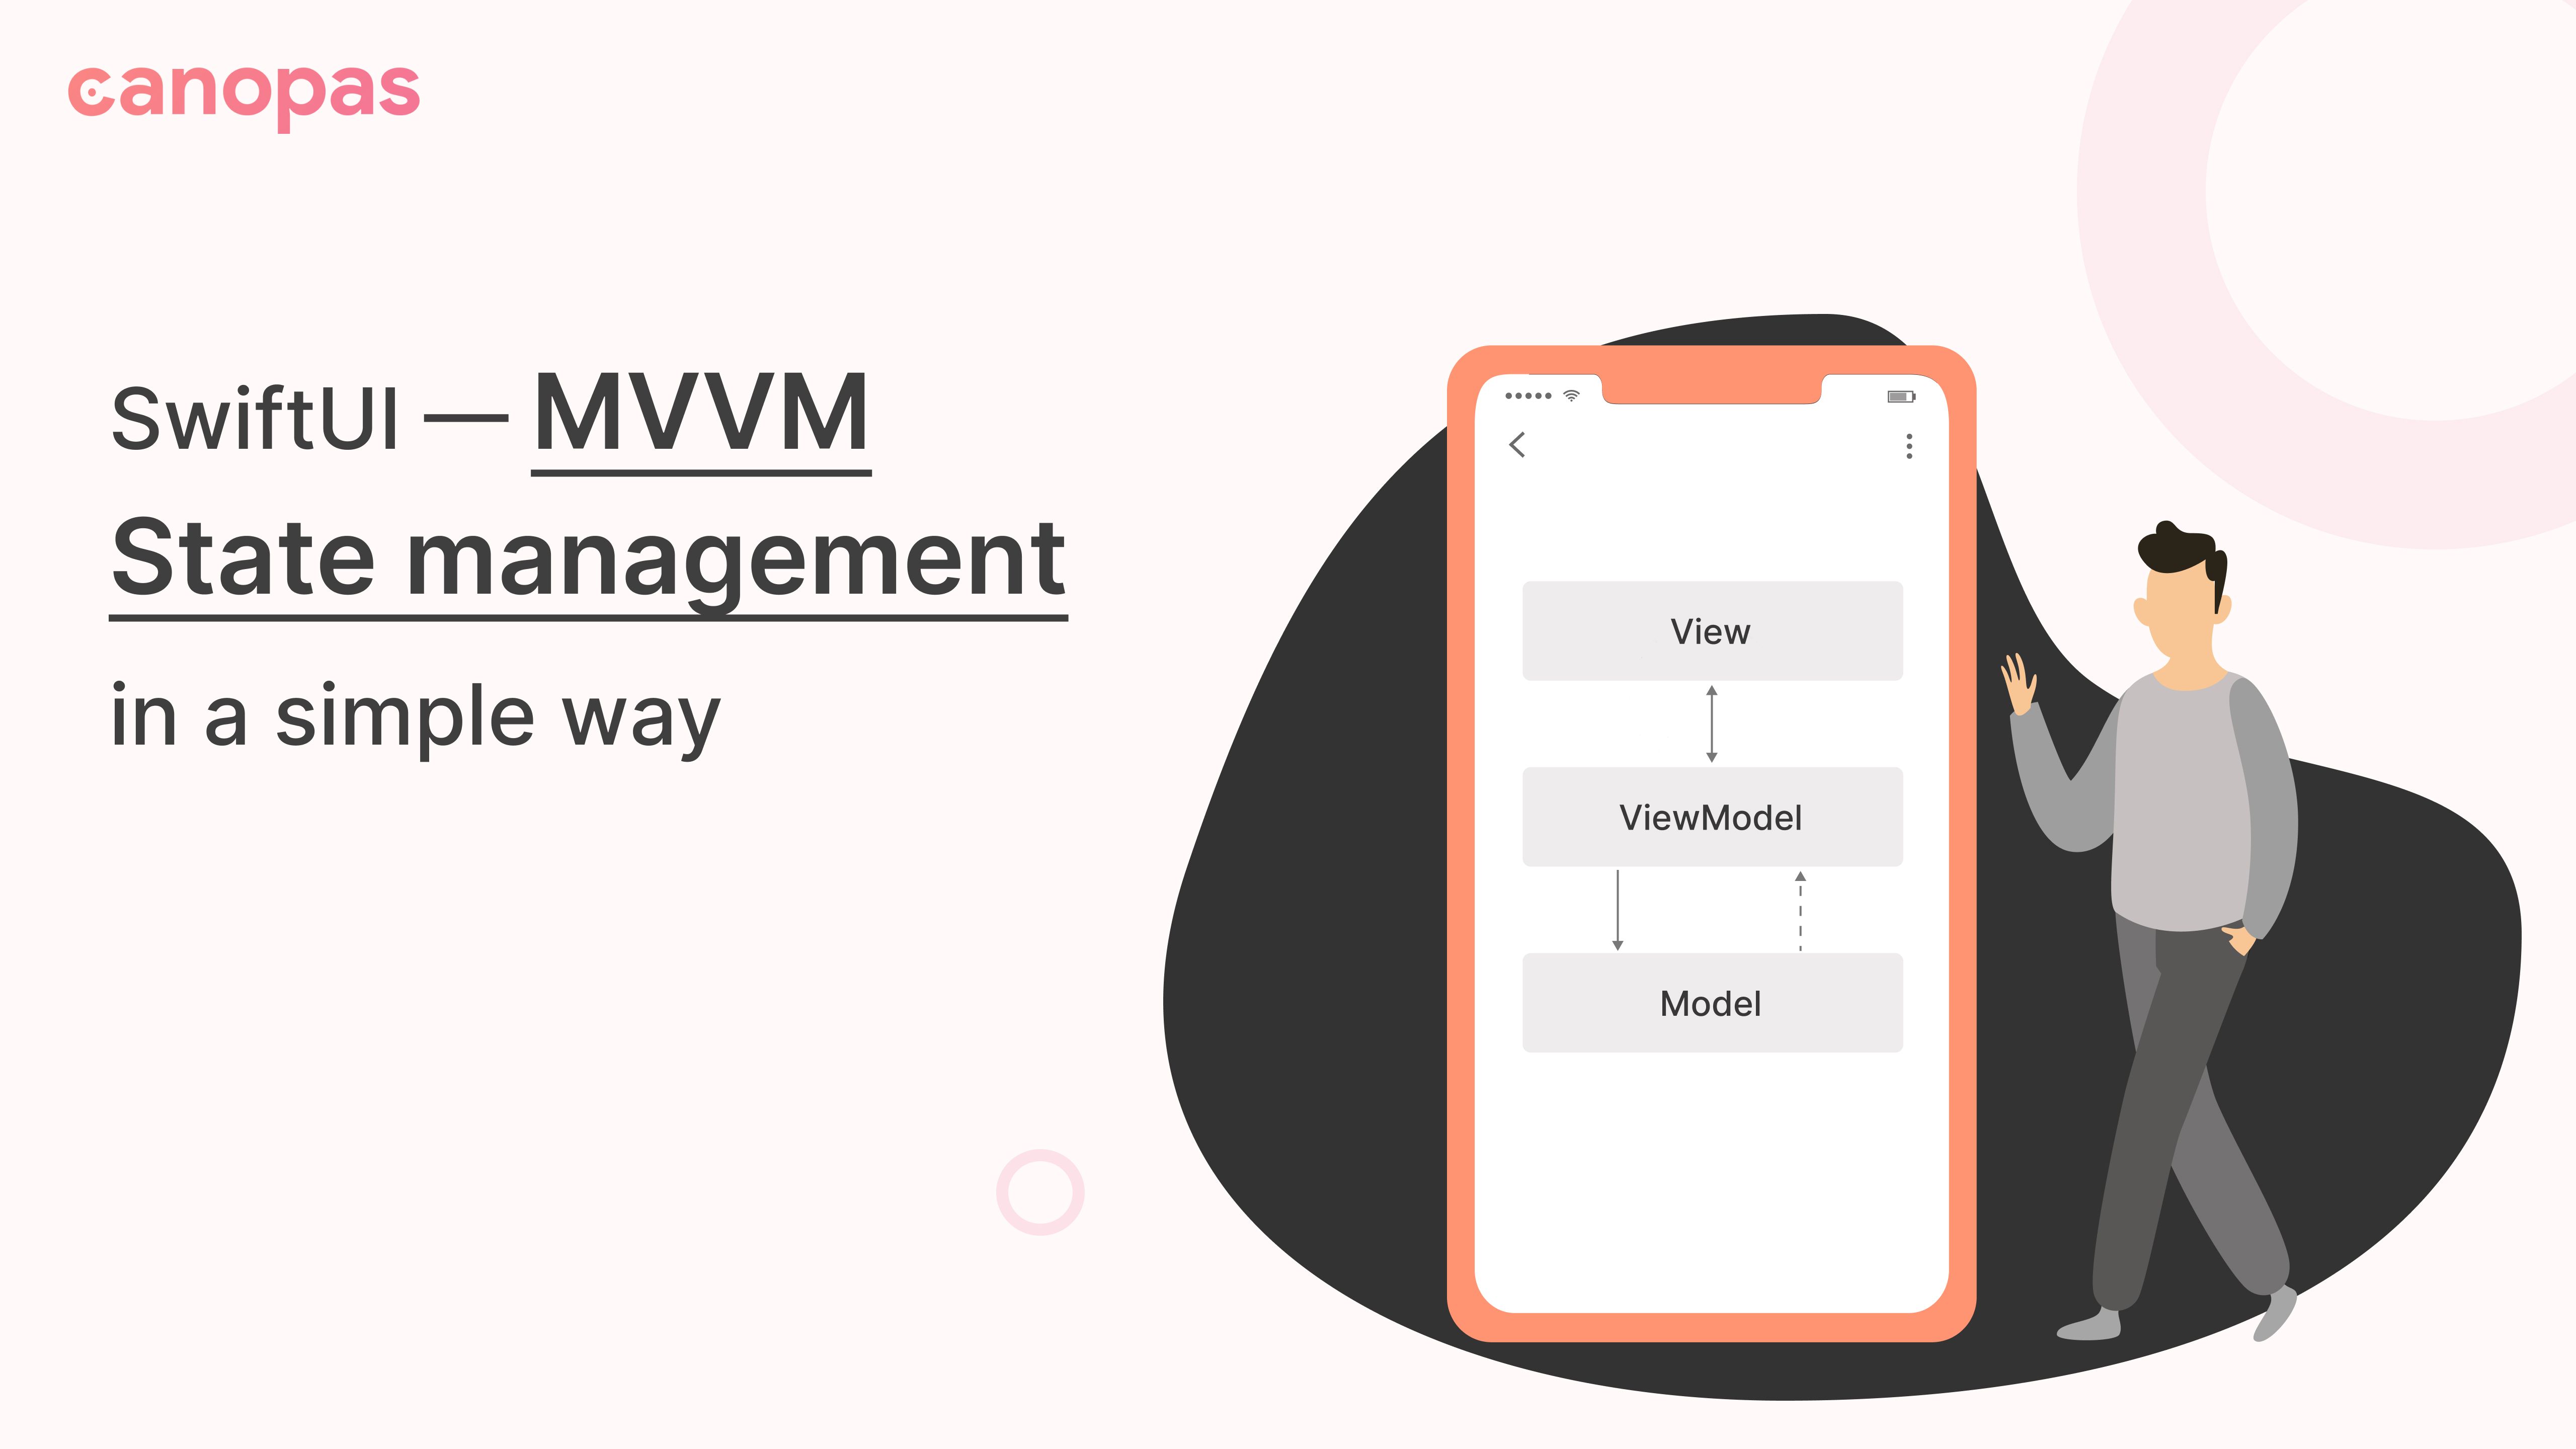
SwiftUI — MVVM State management in a simple way
Background
SwiftUI is Apple’s new declarative framework for building user interfaces for all Apple devices. This framework can be broken down into two essential components: views and state.
State management is an integral part of SwiftUI development, and there are many different ways of working with the state. In which State represents the data associated with a view.
In this blog post, you will learn how to manage a screen's states using only one state variable. You will follow the MVVM software design pattern with very easy steps.
Sponsored
We are what we repeatedly do. Excellence, then, is not an act, but a habit. Try out Justly and start building your habits today!
What’s our goal?
We will design one screen that mainly has 3 possible views that different states will manage,
Today we are going to learn about a state holder to separate business logic from UI components. ViewModel has a longer lifecycle than the view so ViewModel can preserve its state across UI changes.
Here, we can extract business logic from views and put it inside ViewModel in a way that is easy to understand and maintainable for future developers.
For simplicity, I have divided this post into 3 sections.
- Add data layer — Responsible for fetching data from API.
- Add ViewModel — Responsible for managing the state of the screen.
- Add View — Actual UI representation that users will see.
Let’s get started!
Add data layer
Create a new SwiftUI project in Xcode.
We’ll use combine to manage async API calls.
For this example, we are going to use https://api.github.com/users API to fetch users.
Let’s first start by adding User model class.
struct User: Codable, Identifiable {
    var id: Int
    var login: String?
    var avatar_url: String?

    init(id: Int, login: String?, avatar_url: String?) {
        self.id = id
        self.login = login
        self.avatar_url = avatar_url
    }
}
Now Let’s set up APIServiceto fetch API data.
class APIService {

    static let shared = APIService()

    func getUsers() -> AnyPublisher<[User], Error> {
        guard let url = URL(string: "https://api.github.com/users") else {
            return Fail(error: "Unable to generate url" as! Error).eraseToAnyPublisher()
        }
        return Future { promise in
            URLSession.shared.dataTask(with: url) { (data, _, _) in
                DispatchQueue.main.async {
                    do {
                        guard let data = data else {
                            return promise(.failure("Something went wrong" as! Error))
                        }
                        let users = try JSONDecoder().decode([User].self, from: data)
                        return promise(.success(users))
                    } catch let error {
                        return promise(.failure(error))
                    }
                }
            }.resume()
        }.eraseToAnyPublisher()
    }
}
This is a simple combined API call function to get User list from the API.
Add ViewModel
Now let’s add HomeViewModel.
First, we add our all possible view states as enum to define the state of the screen. Initially, our view is in the START state. When we make an API call to fetch users at that time screen goes into a LOADING state.
When we receive the user list from the server, the screen state will be in SUCCESS with the user list. And on the failure of an API call, the screen goes into a FAILURE state.
enum ViewState {
    case START
    case LOADING
    case SUCCESS(users: [User])
    case FAILURE(error: String)
}
Now here is our actual view model class implementation.
class HomeViewModel: ObservableObject {

    enum ViewState {
        case START
        case LOADING
        case SUCCESS(users: [User])
        case FAILURE(error: String)
    }

    @Published var currentState: ViewState = .START
    private var cancelables = Set<AnyCancellable>()

    init() {
        getUsers()
    }

    func getUsers() {
        self.currentState = .LOADING
        APIService.shared.getUsers()
            .sink { completion in
                switch completion {
                case .finished:
                    print("Execution Finihsed.")
                case .failure(let error):
                    self.currentState = .FAILURE(error: error.localizedDescription)
                }
            } receiveValue: { users in
                self.currentState = .SUCCESS(users: users)
            }.store(in: &cancelables)
    }
}
Here, we have added one property currentState to manage the screen states of the screen with the default STARTstate.
On Initialization of our ViewModel, we first call the function to get user data from the server.
Along with that, our view state will be changed to LOADING to START. In this state, we’ll show a progress indicator to the user. Then we make a call to fetch data in the main thread and wait for the result.
Once we receive data from API, we change the state from LOADING to SUCCESS with the received user list. The main benefit we can achieve with this is we don’t need to manage separate properties to store received data in ViewModel.
In case of failure, we set the state to FAILURE with the error message to notify a user that something went wrong.
Add HomeView — That makes use of ViewModel
Now Let’s design our view with the help of the view states.
struct HomeView: View {
@ObservedObject var viewModel = HomeViewModel()
var body: some View {
GeometryReader { geometry in
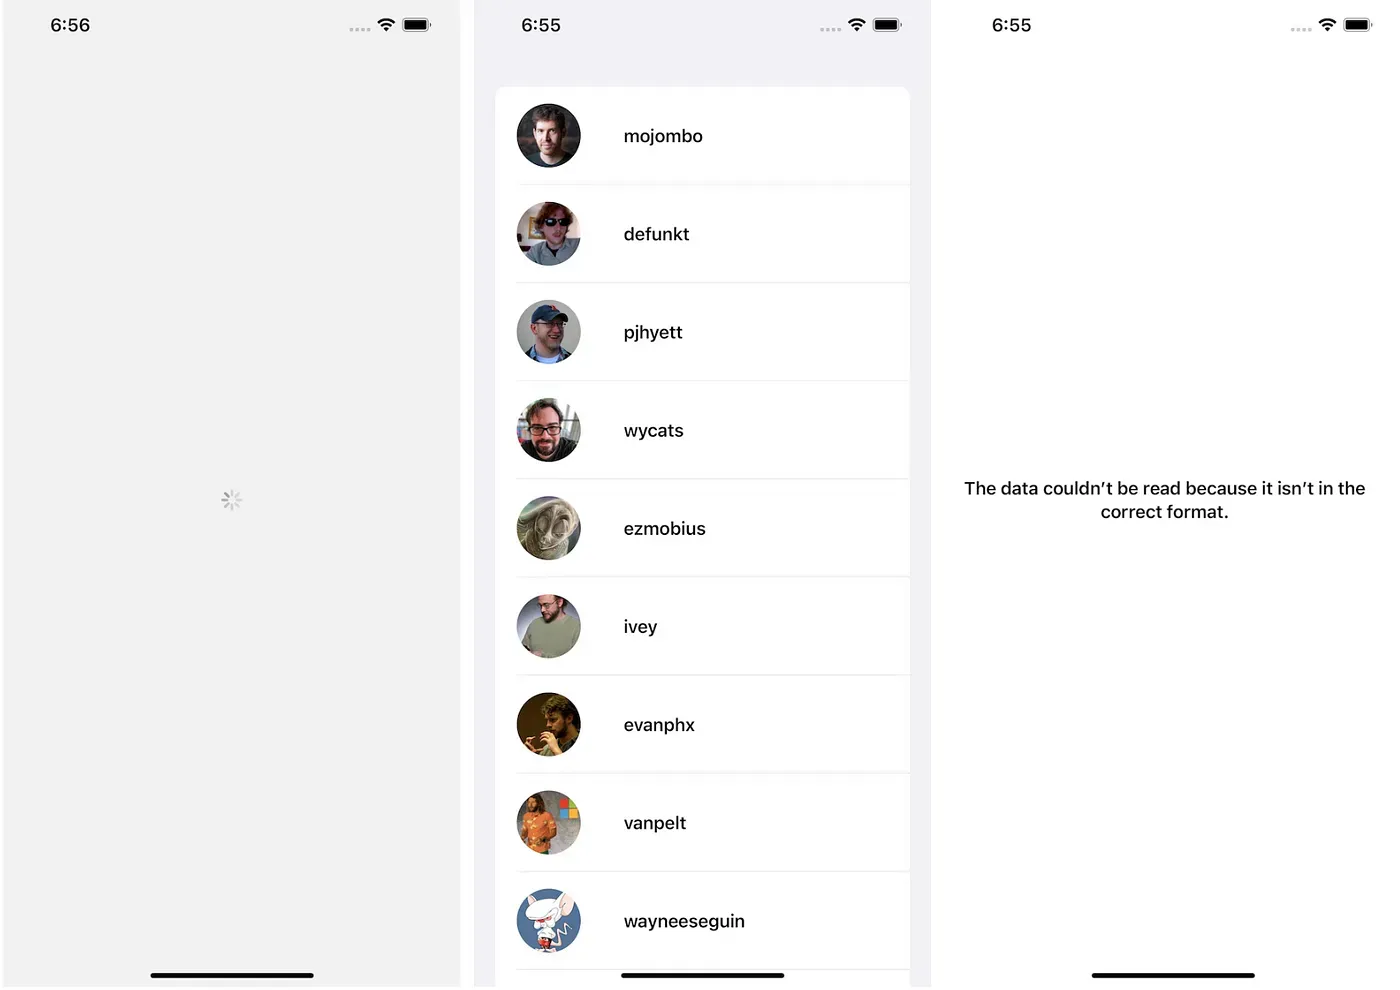
if case .LOADING = viewModel.currentState {
loaderView()
} else if case .SUCCESS(let users) = viewModel.currentState {
List(users) { user in
userCell(user: user)
.frame(width: geometry.size.width, height: 80)
}
} else if case .FAILURE(let error) = viewModel.currentState {
VStack(alignment: .center) {
Spacer()
Text(error)
.font(.headline.bold())
.multilineTextAlignment(.center)
Spacer()
}
.padding()
}
}
}
func userCell(user: User) -> some View {
HStack(spacing: 40) {
AsyncImage(url: URL(string: user.avatar_url ?? "Unknown user")) { image in
image
.resizable()
.scaledToFill()
} placeholder: {
ProgressView()
}
.frame(width: 60, height: 60, alignment: .center)
.clipShape(Circle())
Text(user.login ?? "")
.font(.headline)
Spacer()
}
}
func loaderView() -> some View {
ZStack {
Color.black.opacity(0.05)
.ignoresSafeArea()
ProgressView()
.scaleEffect(1, anchor: .center)
.progressViewStyle(CircularProgressViewStyle(tint: .gray))
}
}
}That’s it.
Here in our HomeView() we set all the views as per the state of the screen according to ViewModel data.
Now whenever ViewModel updates the state of view using this currentState property, the view will re-render based on each case that matches with the current state.
Now, run the application on a simulator or on a real device, it’ll look like the above-given screenshots.
The full source code is available on GitHub.
Conclusion
That’s it for today, hope you learned something new! You will have a basic understanding of how the state can be managed easily with ViewModel and enum.
This is one of the ways to manage the state, however, you should explore other options as well once you are familiar with these basics.
Related Popular Articles

Let's Work Together
Not sure where to start? We also offer code and architecture reviews, strategic planning, and more.