
Jetpack Compose MVVM State Management: A Simple Guide
Introduction
We all want to simplify state management. Be it a life or application or a screen, limiting mutable states that a component can be in, benefits everyone.
In this blog post, you will learn how to manage all the states of a screen using only one state variable. You can read our previous article on how to use jetpack compose with dagger and MVVM architecture pattern.
With jetpack compose, we can preserve the state of view in major two ways
- Using
rememberOf{}a function that provides memory to composable function, or by usingrememberSaveable{}to restore the state of the screen on recreation. We can manage a simple state of view within a compose function itself. - Using
ViewModel,a state holder to separate business logic from UI component. ViewModel has a longer lifecycle than the composition as they are lifecycle-aware components so ViewModel can preserve its state across configuration change.
Today we are going to learn about the second approach. We can extract business logic from views and put it inside ViewModel in a way that is easy to understand and maintain for future developers.
Here’s a video tutorial of this article.
Sponsored
We are what we repeatedly do. Excellence, then, is not an act, but a habit. Try out Justly and start building your habits today!
Let’s do coding!
We are going to use https://jsonplaceholder.typicode.com/users web API to fetch users.
Create a new project in android studio and select an empty compose activity. If you haven’t downloaded the latest version of the android studio, I suggest you to do so.
We’ll use coroutine to manage async API calls, as well as Hilt for dependency injection. We already have jetpack compose-related dependencies in build.gradle file as we created an empty compose activity type of project.
Add following dependencies for retrofit and coroutines.
//Coroutine
    implementation("org.jetbrains.kotlinx:kotlinx-coroutines-android:1.5.2")
// Retrofit
    implementation 'com.squareup.retrofit2:retrofit:2.8.1'
    implementation 'com.squareup.retrofit2:converter-gson:2.8.1'
Don’t forget to add Internet permission in manifest file.
<uses-permission android:name="android.permission.INTERNET"/>Now Let’s set up UserService to fetch API data. Here’s our hilt module which provides dependency of the UserServices APIs. Consider UserServices as a retrofit interface that fetches users from some backend server.
@Module
@InstallIn(SingletonComponent::class)
object  RestModule {

    @Provides
    fun provideBaseUrl() = "https://jsonplaceholder.typicode.com/"

    @Singleton
    @Provides
    fun provideRetrofit(baseUrl:String): Retrofit =
        Retrofit.Builder()
            .baseUrl(baseUrl)
            .addConverterFactory(GsonConverterFactory.create())
            .build()

    @Provides
    @Singleton
    fun provideApiService(retrofit: Retrofit) = retrofit.create(UserServices::class.java)
}
Let’s Add all possible states of the screen. Here we use kotlin sealed class to define the state of a screen. Initially, our view is in START state. When we make a call to fetch users screen goes into LOADING state. When we received the user list from server, screen will be in SUCCESS state with user list. And on failure of API call, screen goes into FAILURE state.
sealed class State {
    object START : State()
    object LOADING : State()
    data class SUCCESS(val users: List<User>) : State()
    data class FAILURE(val message: String) : State()
}
Now here is our ViewModel
@HiltViewModel
class MainViewModel
@Inject constructor(private val userServices: UserServices) : ViewModel() {

    val state = MutableStateFlow<State>(State.START)

    init {
        loadUser()
    }

    private fun loadUser() = viewModelScope.launch {
        state.value = State.LOADING
        try {
            val users = withContext(Dispatchers.IO) { userServices.getUsers() }
            state.value = State.SUCCESS(users)
        } catch (e: Exception) {
            state.value = State.FAILURE(e.localizedMessage)
        }
    }

}
Here we define one MutableStateFlow to manage states of the screen with default state START.
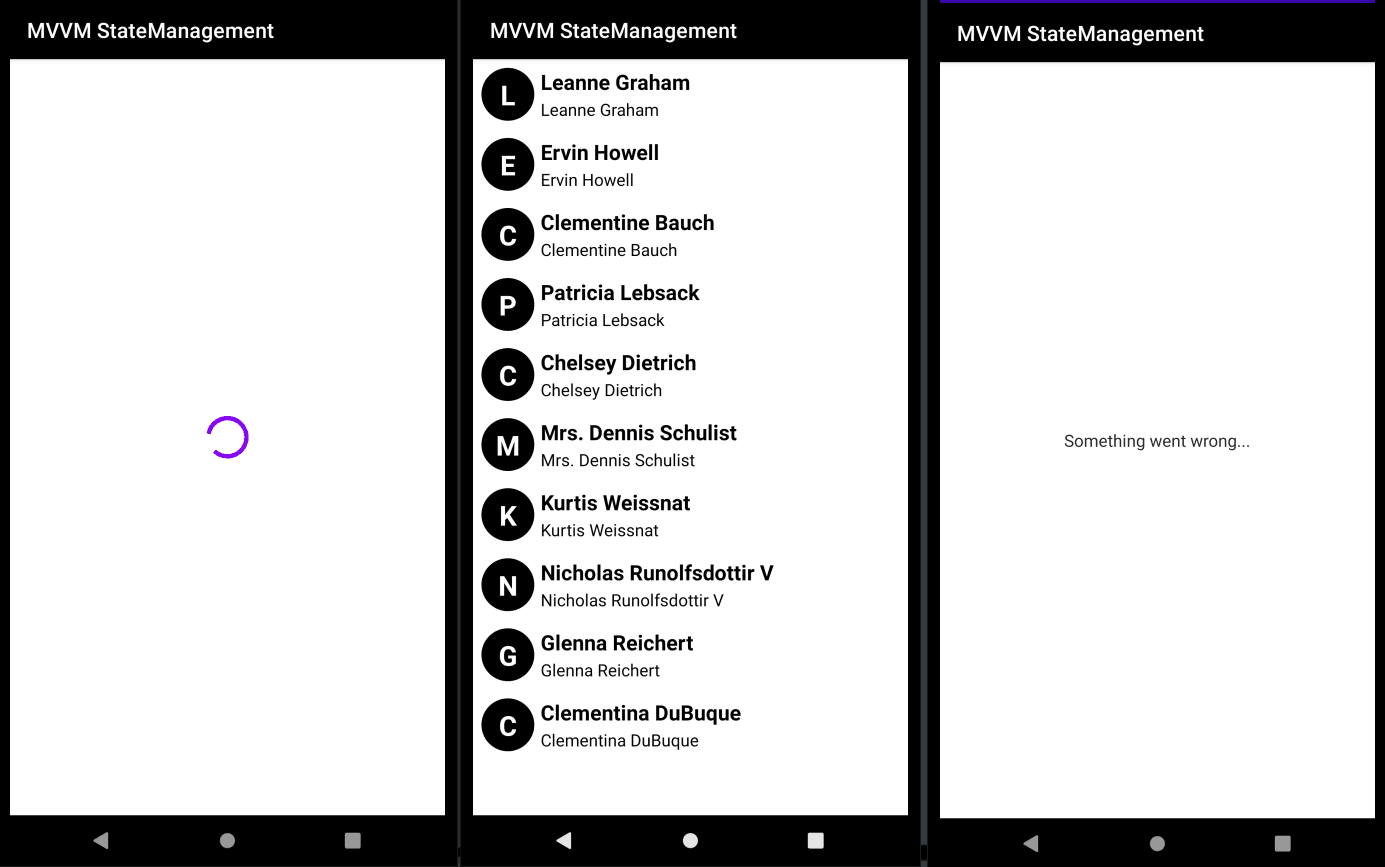
On Initialization of our viewModel, we first change state from START to LOADING. In this state, we’ll show progress indicator to user. Then we make a call to fetch data in IO thread and wait for the result. Once we receive data from API, we change the state from LOADING to SUCCESS with the received user list, and in case of failure, we set the state to FAILURE with the error message to notify user that something went wrong.
Now Let’s build our composable to handle this state.
@AndroidEntryPoint
class MainActivity : ComponentActivity() {
    override fun onCreate(savedInstanceState: Bundle?) {
        super.onCreate(savedInstanceState)
        setContent {
            UserActivityTheme {
                Scaffold(
                    topBar = {
                        TopAppBar(
                            title = { Text("MVVM StateManagement") },
                            backgroundColor = Color.Black,
                            contentColor = Color.White
                        )
                    },
                ) {
                    MainView()
                }
            }
        }
    }
}
@Composable
fun MainView() {
    val viewModel = hiltViewModel<MainViewModel>()
    val state by viewModel.state.collectAsState()
    when (state) {
        State.START -> {
        }
        State.LOADING -> {
            Box(contentAlignment = Alignment.Center, modifier = Modifier.fillMaxSize()) {
                CircularProgressIndicator()
            }
        }
        is State.FAILURE -> {
            Box(contentAlignment = Alignment.Center, modifier = Modifier.fillMaxSize()) {
                Text(text = "Something went wrong...",fontSize = 16.sp)
            }
        }
        is State.SUCCESS -> {
            val users = (state as State.SUCCESS).users
            UserListScreen(users)
        }
    }
}
@Composable
fun UserListScreen(users: List<User>) {
    LazyColumn(modifier = Modifier.fillMaxHeight()) {
        items(items = users) { item ->
            Row(modifier = Modifier.padding(8.dp),
                verticalAlignment = Alignment.CenterVertically) {

               Box(modifier = Modifier
                        .background(Color.Black, CircleShape)
                        .size(50.dp),
                    contentAlignment = Alignment.Center ){
                    Text(
                        text = item.name.substring(0, 1),
                        color = Color.White,
                        fontSize = 26.sp,
                        fontWeight = FontWeight.Bold)
                    }
                Column(
                    modifier = Modifier
                        .align(Alignment.CenterVertically)
                        .padding(start = 6.dp)
                ) {
                    Text(
                        text = item.name,
                        fontSize = 20.sp,
                        fontWeight = FontWeight.Bold,
                        color = Color.Black)
                    Text(
                        text = item.name, fontSize = 16.sp,
                        color = Color.Black,
                       modifier = Modifier.padding(top = 2.dp))
                }
            }
        }
    }
}
Conclusion
Pretty simple…
Here in our MainView() we set the view as per the state of the screen, now whenever ViewModel updates the state, composable recomposes the view based on the current state.
Run the application on emulator or on a real device, it’ll look like this
Related Popular Articles

'%3e%3crect%20opacity='0.3'%20width='253.333'%20height='256.667'%20rx='10'%20transform='matrix(0.898794%200.438371%20-0.425364%200.905022%20109.961%20230.004)'%20fill='%23F2709C'%20fill-opacity='0.2'/%3e%3crect%20opacity='0.3'%20width='211.667'%20height='188.333'%20rx='15'%20transform='matrix(0.987688%200.156434%20-0.151006%200.988533%20-40.0391%201715)'%20fill='%23FF9472'%20fill-opacity='0.2'/%3e%3crect%20opacity='0.3'%20width='150'%20height='150'%20rx='10'%20transform='matrix(0.669131%200.743145%20-0.730788%200.682605%202111.64%201603.34)'%20fill='%23F2709C'%20fill-opacity='0.2'/%3e%3crect%20opacity='0.3'%20width='165'%20height='165'%20rx='15'%20transform='matrix(-0.669131%20-0.743145%20-0.730788%200.682605%201998.3%20643.336)'%20fill='%236CCAFF'%20fill-opacity='0.2'/%3e%3crect%20opacity='0.3'%20width='128.333'%20height='128.333'%20rx='50'%20transform='matrix(0.669131%200.743145%20-0.730788%200.682605%20379.961%20958.336)'%20fill='%23B66CFF'%20fill-opacity='0.2'/%3e%3crect%20opacity='0.3'%20width='128.333'%20height='128.333'%20rx='50'%20transform='matrix(0.669131%200.743145%20-0.730788%200.682605%201859.97%202311.67)'%20fill='%23B66CFF'%20fill-opacity='0.2'/%3e%3crect%20opacity='0.3'%20width='156.667'%20height='158.333'%20rx='10'%20transform='matrix(0.891007%200.453991%20-0.440801%200.897605%20938.312%202176.67)'%20fill='%23B66CFF'%20fill-opacity='0.2'/%3e%3c/g%3e%3c/svg%3e)
