iOS — Designing Data Layer For Offline-first Apps
Background
OK, let’s start with the concept offline-first apps.
Offline first apps are architected in a way that they will continue working normally even during time when you have bad internet or no internet at all.
Ever wondered how note-taking apps like Evernote or chatting apps like Whatsapp keep working without the internet? Not only you can use the existing data, but you can also send a message or add a note and it will sync when the internet becomes available.
That’s not magic! Those apps are designed in such a way.
Offline-first apps are very pleasant to use and certainly delight the users as they are never blocked by the internet when they want to take action, especially in a world where everybody has very limited time!
As we now understand the concept and its importance, let’s see how we can start creating those types of apps!
Sponsored
We are what we repeatedly do. Excellence, then, is not an act, but a habit. Try out Justly and start building your habits today!
How to architect offline first apps
There are many ways to create offline-first apps but ideally, I think UI should not care about it and logic should be entirely encapsulated within the data layer.
Today we will explore that approach where the data layer is entirely responsible for creating an offline-first experience.
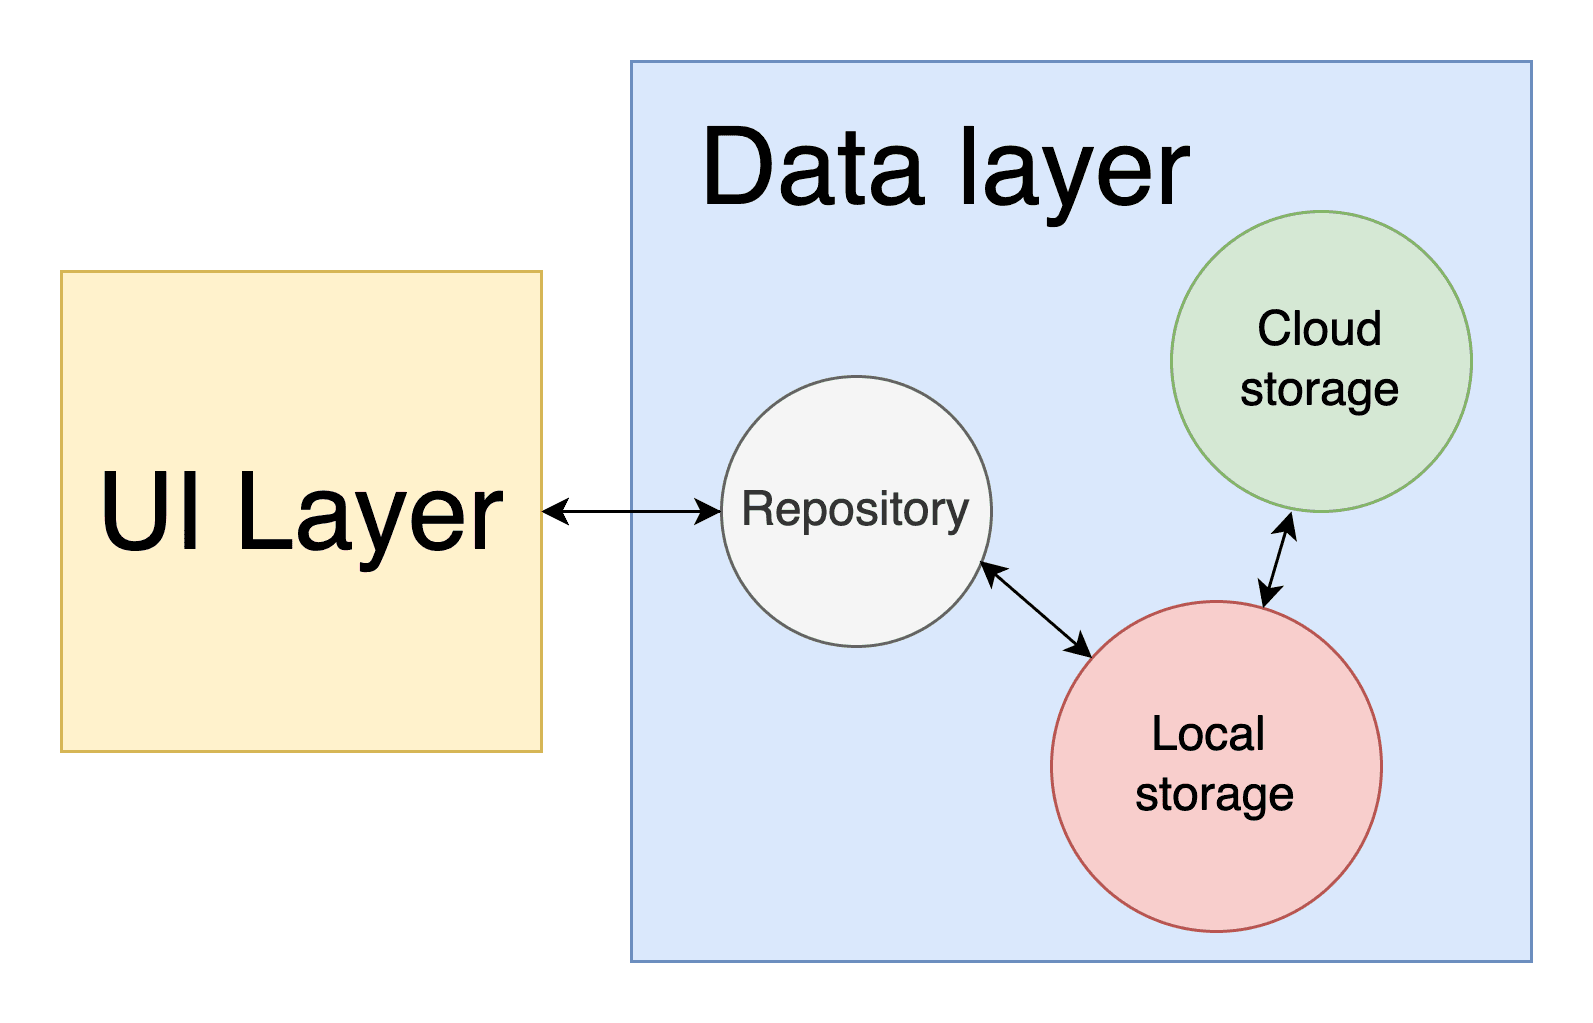
With this approach, the data layer basically provides a repository that interacts with the UI layer. The repository then deals with local storage and remote storage.
To conclude, there are 3 components in the data layer:
- Repository — provides data to the UI layer that it gets from the Local storage. It also notifies the Remote storage when a refresh is needed.
- Local storage — stores data locally that it gets from Repository and Remote storage. It also provides up-to-date data to Repository.
- Remote storage — Gets/Sends data to cloud and updates local storage accordingly.
With this approach, the UI layer basically gets a stream of data from the Repository that it can observe forever! and whenever there’s an update, it will get an event with new data.
Don’t worry if you don’t understand it completely yet, it’s very easy to understand with an example!
Examples
We will create a note-taking application that displays a list of notes with an offline-first approach.
We will use SQLite to store the local data. We will use fake Remote storage as we don’t have actual APIs but it will be very easy to configure real APIs there if you need them.
We will not concentrate much on UI but still, we will create a SwiftUI view that will display the data it gets from the repository.
Let’s get started by creating the Repository first!
Create NoteRepository
Before creating the NoteRepository, let’s create Note model first.
struct Note {
    let id: String
    let title: String
    let text: String
}
A very simple struct with unique id, title and text.
Now let’s create a repository that provides Note data to UI layer. We will use Combine framework to define the stream of data.
class NoteRepository: ObservableObject {

    private let localNoteRepository: LocalNoteRepository
    private let remoteNoteRepository: RemoteNoteRepository

    @Published
    var notes = [Note]()

    var cancellable: AnyCancellable?

    init() {
        self.localNoteRepository = LocalNoteRepository()
        self.remoteNoteRepository = RemoteNoteRepository(localNoteRepository: localNoteRepository)

        cancellable = localNoteRepository.$notePublisher.sink { items in
            self.notes = items
        }
        remoteNoteRepository.refreshNotes()
    }
}
In this snippet —
- We have added two variables — One for the local repository and one for the remote repository.
- We have added a
notesvariable that is a Published field. UI layer can observe this stream to get the latest notes. - During initialization, the repository observes the
LocalNoteRepositoryand updatesnotesstream whenever there’s an update from local storage. - And then it gives hint to
RemoteNoteRepositoryto refresh notes from the cloud. This is totally optional and logic depends entirely on the type of app you are working on.
That’s it for NoteRepository. Now UI layer can easily subscribe to updates from notes field to display a list of current notes.
Let’s explore the implementation of LocalNoteRepository .
Create LocalNoteRepository
LocalNoteRepository is responsible for storing the data locally and providing updates to NoteRepository.
Let’s first see how it will store notes. We are going to use SQLite library for saving data. However, you can choose whatever fits you best.
class LocalNoteRepository {

    let notes = Table("notes")
    let id = Expression<String>("id")
    let title = Expression<String>("title")
    let text = Expression<String>("text")

    let db: Connection?

    init() {
        do {
            db = try Connection()
        } catch {
            self.db = nil
            print("Error while initializing DB \(error)")
        }

        if let db = db {
            try! db.run(notes.create { t in
                t.column(id, primaryKey: true)
                t.column(title)
                t.column(text)
            })
        }
    }
}
Very basic stuff as per SQLite library documentation. The above snippet just creates a notes table with 3 columns required to store Note struct.
Now first let’s explore how it provides up-to-date data to NoteRepository and then we will explore how it stores data that it gets from RemoteNoteRepository .
class LocalNoteRepository {

    @Published
    var notePublisher = [Note]()
    ...

    init() {
        ...

        if let db = db {
            ...
            db.updateHook({ [weak self] operation, db, table, rowid in
                if let self = self, table == "notes" {
                    self.refreshNotes()
                }
            })
        }
    }

    private func refreshNotes() {
        if let db = db {
            var notes = [Note]()
            for note in try! db.prepare(self.notes) {
                notes.append(Note(id: note[id], title: note[title], text: note[text]))
            }

            self.notePublisher = notes
        }
    }
}
A few changes to discuss here
- We started by adding a
notePublisherfield that will allow NoteRepository to observe the notes list. - Then we installed
updateHookin the database, to get updates whenever something is updated in the database. We use this hook to get notified about notes table changes and refresh notes. - Added
refreshNotesfunction that just fetches data from the database and updatesnotePublisherfield.
Now we LocalNoteRepository can provide data to NoteRepository .
Let’s explore how we can save data that we will get from RemoteNoteRepository .
class LocalNoteRepository {

    ...
    func updateNotes(items: [Note]) {
        try! db?.run(notes.delete())

        let inserts =  items.map({ item in
            return [id <- item.id, title <- item.title, text <- item.text]
        })

        try! db?.run(notes.insertMany(inserts))
    }
}
This function is very simple. It just creates an insert operation from the note list and runs DB operation to insert them in a single transaction.
I haven’t handled all possible errors to keep the demo simple. However, in real applications, you should handle all errors and add logs appropriately.
We are done with Local storage. It can save and provide data to the repository.
Now let’s explore the final piece of the puzzle, RemoteNoteRepository .
Create RemoteNoteRepository
Implementation of RemoteNoteRepository is very simple here as we don’t have real APIs to fetch notes from.
Instead, we will just create 2 dummy notes and will pass them to LocalNoteRepository as an update.
class RemoteNoteRepository {

    private let localNoteRepository: LocalNoteRepository

    init(localNoteRepository: LocalNoteRepository) {
        self.localNoteRepository = localNoteRepository
    }

    func refreshNotes() {
        let notes = [
            Note(id: UUID().uuidString,
                 title: "Story of Moon",
                 text: "There was a beautiful lake."),
            Note(id: UUID().uuidString,
                 title: "Trip to Vegas",
                 text: "Whatever happens in vegas, stays in vegas")
]

        // Notes are hardcoded for demo, ideally it should fetch from APIs
        // Mimic API behavior by delaying update
        DispatchQueue.main.asyncAfter(deadline: .now() + 2) {
            self.localNoteRepository.updateNotes(items: notes)
        }
    }
}
Not much to explain here, very simple refreshNotes function that gets notes and updates LocalNoteRepository .
Yey! We are completely done with data layer components. Now UI layer can just create NoteRepository and start showing notes!
Let’s see a very simple example!
struct ContentView: View {

    @ObservedObject
    var noteRepo = NoteRepository()

    var body: some View {
        List(noteRepo.notes, id: \.id) { note in
            Text(note.title)
                .padding()
        }
    }
}
As you can see, the UI layer does not care whether notes are handled offline or not. It can just do one task very effectively and that is displaying notes!
Conclusion
That’s it for today, hope you learned something!
This will give you an idea about how to get started with offline-first architecture and you will be able to build apps that users will love. The example I have shown is very basic but now you can start adding more complexity, bit by bit!
Related Popular Articles