How to Develop a Todo App in Android with TDD: Part 2
Introduction
All code is guilty until proven innocent
This is part 2 of the ongoing series of articles where we keep adding new screens with more complexity.
Welcome back! In this series, we write integration tests for the TODO app following TDD methodology. In this article, we are going to work on add TODO screen.
As usual, we will not focus much on the data part, where will keep saving Todos in the memory using ArrayList, which means it will be erased when you restart the app. That should be fine for our use case as that’s the part we are not focusing on and you can always replace the repository implementation with a real database if you want to persist it.
Sponsored
We are what we repeatedly do. Excellence, then, is not an act, but a habit. Try out Justly and start building your habits today!
Let’s get Started!
We will divide this post into smaller milestones to make sure we stay focused.
1. Add New Todo Button on Home Screen
First, let’s add the FAB button on the home screen. Here’s a test to verify it
@Test
fun testAddButtonIsShown() {
    composeTestRule.onNodeWithTag(TEST_TAG_ADD_BUTTON).assertIsDisplayed()
}
You might be wondering what’s the value of TEST_TAG_ADD_BUTTON here, that’s like id we provided in XML layout files before jetpack compose. It allows us to identify a view in tests. Here, we use test tag to find add button and see if it’s displayed.
If you run the test now, it will fail. So let’s start with adding the actual code to pass this test.
const val TEST_TAG_ADD_BUTTON = "add_button"
@Composable
fun TodoList(viewModel: TodoViewModel) {
val tasks by viewModel.tasks.collectAsState()
Scaffold(
floatingActionButtonPosition = FabPosition.End,
floatingActionButton = {
FloatingActionButton(
onClick = { viewModel.onAddClick() },
modifier = Modifier.testTag(
TEST_TAG_ADD_BUTTON
)
) {
Icon(Icons.Filled.Add, "")
}
}
) {
Column(modifier = Modifier.padding(16.dp)) {
Text(
text = "TODOs", fontSize = 22.sp,
modifier = Modifier.padding(vertical = 8.dp)
)
TaskView(tasks = tasks)
}
}
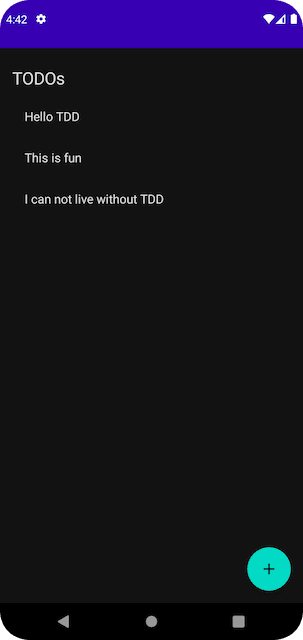
}If you run the app, you will see a beautiful add button
2. Add Button Click Redirects to Todo Screen
To manage navigation in jetpack compose, we will use NavController . It allows us to navigate/pop to destinations, just like we did with fragment navigation.
Let’s refactor our MainActivity to use NavController
class MainActivity : ComponentActivity() {
    override fun onCreate(savedInstanceState: Bundle?) {
        super.onCreate(savedInstanceState)

        setContent {
            TodoTheme {
                // A surface container using the 'background' color from the theme
                Surface(
                    modifier = Modifier.fillMaxSize(),
                    color = MaterialTheme.colors.background
                ) {
                    val navController = rememberNavController()

                    NavHost(
                        navController = navController,
                        startDestination = "/home",
                    ) {
                        composable("/home") {
                            val viewModel by viewModels<TodoViewModel>()
                            TodoList(navController, viewModel)
                        }
                    }
                }
            }
        }
    }
}
Here rememberNavController creates a NavController that is saved across compositions and NavHost is used to allow to do mapping of path to actual UI. For example, we have mapped /home to TodoList , that means TodoList will be shown whenever the current path is /home in NavController .
Now let’s add empty view and ViewModel for add Todo screen and map it here.
class AddTodoViewModel(
    private val taskRepository: TaskRepository = TaskRepositoryImpl.INSTANCE
) : ViewModel() {
}

@Composable
fun AddTodoView(navController: NavController, viewModel: AddTodoViewModel) {
}
and now we map it to /add path in NavHost
NavHost(
    navController = navController,
    startDestination = "/home",
) {
    composable("/home") {
        val viewModel by viewModels<TodoViewModel>()
        TodoList(navController, viewModel)
    }
    composable("/add") {
        val viewModel by viewModels<AddTodoViewModel>()
        AddTodoView(navController, viewModel)
    }
}
Pretty simple, isn’t it?
One thing you might have noticed here is that we are now using a singleton for TaskRepositoryImpl as we need to share the instance between the List and Add screens.
Also, we will need to update TaskRepositoryImpl to provide SharedFlow instead of plan List to make sure observers get updates when a new task is added. So final implementation will look like this.
class TaskRepositoryImpl : TaskRepository {

    private val tasks = mutableListOf<Task>()
    private val taskListFlow = MutableSharedFlow<List<Task>>(replay = 1)

    init {
        tasks.addAll(
            listOf(
                Task("Hello TDD"),
                Task("This is fun"),
                Task("I can not live without TDD")
            )
        )
        taskListFlow.tryEmit(tasks)
    }

    override fun getTasks(): SharedFlow<List<Task>> {
        return taskListFlow
    }

    override fun addTask(title: String) {
        tasks.add(Task(title))
        taskListFlow.tryEmit(tasks)
    }

    companion object {
        val INSTANCE = TaskRepositoryImpl()
    }
}
Again, this is not the best practice. Ideally, you should be managing data through API or a database.
Now, let’s write test to verify AddTodoView is shown when we click add button. We will need to add NavHostController and NavHost into tests as well to verify the navigation.
private lateinit var navController: NavHostController

@Before
fun setUp() {
    composeTestRule.setContent {
        navController = rememberNavController()
        NavHost(
            navController = navController,
            startDestination = "/home",
        ) {
            composable("/home") {
                TodoList(navController, viewModel)
            }
            composable("/add") {
                AddTodoView(navController, AddTodoViewModel(TaskRepositoryImpl()))
            }
        }
    }
    composeTestRule.waitForIdle()
}

@Test
fun testAddButtonRedirectsToAddTodoView() {
    composeTestRule.onNodeWithTag(TEST_TAG_ADD_BUTTON).performClick()
    composeTestRule.waitForIdle()
    assertEquals("/add", navController.currentBackStackEntry?.destination?.route)
    composeTestRule.onNodeWithText("Add Todo").assertIsDisplayed()
}
If you try to run the test, it will fail and that’s expected. Now let’s implement the code to pass this test.
@Composable
fun TodoList(navController: NavController, viewModel: TodoViewModel) {
    val tasks by viewModel.tasks.collectAsState(emptyList())
    val redirectToAdd  by viewModel.redirectToAdd.collectAsState()

    if(redirectToAdd) {
        navController.navigate("/add")
        viewModel.redirectToAdd.value = false
    }
   ...
}

class TodoViewModel(
    private val taskRepository: TaskRepository = TaskRepositoryImpl.INSTANCE
) : ViewModel() {

    val redirectToAdd = MutableStateFlow(false)
    val tasks = taskRepository.getTasks()

    fun onAddClick() {
        redirectToAdd.value = true
    }
}

Composable
fun AddTodoView(navController: NavController, viewModel: AddTodoViewModel) {

    Column(modifier = Modifier.padding(16.dp)) {
        Text(
            text = "Add Todo", fontSize = 22.sp,
            modifier = Modifier.padding(vertical = 8.dp)
        )
    }
}
Run tests now and it should pass! And with it, we are done with the second milestone.
3. Implement Add Todo view
Let’s add a test to verify that button and text fields are shown on AddTodoView screen. We will write this screen’s tests in a different class named AddTodoViewTest as per convention.
class AddTodoViewTest {

    @get:Rule
    val composeTestRule = createComposeRule()

    private lateinit var navController: NavHostController
    private val viewModel = AddTodoViewModel(TaskRepositoryImpl())

    @Before
    fun setUp() {
        composeTestRule.setContent {
            navController = rememberNavController()
            NavHost(
                navController = navController,
                startDestination = "/add",
            ) {
                composable("/home") {
                    TodoList(navController, TodoViewModel())
                }
                composable("/add") {
                    AddTodoView(navController, viewModel)
                }
            }
        }
        composeTestRule.waitForIdle()
    }

    @Test
    fun testScreenViewsAreShown() {
        composeTestRule.onNodeWithText("Add Todo").assertIsDisplayed()
        composeTestRule.onNodeWithText("Add").assertIsDisplayed()
        composeTestRule.onNodeWithTag(TEST_TAG_ADD_TEXT_FIELD).assertIsDisplayed()
    }
}
Here we have changed the start destination from /home to /add as we are testing add Todo screen here. Test will and should fail if you run it now. Let’s implement AddTodoView to make this test pass.
Starting with ViewModel…
class AddTodoViewModel(
    private val taskRepository: TaskRepository = TaskRepositoryImpl.INSTANCE
) : ViewModel() {

    var titleText = MutableStateFlow("")

    fun onConfirm() {
    }
}
and now AddTodoView
const val TEST_TAG_ADD_TEXT_FIELD = "add_text_field"
@Composable
fun AddTodoView(navController: NavController, viewModel: AddTodoViewModel) {
val title by viewModel.titleText.collectAsState()
Column(modifier = Modifier.padding(16.dp)) {
Text(
text = "Add Todo", fontSize = 22.sp,
modifier = Modifier.padding(vertical = 8.dp)
)
TextField(
value = title,
modifier = Modifier.padding(vertical = 8.dp)
.testTag(TEST_TAG_ADD_TEXT_FIELD),
onValueChange = {
viewModel.titleText.value = it
})
Button(
onClick = { viewModel.onConfirm() },
modifier = Modifier.padding(vertical = 16.dp),
) {
Text(text = "Add")
}
}
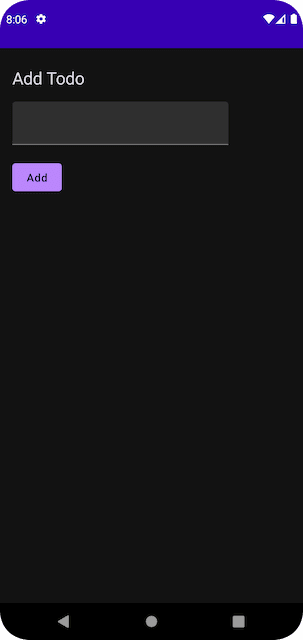
}Now test should pass and if you run the app, it will show Add Todo view.
Now to the 4th and last milestone…
4. Implement Add Todo functionality
Let’s add a test to verify that add button actually adds the item on the list view. As we need to change the start destination to home screen and test full scenario, let’s refactor test class.
class AddTodoViewTest {

    @get:Rule
    val composeTestRule = createComposeRule()

    private lateinit var navController: NavHostController

    private fun init(startDestination: String = "/add") {
        composeTestRule.setContent {
            navController = rememberNavController()
            NavHost(
                navController = navController,
                startDestination = startDestination,
            ) {
                composable("/home") {
                    TodoList(navController, TodoViewModel())
                }
                composable("/add") {
                    AddTodoView(navController, AddTodoViewModel())
                }
            }
        }
        composeTestRule.waitForIdle()
    }

    @Test
    fun testScreenViewsAreShown() {
        init()
        composeTestRule.onNodeWithText("Add Todo").assertIsDisplayed()
        composeTestRule.onNodeWithText("Add").assertIsDisplayed()
        composeTestRule.onNodeWithTag(TEST_TAG_ADD_TEXT_FIELD).assertIsDisplayed()
    }

    @Test
    fun testAddButtonAddsTheItem() {
        init(startDestination = "/home")
        composeTestRule.onNodeWithTag(TEST_TAG_ADD_BUTTON).performClick()

        composeTestRule.onNodeWithTag(TEST_TAG_ADD_TEXT_FIELD)
            .performTextInput("this is a new task")

        composeTestRule.onNodeWithText("Add").performClick()

        // Verify we are on list screen and new task is shown
        composeTestRule.onNodeWithText("TODOs").assertIsDisplayed()
        composeTestRule.onNodeWithText("this is a new task").assertIsDisplayed()
    }
}
If you run the test, it will fail. Let’s update the code to add Todo and dismiss the screen on add button click.
class AddTodoViewModel(
    private val taskRepository: TaskRepository = TaskRepositoryImpl.INSTANCE
) : ViewModel() {

    val dismissView = MutableStateFlow(false)
    var titleText = MutableStateFlow("")

    fun onConfirm() {
        if (titleText.value.isEmpty()) return
        taskRepository.addTask(titleText.value)
        dismissView.value = true
    }

    fun reset() {
        dismissView.value = false
        titleText.value = ""
    }

}

@Composable
fun AddTodoView(navController: NavController, viewModel: AddTodoViewModel) {

    val title by viewModel.titleText.collectAsState()
    val dismiss by viewModel.dismissView.collectAsState()

    if(dismiss) {
        navController.popBackStack()
        viewModel.reset()
    }

    Column(modifier = Modifier.padding(16.dp)) {
        Text(
            text = "Add Todo", fontSize = 22.sp,
            modifier = Modifier.padding(vertical = 8.dp)
        )

        TextField(
            value = title,
            modifier = Modifier.padding(vertical = 8.dp)
                .testTag(TEST_TAG_ADD_TEXT_FIELD),
            onValueChange = {
                viewModel.titleText.value = it
            })

        Button(
            onClick = { viewModel.onConfirm() },
            modifier = Modifier.padding(vertical = 16.dp),
        ) {
            Text(text = "Add")
        }
    }
}
And that’s it, run test again and it should pass now!
Conclusion
In this article, we focused on integrating tests into our TODO app with TDD methodology. We improved the add TODO screen using ArrayLists for memory-based storage, meeting our development needs.
Stay tuned as we refine our app and explore more integrations in future posts.
Happy Coding!
Related Useful Articles

Whether you need...
- *High-performing mobile apps
- *Bulletproof cloud solutions
- *Custom solutions for your business.
