How to Develop a Todo App in Android with TDD: Part 3 Guide
Background
Why do we never have time to do it right, but always have time to do it over?
This is part 3 and the last part of the ongoing series of articles where we keep adding new screens with more complexity to a TODO app.
Welcome back! In this series, we write integration tests for the TODO app following TDD methodology. In this article, We will start off by adding update TODO functionality and later support for the complete TODO feature.
Sponsored
We are what we repeatedly do. Excellence, then, is not an act, but a habit. Try out Justly and start building your habits today!
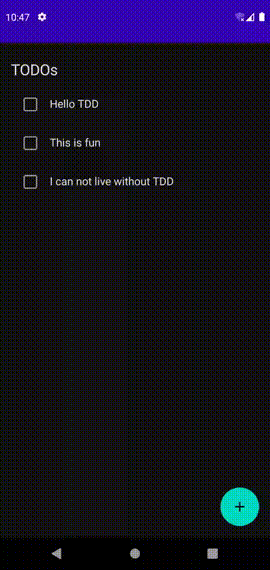
Here’s what you will have at the end of this article...
As usual, we will not focus much on the data part, where will keep saving Todos in the memory using ArrayList, which means it will be erased when you restart the app. That should be fine for our use case as that’s the part we are not focusing on and you can always replace the repository implementation with a real database if you want to persist it.
Let’s Get started!
1. Allow updating TODO item
As usual, we will start with the test which verifies that we show an update screen when the user clicks on a TODO item.
To add the test, we will need to create a basic Update view and ViewModel.
@Composable
fun UpdateTodoView(navController: NavController, viewModel: UpdateTodoViewModel) {
    Text("Update TODO")
}
class UpdateTodoViewModel(
    private val taskRepository: TaskRepository = TaskRepositoryImpl.INSTANCE,
    private val taskId: Int
) : ViewModel() {

}
Now we can add test. Update setUp method’s NavHostto add support for UpdateTodoView
@Before
fun setUp() {
    composeTestRule.setContent {
        navController = rememberNavController()
        NavHost(
            navController = navController,
            startDestination = "/home",
        ) {
            ...
            composable("/edit/{taskId}") {
                val taskId = (it.arguments?.getString("taskId", "") ?: "").toInt()
                val viewModel = UpdateTodoViewModel(taskId = taskId)
                UpdateTodoView(navController, viewModel)
            }
        }
    }
    composeTestRule.waitForIdle()
}
We added a new router to the navigation for Update TODO screen. Unlike other screens, this screen will have a parameter as we will need to pass item that’s being edited to the screen.
Now let’s add the test
@Test
fun testClickingOnItemRedirectsToUpdateTodoView() {
    val tasks: List<Task>
    runBlocking(Dispatchers.IO) {
        tasks = TaskRepositoryImpl.INSTANCE.getTasks().first()
    }

    val task = tasks[2]
    composeTestRule.onNodeWithText(task.title).performClick()
    composeTestRule.waitForIdle()

    assertEquals("/edit/{taskId}", navController.currentBackStackEntry?.destination?.route)
    composeTestRule.onNodeWithText(task.title).assertIsDisplayed()
    composeTestRule.onNodeWithText("Update Todo").assertIsDisplayed()
}
Here we get the task list from a repository and try to click on the item at index 2. After click, we verify
- Current backstack entry destination route = “/edit/{taskId}
- Task title is shown
- “Update Todo” screen title is shown
If you try to run this test now, it will fail as expected. Let’s add code to make the test pass!
We will begin with the repository as it needs to add support for updating and getting the item. To update item, we will need id field in Task to uniquely identify it.
data class Task(
    val id: Int,
    val title: String
)
Now let’s update repository interface and implementation
interface TaskRepository {
    ...
    fun getTask(id: Int): Task?
    fun updateTask(task: Task)
}
class TaskRepositoryImpl : TaskRepository {

    private val tasks = mutableListOf<Task>()
    private val taskListFlow = MutableSharedFlow<List<Task>>(replay = 1)

    init {
        tasks.addAll(
            listOf(
                Task(Random.nextInt(), "Hello TDD"),
                Task(Random.nextInt(), "This is fun"),
                Task(Random.nextInt(), "I can not live without TDD")
            )
        )
        taskListFlow.tryEmit(tasks)
    }

    ...

    override fun getTask(id: Int): Task? {
        return tasks.find { it.id == id }
    }
    override fun updateTask(task: Task) {
        val index = tasks.indexOfFirst { it.id == task.id }
        if (index != -1) {
            tasks[index] = task
            taskListFlow.tryEmit(tasks)
        }
    }
    ...
}
Here we try to find the item from the array and update it. Once that’s done, we broadcast it with taskListFlow .
We are done with Model changes, now let’s update UpdateTodoViewModel
class UpdateTodoViewModel(
    private val taskRepository: TaskRepository = TaskRepositoryImpl.INSTANCE,
    private val taskId: Int
) : ViewModel() {

    val task: Task? = taskRepository.getTask(taskId)

    val dismissView = MutableStateFlow(false)
    var titleText = MutableStateFlow(task?.title ?: "")

    fun onConfirm() {
        if (titleText.value.isEmpty()) return
        val task = task ?: return

        val updated = task.copy(title = titleText.value)
        taskRepository.updateTask(updated)
        dismissView.value = true
    }
}
We will get taskId as a parameter. We will need to fetch it from Repository and update title. In onConfirm function, which will be called when the user clicks “Update” button, we do basic validation and update the task with a new title. Later we update the task in the repository and dismiss the view.
That’s all needed for ViewModel. Now let’s update UpdateTodoView
@Composable
fun UpdateTodoView(navController: NavController, viewModel: UpdateTodoViewModel) {

    val title by viewModel.titleText.collectAsState()
    val dismiss by viewModel.dismissView.collectAsState()

    if (dismiss) {
        navController.popBackStack()
    }

    Column(modifier = Modifier.padding(16.dp)) {
        Text(
            text = "Update Todo", fontSize = 22.sp,
            modifier = Modifier.padding(vertical = 8.dp)
        )

        TextField(
            value = title,
            modifier = Modifier
                .padding(vertical = 8.dp)
                .testTag(TEST_TAG_ADD_TEXT_FIELD),
            onValueChange = {
                viewModel.titleText.value = it
            })

        Button(
            onClick = { viewModel.onConfirm() },
            modifier = Modifier.padding(vertical = 16.dp),
        ) {
            Text(text = "Update")
        }
    }
}
That’s almost similar to AddTodoView with minor changes. The only change that you will notice here is button text change. In production apps, you can try to reuse AddTodoView for editing item as well, just some logic to handle button name changes is needed.
Now let’s add logic to redirect to this screen on the TODO item click. We will start off by adding a route in NavHost, similar to how we had done in tests.
NavHost(
    navController = navController,
    startDestination = "/home",
) {
    ...
    composable("/edit/{taskId}") {
        val taskId = (it.arguments?.getString("taskId", "") ?: "").toInt()
        val viewModel = UpdateTodoViewModel(taskId = taskId)
        UpdateTodoView(navController, viewModel)
    }
}
Now let’s update the TODO list screen to handle click and redirection. We will start with the ViewModel update.
class TodoViewModel(
    private val taskRepository: TaskRepository = TaskRepositoryImpl.INSTANCE
) : ViewModel() {

    val redirectToAdd = MutableStateFlow(false)
    val redirectToEdit = MutableStateFlow<Task?>(null)
    ...
    fun onEditClick(task: Task) {
        redirectToEdit.value = task
    }
}
Now let’s update TodoList the view to call onEditClick on the row item click.
@Composable
fun TodoList(navController: NavController, viewModel: TodoViewModel) {
    ...
    val redirectToEdit by viewModel.redirectToEdit.collectAsState()

    ...
            TaskView(
                tasks = tasks,
                onClick = {
                    viewModel.onEditClick(it)
                })
    ...
}
@Composable
fun TaskView(
    tasks: List<Task>,
    onClick: (task: Task) -> Unit
) {
    tasks.forEach {
        Row(modifier = Modifier
            .padding(16.dp)
            .fillMaxWidth()
            .clickable {
                onClick(it)
            }
        ) {

            Text(
                text = it.title,
                fontSize = 16.sp,
            )
        }
    }
}
That’s it. Run the test now and it should pass. With that, we are done with the Update TODO functionality.
2. Add complete TODO functionality
Let’s add a test to verify the behavior
@Test
fun testClickingOnCheckboxCompletesTodo() {
    val tasks: List<Task>
    runBlocking(Dispatchers.IO) {
        tasks = TaskRepositoryImpl.INSTANCE.getTasks().first()
    }

    val task = tasks[1]

    composeTestRule.onNodeWithTag(TEST_TAG_CHECKBOX_BUTTON + task.id)
        .assertIsOff()
        .performClick()

    composeTestRule.onNodeWithTag(TEST_TAG_CHECKBOX_BUTTON + task.id)
Pretty simple text except the inclusion of another TAG. Here we have used TAG to identify CheckBox. However, providing TAG is not enough as we have multiple items with the same TAG in the list. So we have used combination of “TAG + ID” as an identifier.
If you run the test now, it will fail as expected.
Let’s add code in ViewModel to add support for completing an item.
class TodoViewModel(
    private val taskRepository: TaskRepository = TaskRepositoryImpl.INSTANCE
) : ViewModel() {

    ...

    fun onComplete(task: Task, complete: Boolean) {
        taskRepository.updateTask(task.copy(isComplete = complete))
    }
}
Now we will make use of that function in view
@Composable
fun TodoList(navController: NavController, viewModel: TodoViewModel) {
     ...
            TaskView(
                tasks = tasks,
                onClick = {
                    viewModel.onEditClick(it)
                },
                onComplete = { task, complete ->
                    viewModel.onComplete(task, complete)
                })
        }
    }
}
@Composable
fun TaskView(
    tasks: List<Task>,
    onComplete: (task: Task, complete: Boolean) -> Unit,
    onClick: (task: Task) -> Unit
) {
    tasks.forEach {
        Row(modifier = Modifier
            .padding(16.dp)
            .fillMaxWidth()
            .clickable {
                onClick(it)
            }
        ) {
            val checkedState = remember { mutableStateOf(it.isComplete) }
            Checkbox(
                checked = checkedState.value,
                onCheckedChange = { complete ->
                    checkedState.value = complete
                    onComplete(it, complete)
                },
                modifier = Modifier.testTag(TEST_TAG_CHECKBOX_BUTTON + it.id)
            )
            Spacer(modifier = Modifier.size(16.dp))
            Text(
                text = it.title,
                fontSize = 16.sp,
            )
        }
    }
}
That’s it, run the test and it should pass!
With that, we are done with the basic TODO app that supports
- Adding a TODO item
- Updating TODO item
- Completing a TODO item
I hope you learned something useful in this series. Full source code is available in a github repository.
Conclusion
In this article, We've covered how to enhances the TODO app with update and complete functionalities using TDD methodology. By following above steps, you'll gain a robust understanding of integration testing.
We use an in-memory ArrayList for simplicity, which can be replaced with a persistent database later.
Stay tuned for a breakdown of the implementation into manageable milestones for a comprehensive development journey.
Happy testing!
Related Articles

Let's Work Together
Not sure where to start? We also offer code and architecture reviews, strategic planning, and more.