
Vue 3 component testing with Jest
Introduction
Testing is crucial for ensuring that our code is working as expected and maintaining the stability of the application. When working with Vue.js or any other js framework, Jest is an excellent choice for testing your components.
In this blog post, we will see how to set up your environment, write tests for different types of components, and share best practices for writing clean and maintainable tests using Jest and Vue 3.
By the end, you will have a solid understanding of how to test your Vue components using Jest.
Sponsored
1. Why Component Testing?
Component testing is crucial for ensuring that individual components in your application are working as expected, and for maintaining the overall stability of your application.
It allows you to isolate and test specific functionality, catch bugs early, and ensure that changes to one component don’t break other application parts.
Additionally, component testing also helps in improving the maintainability of your code by providing clear documentation on how a component should behave and be used.
2. What to test in a component test?
A Vue.js component typically includes the following to be tested:
- Properties (props): Testing how the component behaves when passed different props, and how it handles missing or invalid props.
- Data: Testing how the component behaves when the data is changed and how it responds to different states.
- Computed properties: Testing how the component behaves when computed properties are updated, and how they depend on other properties and data.
- Methods: Testing how the component behaves when its methods are called, and how they interact with the component’s state and props.
- Events: Testing how the component behaves when it emits events, and how it responds to events emitted by its child components.
- DOM: Testing how the component renders, and how it updates the DOM when its state or props change.
- Lifecycle hooks: Testing how the component behaves when its lifecycle hooks are called, and how it interacts with the Vue.js instance.
- Integration: Testing how the component interacts with other components, services, and/or libraries, it can be optional though.
- Error handling: Testing how the component handles errors, and how it behaves when it encounters unexpected situations.
However, not all components will require testing all of the above-listed aspects. It really depends on the complexity and the requirement of the component.
3. Required packages
- Jest — It is a JavaScript testing framework that provides a powerful and easy-to-use API for writing and running tests. It works seamlessly with Vue.js, making it an excellent choice for testing Vue components.
- @vue/test-utils — It is a library that provides a set of utilities for testing Vue components. It provides a set of methods for interacting with the component, such as
shallowMountwhich we will use to create a shallow wrapper of the component, andfindwhich we will use to locate elements in the component's template. - @vue/vue3-jest — It’s a Jest transformer for Vue Components.
4. Setting up the environment
Before we can start writing tests for our Vue components, we need to set up our environment. This involves installing and configuring jest, @vue/test-utils and babel-jest in our Vue project.
1. First, we need to install Jest and @vue/test-utils using npm or yarn:
npm install --save-dev jest @vue/test-utilsor
yarn add -D jest @vue/test-utils5. Writing our first test
- Create a component called HelloWorld.vue and add below simple HTML code to it.
<!-- HelloWorld.vue -->

<template>
  <p>Hello there!</p>
</template>
Now, create a directory and name it as tests . However, It’s not compulsory you can name it what you like.
I have added a
testsdirectory inside the root directory, feel free to vary the path if you wish to.
- Let’s create a test file, so-called the test suite for the component HelloWorld.vue.
To make it easy to understand we will name it the same as our component which ishelloworld.test.js.
// helloworld.test.js

import HelloWorld from "../src/components/HelloWorld.vue";
import { mount } from "@vue/test-utils";

test("HelloWorld Component renders the correct text", () => {
  const wrapper = mount(HelloWorld);
  expect(wrapper.text()).toBe("Hello there!");
});
If you’ve configured eslint in your project and it shows the error like test is not defined, no need to worry about just add the path of your
testsdirectory inside .eslintignore file. The error should be disappeared!
Here, mount can be replaced with shallowMount according to requirements. wrapper is the Vue instance involved in testing the component.
mount()andshallowMount()are both functions provided by the Vue Test Utils library for creating a test-specific Vue instance of a component.mountis used when you need to test the component in the context of its child components andshallowMountis used when you only need to test the component in isolation. However,shallowMountmakes the test faster.- Add
"test" : "jest"command to the script section of the package.json file and execute it likenpm test.
Alas! the test is failing 😨.
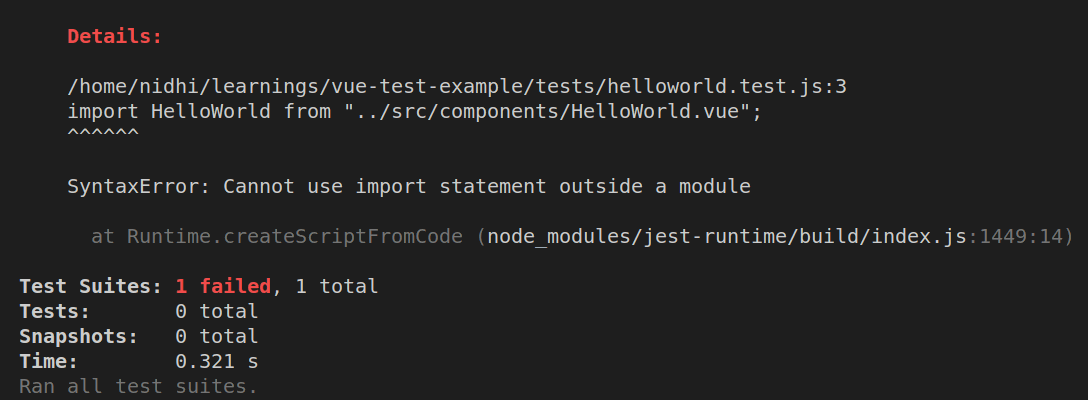
It’s because Jest runs tests in a Node.js environment, which does not support the use of the import statement by default. Instead, you should use the require statement to import modules.
To fix this error, you can use a tool like Babel to transpile your JavaScript code, which will convert the import statements into the equivalent require() statements that Node.js can understand.
Moreover, we will go with another solution. That’s the usage of babel-jest package to internally transpile import statements into required ones.
- Install
babel-jestpackage, that will be used by jest to transpile our code.
npm install babel-jest --save- Configure jest to use
babel-jestby creating thejest.config.jsfile as below.
// jest.config.js

module.exports = {
  transform: {
    "^.+\\.jsx?$": "babel-jest",
  },
};
Again running the test and it still gives the same error😞
- Install the package
@babel/preset-envand configure it inside the .babelrc file in the root directory.
npm install @babel/preset-env --save// .babelrc
{
"presets": ["@babel/preset-env"]
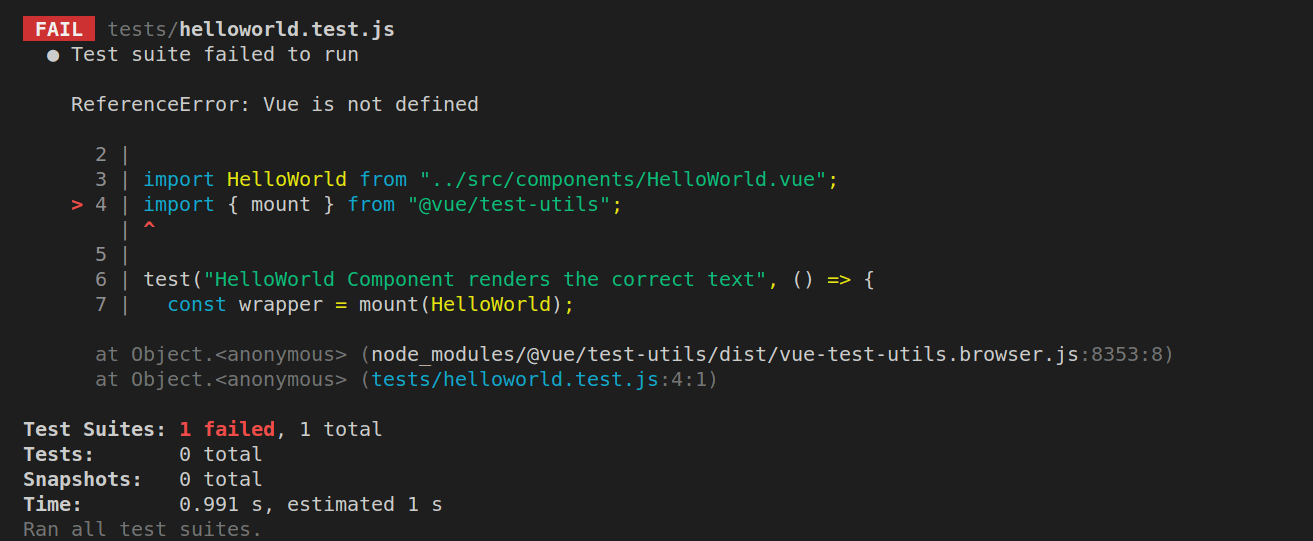
}Now it gives a different error as below.

You see, our template has only HTML code and it’s being mounted here now. Let’s solve the error without any more ado.
The reason behind the above error is, jest is unable to understand and process .vue files!
As a solution, we need to set up the vue3-jest package, which will work as a transformer for .vue files.
- Install
vue3-jestpackage
WARNING: If you’re using Vue.js 2, user vue-jest.
npm install @vue/vue3-jest --save- Update jest configuration file
// jest.config.js

module.exports = {
  transform: {
    "^.+\\.jsx?$": "babel-jest",
     '^.+\\.vue$': '@vue/vue3-jest',
  },
};
Again giving a new error, let’s explore it.
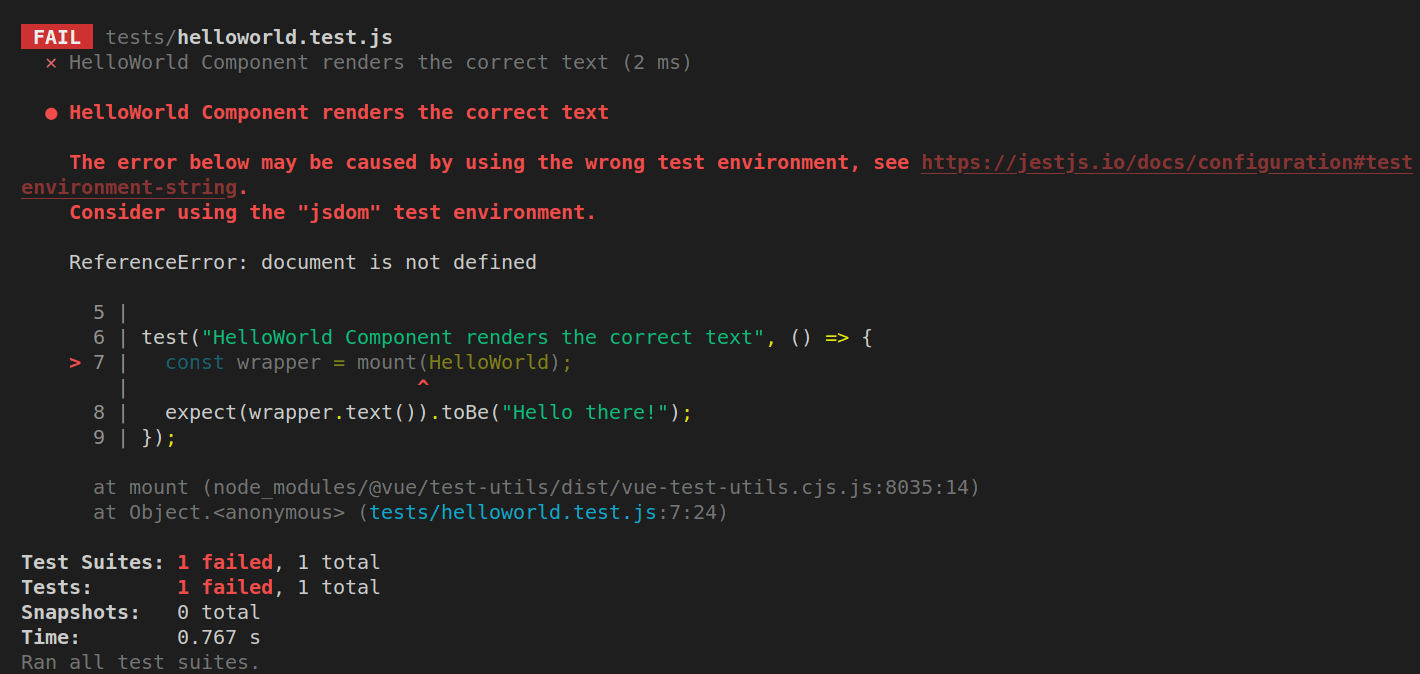
This error message indicates that the document object is not defined in the context of the code that is currently being executed.
A web browser typically provides this object and is not available in a Node.js environment when running tests with Jest. Therefore, we need to specify the test document object.
Install jest-environment-jsdom package and add it inside the jest.config.js.
npm install jest-environment-jsdom --save// jest.config.js
module.exports = {
  transform: {
    "^.+\\.jsx?$": "babel-jest",
     '^.+\\.vue$': '@vue/vue3-jest',
  },
  testEnvironment: "jsdom",
};
Oops!! it’s giving another error now 😟
It’s being thrown in the latest version of @vue/test-utils package.
As a solution, update the jest.config.js file as below.
module.exports = {
  transform: {
    "^.+\\.vue$": "@vue/vue3-jest",
    "^.+\\.jsx?$": "babel-jest",
  },
  testEnvironment: "jsdom",
  testEnvironmentOptions: {
    customExportConditions: ["node", "node-addons"],
  },
};
Boom!! when you run the test it passes 👯

6. Testing different types of components
In the previous section, we looked at how to write a simple test for a Vue component.
However, a component can have different types of functionality such as data, computed properties, methods, etc.
In this section, we will look at how to test them using Jest and @vue/test-utils.
Consider a component named FruitList.vue for testing different aspects.
<!-- FruitList.vue -->

<template>
  <div>
    <ol>
      <li v-for="fruit in fruits" :key="fruit">
        {{ fruit }}
      </li>
    </ol>
    <p>
      Number of fruits: {{ numFruits }}
    </p>
  </div>
</template>

<script>
export default {
  data() {
    return {
      fruits: ["apple", "banana", "orange"],
    };
  },
  computed: {
    numFruits() {
      return this.fruits.length;
    },
  },
};
</script>- Testing a component with data
import { shallowMount } from '@vue/test-utils'
import FruitList from '../src/components/FruitList.vue'

describe('FruitList component test', () => {
    test("tests data attributes", () => {
        const wrapper = shallowMount(FruitList)
        expect(wrapper.vm.fruits).toEqual(["apple", "banana", "orange"]);
    })
})
The above test case tests data attributes, i.e. the initial value of the fruits array.
- Testing a component with computed properties
test('return total number of fruits', () => {
    const wrapper = shallowMount(FruitList)

    expect(wrapper.vm.numFruits).toBe(2); // it fails because fruits array has 3 elements not 2

     expect(wrapper.vm.numFruits).toBe(3); // it passes
})
This tests the computed property numFruits has the correct value.
- Testing a component with methods
 test('tests addFruit method', () => {
    const wrapper = shallowMount(FruitList)

    const vm = wrapper.vm
    expect(vm.fruits.length).toBe(3)

    // add mango to the fruit list
    vm.addFruit('mango')

    expect(vm.fruits.length).toBe(4)
})- Testing what the component will render
test('displays a list of fruits', () => {
   const wrapper = shallowMount(FruitList)
   const fruits = wrapper.findAll('li')

   expect(fruits.at(0).text()).toBe('apple')
   expect(fruits.at(1).text()).toBe('banana')
   expect(fruits.at(2).text()).toBe('orange')
})

test('displays the number of fruits', () => {
   const wrapper = shallowMount(FruitList)
   const numFruits = wrapper.find('p')
   expect(numFruits.text()).toBe('Number of fruits: 3')
})
The above test cases verify the required data is being rendered properly.
7. Handling non-javascript assets
When we test the component, it’s obvious that it consists of several assets like images and CSS files.
While running tests, Jest doesn’t handle non-JavaScript assets by default, and as such the test fails whenever it doesn’t find the respective assets.
We need to stub the assets used by a component. jest-transform-stub is a Jest transformer that allows you to replace the imports of certain modules in your test files with a stub internally.
Simply adding the below configuration in jest.config.js, would save you from failing tests!
transform: {
    ".+\\.(css|scss|png|jpg|svg)$": "jest-transform-stub",
},
Here, all the css/scss/png/jpg/svg will be stubbed while running the test, and jest won’t make any complaints.
If you’re using @/ as the shorthand notation to the src directory, You will get an error for not finding a specific path like @/assets/image.png.
Adding the below mapping in jest.config.js would disappear the error.
 moduleNameMapper: {
    "^@/(.*)$": "<rootDir>/src/$1",
  },
8. Best practices
- Keep tests simple and focused
Each test should focus on a single aspect of the component’s behavior. Avoid testing multiple things in one test, as it can make the test harder to understand and maintain.
This means that you shouldn’t test other components, services, or dependencies that the component uses. - Test the component’s behavior, not its implementation
The component’s implementation may change over time, but its behavior should stay the same.
Therefore, it’s important to test the component’s behavior, not its implementation.
Test for the expected output, not the implementation details. - Use a consistent naming convention for your tests
Consistently naming your test files and cases will make it easier to find and understand the tests. - Test the component’s edge cases
Edge cases are situations where the component may behave unexpectedly. It’s important to test these cases to ensure that the component behaves correctly.
If you have missed any of the steps above, find a full example at Vue3-component-test-example.
Conclusion
In this blog post, we have covered the following key points:
- Setting up the testing environment using Jest, @vue/test-utils and babel-jest
- Writing your first test for a simple Vue component
- Testing different types of components such as components with props, events, computed properties and methods, and lifecycle hooks
- Best practices for writing effective tests
To sum up, writing tests can seem daunting at first, but by following the guidelines and best practices outlined in this blog post, you will be able to write effective tests for your Vue components with confidence.
Keep testing!!
References
Similar Popular Articles

'%3e%3crect%20opacity='0.3'%20width='253.333'%20height='256.667'%20rx='10'%20transform='matrix(0.898794%200.438371%20-0.425364%200.905022%20109.961%20230.004)'%20fill='%23F2709C'%20fill-opacity='0.2'/%3e%3crect%20opacity='0.3'%20width='211.667'%20height='188.333'%20rx='15'%20transform='matrix(0.987688%200.156434%20-0.151006%200.988533%20-40.0391%201715)'%20fill='%23FF9472'%20fill-opacity='0.2'/%3e%3crect%20opacity='0.3'%20width='150'%20height='150'%20rx='10'%20transform='matrix(0.669131%200.743145%20-0.730788%200.682605%202111.64%201603.34)'%20fill='%23F2709C'%20fill-opacity='0.2'/%3e%3crect%20opacity='0.3'%20width='165'%20height='165'%20rx='15'%20transform='matrix(-0.669131%20-0.743145%20-0.730788%200.682605%201998.3%20643.336)'%20fill='%236CCAFF'%20fill-opacity='0.2'/%3e%3crect%20opacity='0.3'%20width='128.333'%20height='128.333'%20rx='50'%20transform='matrix(0.669131%200.743145%20-0.730788%200.682605%20379.961%20958.336)'%20fill='%23B66CFF'%20fill-opacity='0.2'/%3e%3crect%20opacity='0.3'%20width='128.333'%20height='128.333'%20rx='50'%20transform='matrix(0.669131%200.743145%20-0.730788%200.682605%201859.97%202311.67)'%20fill='%23B66CFF'%20fill-opacity='0.2'/%3e%3crect%20opacity='0.3'%20width='156.667'%20height='158.333'%20rx='10'%20transform='matrix(0.891007%200.453991%20-0.440801%200.897605%20938.312%202176.67)'%20fill='%23B66CFF'%20fill-opacity='0.2'/%3e%3c/g%3e%3c/svg%3e)
