
Animations in Jetpack Compose with examples
Introduction
Hi guys, today we are going to explore how we can implement animations in Jetpack compose. Full source code of this project is available on github, feel free to fork or directly use required animations in your applications.
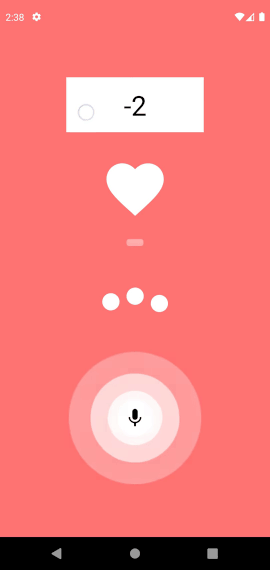
This post consists of 4 animations:
- Stepper animation — Card that will flip right or left depending on where you tap
- Heart animation — Heart jumping animation with shadow
- Progress animation — Standard progress animations with 3 dots
- Wave animation — Recording button with infinite waves
Sponsored
We are what we repeatedly do. Excellence, then, is not an act, but a habit. Try out Justly and start building your habits today!
Final implementation will look like this…
Let’s begin with the animations!
Stepper animation
We will first design static UI for the animation with tap functionality, which we will later animate.
Let’s add following code to implement stepper UI
@Composable
fun Step(number: Int) {
    Row(
        modifier = Modifier
            .fillMaxSize()
            .background(Color.White)
    ) {
        Box(modifier = Modifier
            .weight(1f)
            .fillMaxHeight()
            .clickable {
                flipBack()
            })

        Box(
            modifier = Modifier
                .weight(1f)
                .fillMaxHeight()
        ) {
            Text(
                modifier = Modifier.align(Center),
                text = number.toString(), color = Color.Black, fontSize = 40.sp
            )
        }

        Box(modifier = Modifier
            .weight(1f)
            .fillMaxHeight()
            .clickable {
                flipNext()
            })
    }

}
fun flipBack() {
}

fun flipNext() {
We have used a row that will have 3 divisions, first and third for detecting taps and middle one for showing current step number. We also have flipBack and flipNext functions which are called on tap but haven’t implemented yet.
If you look at animation closely, stepper has two sides — front and back. We need two sides because we keep showing current side while switching to next one. Let’s make above UI reusable and implement stepper that will switch sides without animation.
@Composable
fun StepperAnimation(modifier: Modifier) {
    var currentNumber by remember {
        mutableStateOf(0)
    }

    var frontNumber by remember {
        mutableStateOf(currentNumber)
    }
    var backNumber by remember {
        mutableStateOf(currentNumber)
    }

    var targetAngle by remember {
        mutableStateOf(0f)
    }

    fun isFront(): Boolean {
        val value = abs(targetAngle % 360)
        return value < 90 || value > 270
    }

    fun flipBack() {
        currentNumber -= 1
        if (isFront()) {
            backNumber = currentNumber
        } else {
            frontNumber = currentNumber
        }
        targetAngle -= 180f
    }

    fun flipNext() {
        currentNumber += 1
        if (isFront()) {
            backNumber = currentNumber
        } else {
            frontNumber = currentNumber
        }
        targetAngle += 180f
    }

    @Composable
    fun Step(number: Int, rotationY: Float) {
        Row(
            modifier = Modifier
                .fillMaxSize()
                .background(Color.White)
                .graphicsLayer {
                    this.rotationY = rotationY
                }
        ) {
            Box(modifier = Modifier
                .weight(1f)
                .fillMaxHeight()
                .clickable {
                    flipBack()
                })

            Box(
                modifier = Modifier
                    .weight(1f)
                    .fillMaxHeight()
            ) {
                Text(
                    modifier = Modifier.align(Center),
                    text = number.toString(), color = Color.Black, fontSize = 40.sp
                )
            }

            Box(modifier = Modifier
                .weight(1f)
                .fillMaxHeight()
                .clickable {
                    flipNext()
                })
        }

    }

    Box(
        modifier = modifier
            .height(80.dp)
            .width(200.dp)
            .graphicsLayer {
                rotationY = targetAngle
            }
    ) {
        if (isFront()) {
            //Front
            Step(number = frontNumber, rotationY = 0f)
        } else {
            //Back
            Step(number = backNumber, rotationY = targetAngle)
        }
    }

}
We have done following changes to previous code:
- If you see at the bottom, we have reused the
stepfunction and we show different step depending on whether user is seeing front or back side of the stepper. - We have added
targetAnglevariable that is default 0 but we change it to-180and180degrees when user clicks on flip back or next. We manage rotation withgraphicsLayer'srotationYproperty. If you apply rotationY property to step containerBoxonly, you will see mirrored back side of the stepper. To fix it, we will have to rotate the view again with the same angle. i.e 180 + 180 = 360 = 0 - Added
currentNumbervariable which will keep track of current step count - Added
frontNumberandbackNumberthat are used by respective sides of the stepper. - Implemented
flipBackandflipNextfunctions. Both function will increase/decrease current number, set it to next side’s variable and will changetargetAngleto flip the stepper.
If you run the code now, stepper will work but without any animation and that’s not cool at all. Let’s add some animations.
To add animation, we will use state animation API of Jetpack compose.
val rotation = animateFloatAsState(
    targetValue = targetAngle,
    animationSpec = tween(
        durationMillis = 400,
        easing = FastOutSlowInEasing,
    )
)
fun isFront(): Boolean {
    val value = abs(rotation.value % 360)
    return value < 90 || value > 270
}
Box(
    modifier = modifier
        .height(80.dp)
        .width(200.dp)
        .graphicsLayer {
            rotationY = rotation.value
        }
) {
    if (isFront()) {
        //Front
        Step(number = frontNumber, rotationY = 0f)
    } else {
        //Back
        Step(number = backNumber, rotationY = rotation.value)
    }
We added a rotation animation that will smoothly animate targetAngle value whenever its value changes. We updated stepper code to use rotation from animation instead of targetAngle
Well, that’s it. Run the composable and you will see stepper animate!!
Heart animation
This animation has two parts — Jumping heart image and bottom shadow. We will implement jumping heart first!
Let’s start with basic UI
Column(
    modifier = modifier
        .width(200.dp)
) {
    Icon(
        imageVector = Icons.Filled.Favorite,
        "",
        tint = Color.White,
        modifier = Modifier
            .size(100.dp)
            .align(CenterHorizontally)
    )
}
A column with icon, pretty simple!
Let’s add jumping animation, we will use Jetpack compose infinite animation API.
val infiniteTransition = rememberInfiniteTransition()
    val dy by infiniteTransition.animateFloat(
        initialValue = 0f,
        targetValue = 1f,
        animationSpec = infiniteRepeatable(
            animation = tween(1000, easing = LinearEasing),
            repeatMode = RepeatMode.Reverse
        )
    )

    val travelDistance = with(LocalDensity.current) { 30.dp.toPx() }

    Column(
        modifier = modifier
            .width(200.dp)
    ) {
        Icon(
            imageVector = Icons.Filled.Favorite,
            "",
            tint = Color.White,
            modifier = Modifier
                .size(100.dp)
                .align(CenterHorizontally)
                .graphicsLayer {
                    translationY = dy * travelDistance
                },
        )
    }
}
Let’s discuss the changes we made:
- Added
dyanimation that is afloatvalue transition. It will transition between values 0 and 1 infinitely. - Added
travelDistancevariable which tracks how high we want to jump the heart image. - Added
translationYproperty in heart icon.dyvalue will change based on current running animation frame and it will be handled by jetpack compose.
If you run the composable now, you will see heart jumping. Now let’s add the missing shadow!
Column(
    modifier = modifier
        .width(200.dp)
) {
    ...
    Spacer(modifier = Modifier.height(30.dp))

    Box(
        modifier = Modifier
            .width(40.dp)
            .height(10.dp)
            .align(CenterHorizontally)
            .graphicsLayer {
                scaleX = 0.5f + dy / 2
                alpha = 0.3f + dy / 2
            }
    ) {
        Box(
            modifier = Modifier
                .fillMaxSize()
                .background(color = Color.White, shape = CircleShape)
        )
    }
}
We added a new Box that’s responsible for showing shadow. You will see we have configured two graphicsLayer properties here which are dependent on the animation — scaleX and alpha . That’s because we want to animate those properties at the same time. We are not limited to two properties though, possibilities are infinite with jetpack compose!!
Run the composable and you will see fully implemented heart animation.
@Composable
fun ProgressAnimation(modifier: Modifier) {

    val dots = listOf(
        remember { Animatable(0f) },
        remember { Animatable(0f) },
        remember { Animatable(0f) },
    )

    Row(modifier) {
        dots.forEachIndexed { index, dot ->
            Box(
                Modifier.size(25.dp)
            ) {
                Box(
                    Modifier
                        .fillMaxSize()
                        .background(color = Color.White, shape = CircleShape)
                )
            }

            if (index != dys.size - 1) {
                Spacer(modifier = Modifier.width(10.dp))
            }
        }
    }

}
Progress animation
UI is pretty self explanatory except the dot variable at the top. Ignore that for now, it stores the animatable values that we will use later on.
Otherwise, we just iterated an array with 3 elements and created 3 dots. Well, at least dot looking Box! We also have logic to add space between dots that is executed for each iteration except last one as we don’t need space after last dot.
If you run the composable now, you will see three static dots.
Now is the time to animate dots. We will use jetpack compose Animatable API.
We should use this API if we want to animate the value dynamically, i.e in our case we want to delay animation start of the second and third dots. We can not use start delayMillis as that is considered for repeat animation as well. We just want to delay initial animation, and then continue loop without any delay.
val dots = listOf(
    remember { Animatable(0f) },
    remember { Animatable(0f) },
    remember { Animatable(0f) },
)

dots.forEachIndexed { index, animatable ->
    LaunchedEffect(animatable) {
        delay(index * 100L)
        animatable.animateTo(
            targetValue = 1f, animationSpec = infiniteRepeatable(
                animation = keyframes {
                    durationMillis = 2000
                    0.0f at 0 with LinearOutSlowInEasing
                    1.0f at 200 with LinearOutSlowInEasing
                    0.0f at 400 with LinearOutSlowInEasing
                    0.0f at 2000
                },
                repeatMode = RepeatMode.Restart,
            )
        )
    }
}
We create animation variable that will animate between 0 to 1. As previously discussed, we delay second and third dot ball animation, 100ms each. Also, we have used keyframes animation API here.
keyframes allow us to define what target value should be at particular time. We set it to 1.0 at 200ms and set it back to 0 at 400ms as we want to jump dots only for 400ms. With keyframes, we can create very cool animations that will change its rate depending on time.
Now let’s add remaining code to complete the animation
val dys = dots.map { it.value }

val travelDistance = with(LocalDensity.current) { 15.dp.toPx() }

Row(modifier) {
    dys.forEachIndexed { index, dy ->
        Box(
            Modifier
                .size(25.dp)
                .graphicsLayer {
                    translationY = -dy * travelDistance
                },
        ) {
        ...
    }
}
Here we transform Animatable array to its values and create travelDistance variable for dot jump height. Later, we configure translationY of the dot view to change its position according to animation.
We are done with the animation! Run the composition and see dots jumping in rhythm.
Wave animation
Wave animation is very much like progress animation. The difference is in the UI and also the animation property. For waves, we animate alpha and scaleX scaleY properties.
Let’s begin by adding static UI
@Composable
fun WavesAnimation(modifier: Modifier) {

    val waves = listOf(
        remember { Animatable(0f) },
        remember { Animatable(0f) },
        remember { Animatable(0f) },
        remember { Animatable(0f) },
    )

    Box(modifier) {
        // Waves
        waves.forEach { wave ->
            Box(
                Modifier
                    .size(50.dp)
                    .align(Center)
            ) {
                Box(
                    Modifier
                        .fillMaxSize()
                        .background(color = Color.White, shape = CircleShape)
                )
            }
        }

        // Mic icon
        Box(
            Modifier
                .size(50.dp)
                .align(Center)
                .background(color = Color.White, shape = CircleShape)
        ) {
            Icon(
                painter = painterResource(id = R.drawable.ic_baseline_mic_24),
                "",
                tint = Color.Black,
                modifier = Modifier
                    .size(32.dp)
                    .align(Center)
            )
        }

    }

}
Pretty basic UI stuffs. We iterated waves and added circle view for each wave. We also added a static mic icon in the center that will not be animated.
If you notice, we have used same 50dp size for all waves. Well, that’s fine, we will animate it to different size with scale transformation.
Now let’s animate the waves~
val animationSpec = infiniteRepeatable<Float>(
    animation = tween(4000, easing = FastOutLinearInEasing),
    repeatMode = RepeatMode.Restart,
)

waves.forEachIndexed { index, animatable ->
    LaunchedEffect(animatable) {
        delay(index * 1000L)
        animatable.animateTo(
            targetValue = 1f, animationSpec = animationSpec
        )
    }
}

val dys = waves.map { it.value }

Box(modifier) {
    // Waves
    dys.forEach { dy ->
        Box(
            Modifier
                .size(50.dp)
                .align(Center)
                .graphicsLayer {
                    scaleX = dy * 4 + 1
                    scaleY = dy * 4 + 1
                    alpha = 1 - dy
                },
        )
        ...
}
Here, just like progress animation, we created animation that will animate between 0 to 1 infinitely. Based on that, we scaled waves and animated alpha between 1 to 0, that will make waves disappear at the animation end when they are scaled maximum.
That’s it, if you run the composable now, waves will animate!
Conclusion
That will be it for today. As we observed, Jetpack compose animation APIs are very straightforward and clear to use. Also, they allow us to write complex animations with very few lines of code.
If we had to write the above animations using traditional android views, the implementation will not be as clear as above and it might take lots of lines of code and our brain too!
Full source code of the animation is available on github.
Happy animating!
Related Useful Article


Get started today
Let's build the next
big thing!
Let's improve your business's digital strategy and implement robust mobile apps to achieve your business objectives. Schedule Your Free Consultation Now.
Get Free Consultation
Get started today
Let's build the next big thing!
Let's improve your business's digital strategy and implement robust mobile apps to achieve your business objectives. Schedule Your Free Consultation Now.
Get Free Consultation