Android OpenGL ES: Step-by-Step Guide
Introduction
OpenGL stands for Open Graphics Library. It is a platform-independent API that allows you to create hardware accelerated graphics fast!!
OpenGL ES, short for OpenGL for Embedded Systems, is a subset of the API. It is a very low-level API.
Update: Here’s the second part of this series which you’ll find useful.
Sponsored
We are what we repeatedly do. Excellence, then, is not an act, but a habit. Try out Justly and start building your habits today!
Prerequisites
Ok, so what should you need before we start learning OpenGL? you’ll need:
- the latest version of Android Studio
- an Android device that supports OpenGL ES 2.0 or higher
There are two classes in the Android framework that allow you to create and manipulate graphics with the OpenGL ES API: GLSurfaceView and GLSurfaceView.Renderer.
The GLSurfaceView is a special view that manages OpenGL surfaces for us and draws it into the Android view system.
Let’s see the implementation of the GLSurfaceView.Renderer class. There are three methods in a renderer.
onSurfaceCreated()- Called once for each Surface view’s cycle to setup the view’s OpenGl ES environment.onDrawFrame()- Called for each redraw of the view.onSurfaceChanged()- Called if the geometry of the view changes, for example when the device's screen orientation changes.
Let's get Started!
Declare OpenGl ES use in manifest
<uses-feature
        android:glEsVersion="0x00020000"
        android:required="true" />
We must need to add this declaration in the manifest to use OpenGL ES 2.0 API.
Create an activity to hold the view
class MainActivity : AppCompatActivity() {

    private var gLView: GLSurfaceView? = null

    override fun onCreate(savedInstanceState: Bundle?) {
        super.onCreate(savedInstanceState)
        gLView = MyGLSurfaceView(this);
        setContentView(gLView);
    }
}
Implement GLSurfaceView class
A GLSurfaceView is a specialized view where you can draw OpenGL ES graphics. It does not do much by itself. The actual drawing of objects is controlled in the GLSurfaceView.Renderer that you set on this view.
class MyGLSurfaceView(context: Context) : GLSurfaceView(context) {
    private val renderer: MyGLRenderer

    init {
        // Create an OpenGL ES 2.0 context
        setEGLContextClientVersion(2)
        renderer = MyGLRenderer()
        // Set the Renderer for drawing on the GLSurfaceView
        setRenderer(renderer)
    }

}
Create Renderer
The renderer controls what is drawn on the GLSurfaceView. Here is a very basic implementation of an OpenGL ES renderer, that does nothing more than draw a black background in the GLSurfaceView
class MyGLRenderer : GLSurfaceView.Renderer {
    override fun onDrawFrame(unused: GL10) {
        //Redraw background
    }
    override fun onSurfaceCreated(gl: GL10, config: EGLConfig) {
        GLES20.glClearColor(0.0f, 0.0f, 0.0f, 1.0f)
    }

    override fun onSurfaceChanged(unused: GL10, width: Int, height: Int) {
        // Set the viewport to the size of the view.
        GLES20.glViewport(0, 0, width, height)
    }
}
If you compile and run it you will see a nice black screen.
Now, it’s time to draw our first triangle on the screen. Before we start we must need to go through the basic step of drawing with OpenGL ES.
Let’s start with Vertices & Buffer first.
private val vertices = floatArrayOf(
    // X, Y, Z,
    0.0f, 0.5f, 0.0f,
    0.5f, -0.5f, 0.0f,
    -0.5f, -0.5f, 0.0f,
)
private var vertexBuffer: FloatBuffer =
    // (number of coordinate values * 4 bytes per float)
    ByteBuffer.allocateDirect(vertices.size * 4).run {
        // use the device hardware's native byte order
        order(ByteOrder.nativeOrder())

        // create a floating point buffer from the ByteBuffer
        asFloatBuffer().apply {
            // add the coordinates to the FloatBuffer
            put(vertices)
            // set the buffer to read the first coordinate
            position(0)
        }
    }
vertices float array defines our triangle vertex. OpenGL by default assumes a square screen. The area in which we are going to draw spans from -1.0 to 1.0. Starting from (-1.0,1.0) top-left to (-1.0,-1.0) bottom-left.
vertexBuffer’s code seems confusing, but remember this is just an extra step required to pass our data to OpenGL. This float buffer occupies extra space in GPU for us.
Before we dive into detail, let’s first learn the basics about shader. At least one VertexShader & FragmentShader is required to draw shapes on the screen.
private val vertexShaderCode =
    "attribute vec4 vPosition;" +
            "void main() {" +
            "  gl_Position = vPosition;" +
            "}"

private val fragmentShaderCode =
    "precision mediump float;" +
            "uniform vec4 vColor;" +
            "void main() {" +
            "  gl_FragColor = vColor;" +
            "}"
VertexShader perform the operation on each vertex, while FragmentShader fill the shape with color or texture. Basically FragmentShader receive input from the output of VertexShader.
In the vertexShaderCode we specified one attribute which is the position of our vertex. This position comes from vertexBuffer that we specified earlier. In other hand in fragmentShaderCode has vColor attribute which is the color of our shape.
Before we use our shader we need to create a shader resource. Let’s create one common function to create vertexShader and fragmentShader resource
fun loadShader(type: Int, shaderCode: String): Int {

    // create a vertex shader type (GLES20.GL_VERTEX_SHADER)
    // or a fragment shader type (GLES20.GL_FRAGMENT_SHADER)
    return GLES20.glCreateShader(type).also { shader ->

        // add the source code to the shader and compile it
        GLES20.glShaderSource(shader, shaderCode)
        GLES20.glCompileShader(shader)
    }
}
glCreateShader returns the shader resource that has been created.
private var mProgram: Int
val vertexShader: Int = loadShader(GLES20.GL_VERTEX_SHADER,vertexShaderCode)
val fragmentShader: Int = loadShader(GLES20.GL_FRAGMENT_SHADER,fragmentShaderCode)
Init
{
   ....
// create empty OpenGL ES Program
mProgram = GLES20.glCreateProgram().also {

    // add the vertex shader to program
    GLES20.glAttachShader(it, vertexShader)

    // add the fragment shader to program
    GLES20.glAttachShader(it, fragmentShader)

    // creates OpenGL ES program executables
    GLES20.glLinkProgram(it)
}
}
Before we start the linking process, we must need to create our shader program. Each shader program must have at least one VertexShader and FragmentShader.
Now it’s time to draw our shape by using this program
const val COORDS_PER_VERTEX = 3
// Set color with red, green, blue and alpha (opacity) values
val color = floatArrayOf(0.62f, 0.62f, 0.62f, 1.0f)
private val vertexCount: Int = vertices.size / COORDS_PER_VERTEX
private val vertexStride: Int = COORDS_PER_VERTEX * 4 // 4 bytes per vertex
fun draw() {
    // Add program to OpenGL ES environment
    GLES20.glUseProgram(mProgram)

    // get handle to vertex shader's vPosition member
    GLES20.glGetAttribLocation(mProgram, "vPosition").also {

        // Enable a handle to the triangle vertices
        GLES20.glEnableVertexAttribArray(it)

        // Prepare the triangle coordinate data
        GLES20.glVertexAttribPointer(
            it,
            COORDS_PER_VERTEX,
            GLES20.GL_FLOAT,
            false,
            vertexStride,
            vertexBuffer
        )

        // get handle to fragment shader's vColor member
        GLES20.glGetUniformLocation(mProgram, "vColor").also { colorHandle ->

            // Set color for drawing the triangle
            GLES20.glUniform4fv(colorHandle, 1, color, 0)
        }

        // Draw the triangle
        GLES20.glDrawArrays(GLES20.GL_TRIANGLES, 0, vertexCount)

        // Disable vertex array
        GLES20.glDisableVertexAttribArray(it)
    }
}
Let’s see the process of drawing line by line.
glUseProgram() method add shader program to OpenGL.
glGetAttribLocation() bind vertex shader’s vPosition attribute.
glEnableVertexAttribArray() enable the right attribute of vertex shader.
glVertexAttribPointer() tells OpenGL to use this data and feed it into the vertex shader and apply it to our position attribute. We also need to tell OpenGL how many elements there are between each vertex or the stride. This method has six parameters, the first one is the position, second is the size of the vertex. In our case, we concern about position [x,y,z] so size is 3. The third parameter is for the type of vertex which is GLES20.GL_FLOAT . The fourth parameter is used to specify whether our data is normalized or not, in our case our data are already in normalized form. The fifth parameter vertexStride specifies the number of elements in between the vertex position. And the last parameter is for our vertex buffer.
glGetUniformLocation specify the vColor attribute of FragmentShader.
glDrawArrays draw the triangle. The first parameter tells OpenGL which type of element you want to draw, the second parameter is for the position of starting component of the vertex, and the third one is for the size of the vertex.
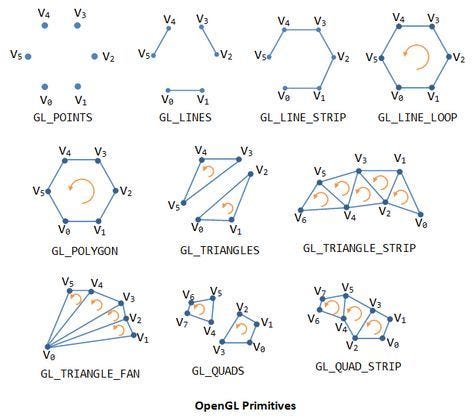
We can draw lines, points, polygons, triangles, etc.

Now at the end, we need to disable vertex array attributes by calling glDisableVertexAttribArray.
Our final Triangle class looks like
package com.example.opengl

import android.opengl.GLES20
import java.nio.ByteBuffer
import java.nio.ByteOrder
import java.nio.FloatBuffer

const val COORDS_PER_VERTEX = 3

private val vertices = floatArrayOf(
    // X, Y, Z,
    0.0f, 0.5f, 0.0f, //TOP
    0.5f, -0.5f, 0.0f, //LEFT
    -0.5f, -0.5f, 0.0f, //RIGHT
)

class Triangle {
    private var mProgram: Int
    private val vertexCount: Int = vertices.size / COORDS_PER_VERTEX
    private val vertexStride: Int = COORDS_PER_VERTEX * 4 // 4 bytes per vertex

    private val vertexShaderCode =
        "attribute vec4 vPosition;" +
                "void main() {" +
                "  gl_Position = vPosition;" +
                "}"

    private val fragmentShaderCode =
        "precision mediump float;" +
                "uniform vec4 vColor;" +
                "void main() {" +
                "  gl_FragColor = vColor;" +
                "}"

    private var vertexBuffer: FloatBuffer =
        // (number of coordinate values * 4 bytes per float)
        ByteBuffer.allocateDirect(vertices.size * 4).run {
            // use the device hardware's native byte order
            order(ByteOrder.nativeOrder())

            // create a floating point buffer from the ByteBuffer
            asFloatBuffer().apply {
                // add the coordinates to the FloatBuffer
                put(vertices)
                // set the buffer to read the first coordinate
                position(0)
            }
        }

    // Set color with red, green, blue and alpha (opacity) values
    val color = floatArrayOf(0.62f, 0.62f, 0.62f, 1.0f)

    init {

        val vertexShader: Int = loadShader(GLES20.GL_VERTEX_SHADER, vertexShaderCode)
        val fragmentShader: Int = loadShader(GLES20.GL_FRAGMENT_SHADER, fragmentShaderCode)

        // create empty OpenGL ES Program
        mProgram = GLES20.glCreateProgram().also {

            // add the vertex shader to program
            GLES20.glAttachShader(it, vertexShader)

            // add the fragment shader to program
            GLES20.glAttachShader(it, fragmentShader)

            // creates OpenGL ES program executables
            GLES20.glLinkProgram(it)
        }

    }

    fun loadShader(type: Int, shaderCode: String): Int {

        // create a vertex shader type (GLES20.GL_VERTEX_SHADER)
        // or a fragment shader type (GLES20.GL_FRAGMENT_SHADER)
        return GLES20.glCreateShader(type).also { shader ->

            // add the source code to the shader and compile it
            GLES20.glShaderSource(shader, shaderCode)
            GLES20.glCompileShader(shader)
        }
    }

    fun draw() {
        // Add program to OpenGL ES environment
        GLES20.glUseProgram(mProgram)

        // get handle to vertex shader's vPosition member
        GLES20.glGetAttribLocation(mProgram, "vPosition").also {

            // Enable a handle to the triangle vertices
            GLES20.glEnableVertexAttribArray(it)

            // Prepare the triangle coordinate data
            GLES20.glVertexAttribPointer(
                it,
                COORDS_PER_VERTEX,
                GLES20.GL_FLOAT,
                false,
                vertexStride,
                vertexBuffer
            )

            // get handle to fragment shader's vColor member
            GLES20.glGetUniformLocation(mProgram, "vColor").also { colorHandle ->

                // Set color for drawing the triangle
                GLES20.glUniform4fv(colorHandle, 1, color, 0)
            }

            // Draw the triangle
            GLES20.glDrawArrays(GLES20.GL_TRIANGLES, 0, vertexCount)

            // Disable vertex array
            GLES20.glDisableVertexAttribArray(it)
        }
    }
}
Once you have all this code in place, to start the drawing process we required to call draw() from our rendered’s onDrawFrame() method.
class MyGLRenderer : GLSurfaceView.Renderer {
    private lateinit var triangle: Triangle

    override fun onDrawFrame(unused: GL10) {

        triangle.draw()
    }
    override fun onSurfaceCreated(gl: GL10, config: EGLConfig) {
        ....
        triangle = Triangle()
    }

    override fun onSurfaceChanged(unused: GL10, width: Int, height: Int) {
        // Set the viewport to the size of the view.
        GLES20.glViewport(0, 0, width, height)
    }
}
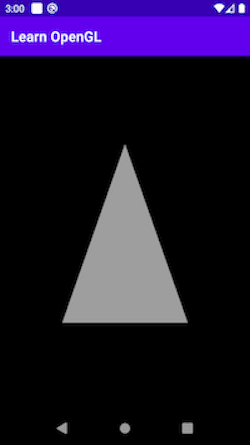
When you run your application, you will see a nice gray triangle on the screen.

Related Useful Articles


Get started today
Let's build the next
big thing!
Let's improve your business's digital strategy and implement robust mobile apps to achieve your business objectives. Schedule Your Free Consultation Now.
Get Free Consultation
Get started today
Let's build the next big thing!
Let's improve your business's digital strategy and implement robust mobile apps to achieve your business objectives. Schedule Your Free Consultation Now.
Get Free Consultation