Websocket Alternative: How to use Firestore to Listen to Realtime Events
Background
Imagine you’re building a real-time chat application where users can communicate instantly with each other, or a collaborative document editing tool similar to Google Docs.
In such applications, changes made by one user must be immediately reflected for all other users. Websockets can do that for us, but then we need to dive into managing different events that are being exchanged between two clients (for ex. A mobile application and a web app).
Ah, you got it right! Firestore, a NoSQL document database from Firebase, offers excellent real-time capabilities, and integrating it with Vue 3 can help us achieve the desired real-time functionality seamlessly.
In this blog, we’ll walk through how to configure Firestore to listen to real-time events in a Vue 3 application. We’ll explore a practical example, discuss potential applications, and provide detailed code examples to demonstrate how two different apps can listen and respond to each other’s events.
Sponsored
We are what we repeatedly do. Excellence, then, is not an act, but a habit. Try out Justly and start building your habits today!
Scenarios and Applications
Before diving into the code, let’s consider some real-world scenarios where real-time event listening is indeed needed.
- Real-Time Chat Applications: Users can send and receive messages instantly without refreshing the page.
- Collaborative Editing Tools: Multiple users can edit documents simultaneously, with changes reflected in real-time.
- Live Sports Updates: Fans can receive live scores and updates during a game.
- Stock Market Dashboards: Investors can see live price updates and market changes as they happen.
These scenarios underscore the importance of real-time data synchronization, making Firestore a perfect match.
Why Choose Firestore Over WebSockets?
While WebSockets are a powerful technology for real-time communication, Firestore offers several advantages that make it a better choice for many applications.
- Simplicity: Firestore provides a higher-level API that simplifies the implementation of real-time updates, reducing the complexity of managing socket connections and message parsing.
- Scalability: Firestore automatically scales with your application’s usage, handling large numbers of concurrent connections and data without requiring extensive infrastructure management.
- Offline Support: Firestore has built-in offline data persistence, allowing applications to function even when the user is offline and synchronize changes when connectivity is restored.
- Security: Firestore integrates seamlessly with Firebase Authentication and Firebase Security Rules, making managing user authentication and data access controls easier.
- Integration: Firestore is part of the Firebase ecosystem, providing easy integration with other Firebase services like Cloud Functions, Cloud Messaging, and Analytics.
Prerequisites
- A Vue.js app
- The Firebase project along with the Firestore setup
I’m assuming that you’ve already set up a Firebase project and Firestore database. Let’s move toward implementation. Consider having a look at How to configure Firestore, if not.
To better understand, we will implement two different Vue apps that will listen to events from each other. On a side note, Any of them or both can be replaced with another client like a Mobile application.
- First app is being used by Alex
- Second app is being used by Bob
Let’s create the first app Alex(For Alex) and we will create a similar second app Bob(For Bob) later.
Configure Firestore
Install Firebase in the Vue project
npm install firebaseConfigure Firestore in Vue 3
Create a firebase.js file in the src directory to initialize Firestore and add the code below.
P.S. Don’t forget to replace the placeholder strings with your actual Firebase configuration values.
// src/firebase.js

import { initializeApp } from 'firebase/app';
import { getFirestore } from 'firebase/firestore';

const firebaseConfig = {
  apiKey: "YOUR_API_KEY",
  authDomain: "YOUR_AUTH_DOMAIN",
  projectId: "YOUR_PROJECT_ID",
  storageBucket: "YOUR_STORAGE_BUCKET",
  messagingSenderId: "YOUR_MESSAGING_SENDER_ID",
  appId: "YOUR_APP_ID"
};

// Initialize Firebase
const app = initializeApp(firebaseConfig);
const db = getFirestore(app);

export { db };- The code above initializes the Firebase app and Firestore instance, which can be used at other places.
Create collection
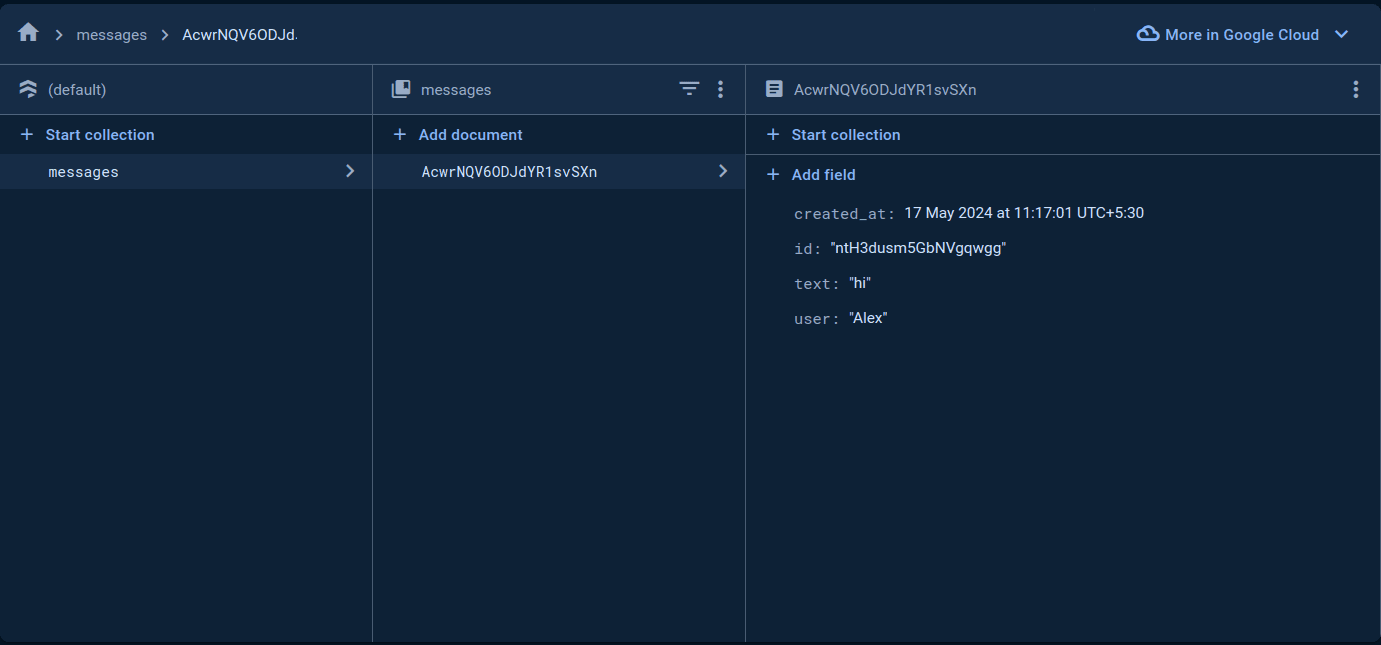
Create collection messages in the firestore. The document fields will be,
- id (string) -> unique identifier(random)
- text (string)-> message from a user
- user(string) -> name of the sender (Alex or Bob)
- created_at(timestamp) -> message sent date-time
The collection should look like below.
Configure Chat app
Remove all the code from App.vue and routes from index.js.
Display all messages
<template>
  <div>
    <h1>Alex's device</h1>
    <ul>
      <li v-for="message in messages" :key="message.id">
        {{ message.user }} : {{ message.text }}
      </li>
    </ul>
  </div>
</template>

<script setup>
import {
  collection,
  query,
  orderBy,
  getDocs,
} from "firebase/firestore";
import { db } from "./firebase";
import { ref, onMounted } from "vue";

const messages = ref([]);

onMounted(async () => {
  // fetches all the "messages" in ascending order of created_at
  const q = query(collection(db, "messages"), orderBy("created_at"));
  const querySnapshot = await getDocs(q);
  messages.value = querySnapshot.docs.map((doc) => ({
    id: doc.id,
    text: doc.data().text,
    user: doc.data().user,
  }));
});
</script>

<style scoped>
ul {
  list-style-type: none;
  padding: 0;
}

li {
  background: #f1f1f1;
  margin: 5px 0;
  padding: 10px;
  border-radius: 5px;
}
</style>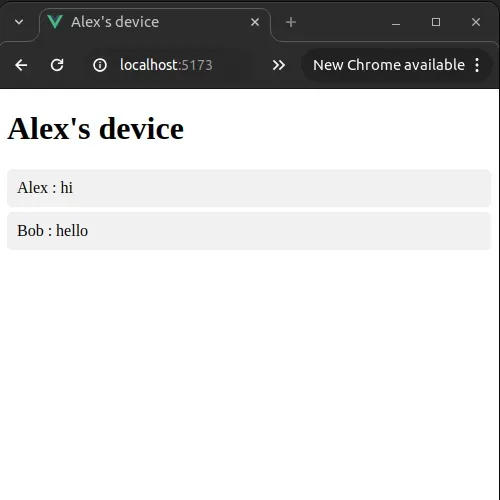
Send new message
Let’s add an input field through which the user can send a new message in chat.
Add the below code after <li></li> . Add styles in the styles section.
<input v-model="newMessage" @keyup.enter="sendMessage" placeholder="Type a message" />
<button @click="sendMessage">Send</button>

<style>
  input {
  padding: 10px;
  box-sizing: border-box;
}

button {
  padding: 10px;
  background: #007bff;
  color: white;
  border: none;
  border-radius: 5px;
  cursor: pointer;
  margin-left: 10px;
}
</style>
Update the <script></script> section as below, it will manage sending and adding messages to the collection messages .
<script setup>
import {
  collection,
  query,
  orderBy,
  addDoc,
  getDocs,
} from "firebase/firestore";
import { db } from "./firebase";
import { ref, onMounted } from "vue";

const messages = ref([]); // empty list
const newMessage = ref(""); // empty new message

onMounted(async() => {
  const q = query(collection(db, "messages"), orderBy("created_at"));
  const querySnapshot = await getDocs(q); // fetch messages in the ascending order of created_at
  messages.value = querySnapshot.docs.map(doc => ({ id: doc.id, text: doc.data().text, user: doc.data().user }));
});

// save message to "messages" collection
const sendMessage = async () => {
  if (newMessage.value.trim()) {
    await addDoc(collection(db, "messages"), {
      text: newMessage.value,
      user: "Alex",
      created_at: new Date(),
    });
    newMessage.value = "";
  }
};
</script>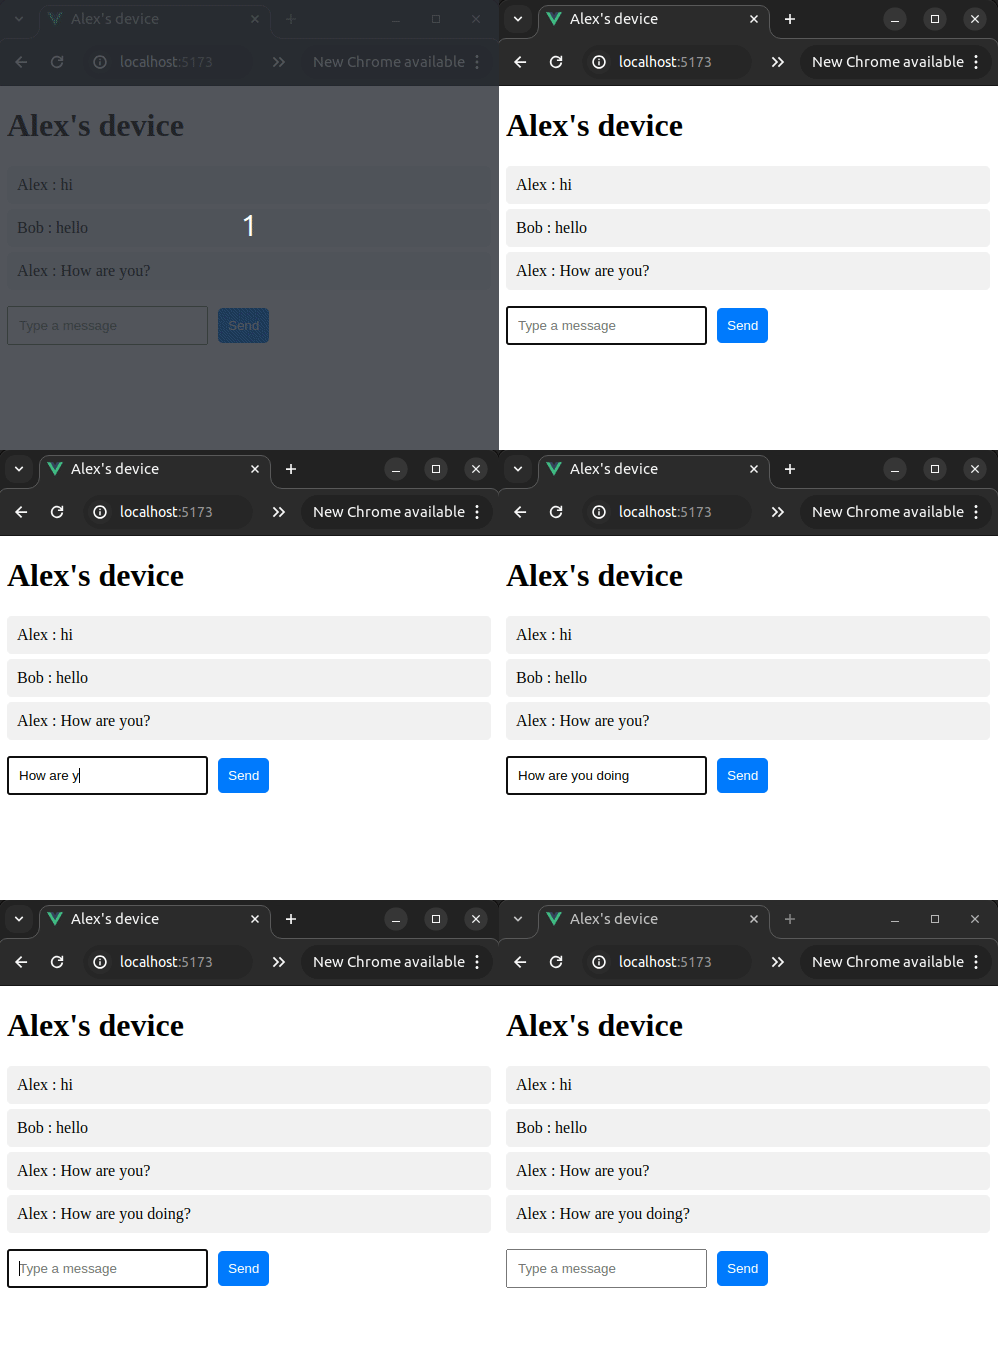
Listen to real-time events
Here comes a twist in the story. Until now we fetched messages and added new messages. Now we want to catch real updates on the messages collection.
That means when any document is added/updated in the messages collection it will receive an event to update the existing data. Don’t worry! It’s not rocket science😅.
For listening events, there’s a method onSnapShot, we will replace our current getDocs method as onSnapShot can manage fetching and listening.
Refer to Firebase Firestore Guide for more details.
Add the below code to App.vue
<template>
  <div>
    <h1>Alex's device</h1>
    <ul>
      <li v-for="message in messages" :key="message.id">
        {{ message.user }} : {{ message.text }}
      </li>
    </ul>
    <input
      v-model="newMessage"
      @keyup.enter="sendMessage"
      placeholder="Type a message"
    />
    <button @click="sendMessage">Send</button>
  </div>
</template>

<script setup>
import {
  collection,
  query,
  orderBy,
  addDoc,
  onSnapshot,
} from "firebase/firestore";
import { db } from "./firebase";
import { ref, onMounted } from "vue";

const messages = ref([]); // empty list
const newMessage = ref(""); // empty new message

onMounted(() => {
  const q = query(collection(db, "messages"), orderBy("created_at"));
  onSnapshot(q, (snapshot) => { // listen to realtime events and fetch messages
    messages.value = snapshot.docs.map((doc) => ({
      id: doc.id,
      text: doc.data().text,
      user: doc.data().user,
    }));
  });
});

// sends new message
const sendMessage = async () => {
  if (newMessage.value.trim()) {
    await addDoc(collection(db, "messages"), {
      text: newMessage.value,
      user: "Alex",
      created_at: new Date(),
    });
    newMessage.value = "";
  }
};
</script>

<style scoped>
ul {
  list-style-type: none;
  padding: 0;
}

li {
  background: #f1f1f1;
  margin: 5px 0;
  padding: 10px;
  border-radius: 5px;
}

input {
  padding: 10px;
  box-sizing: border-box;
}

button {
  padding: 10px;
  background: #007bff;
  color: white;
  border: none;
  border-radius: 5px;
  cursor: pointer;
  margin-left: 10px;
}
</style>
Create an App for Bob
You can create the same vue app for Bob as alex, or you can create an app on other platforms too like mobile.
For now, Copy the alex app and create the same app named bob. Replace Alex with Bob everywhere in the App.vue. It’s that simple!
Let’s run both apps…
Yay! We have our chat apps handy 🎉. You will find the chat interfaces below. Let’s check if it works in real.
- Update the document data directly inside the collection

- Add new documents to the collection
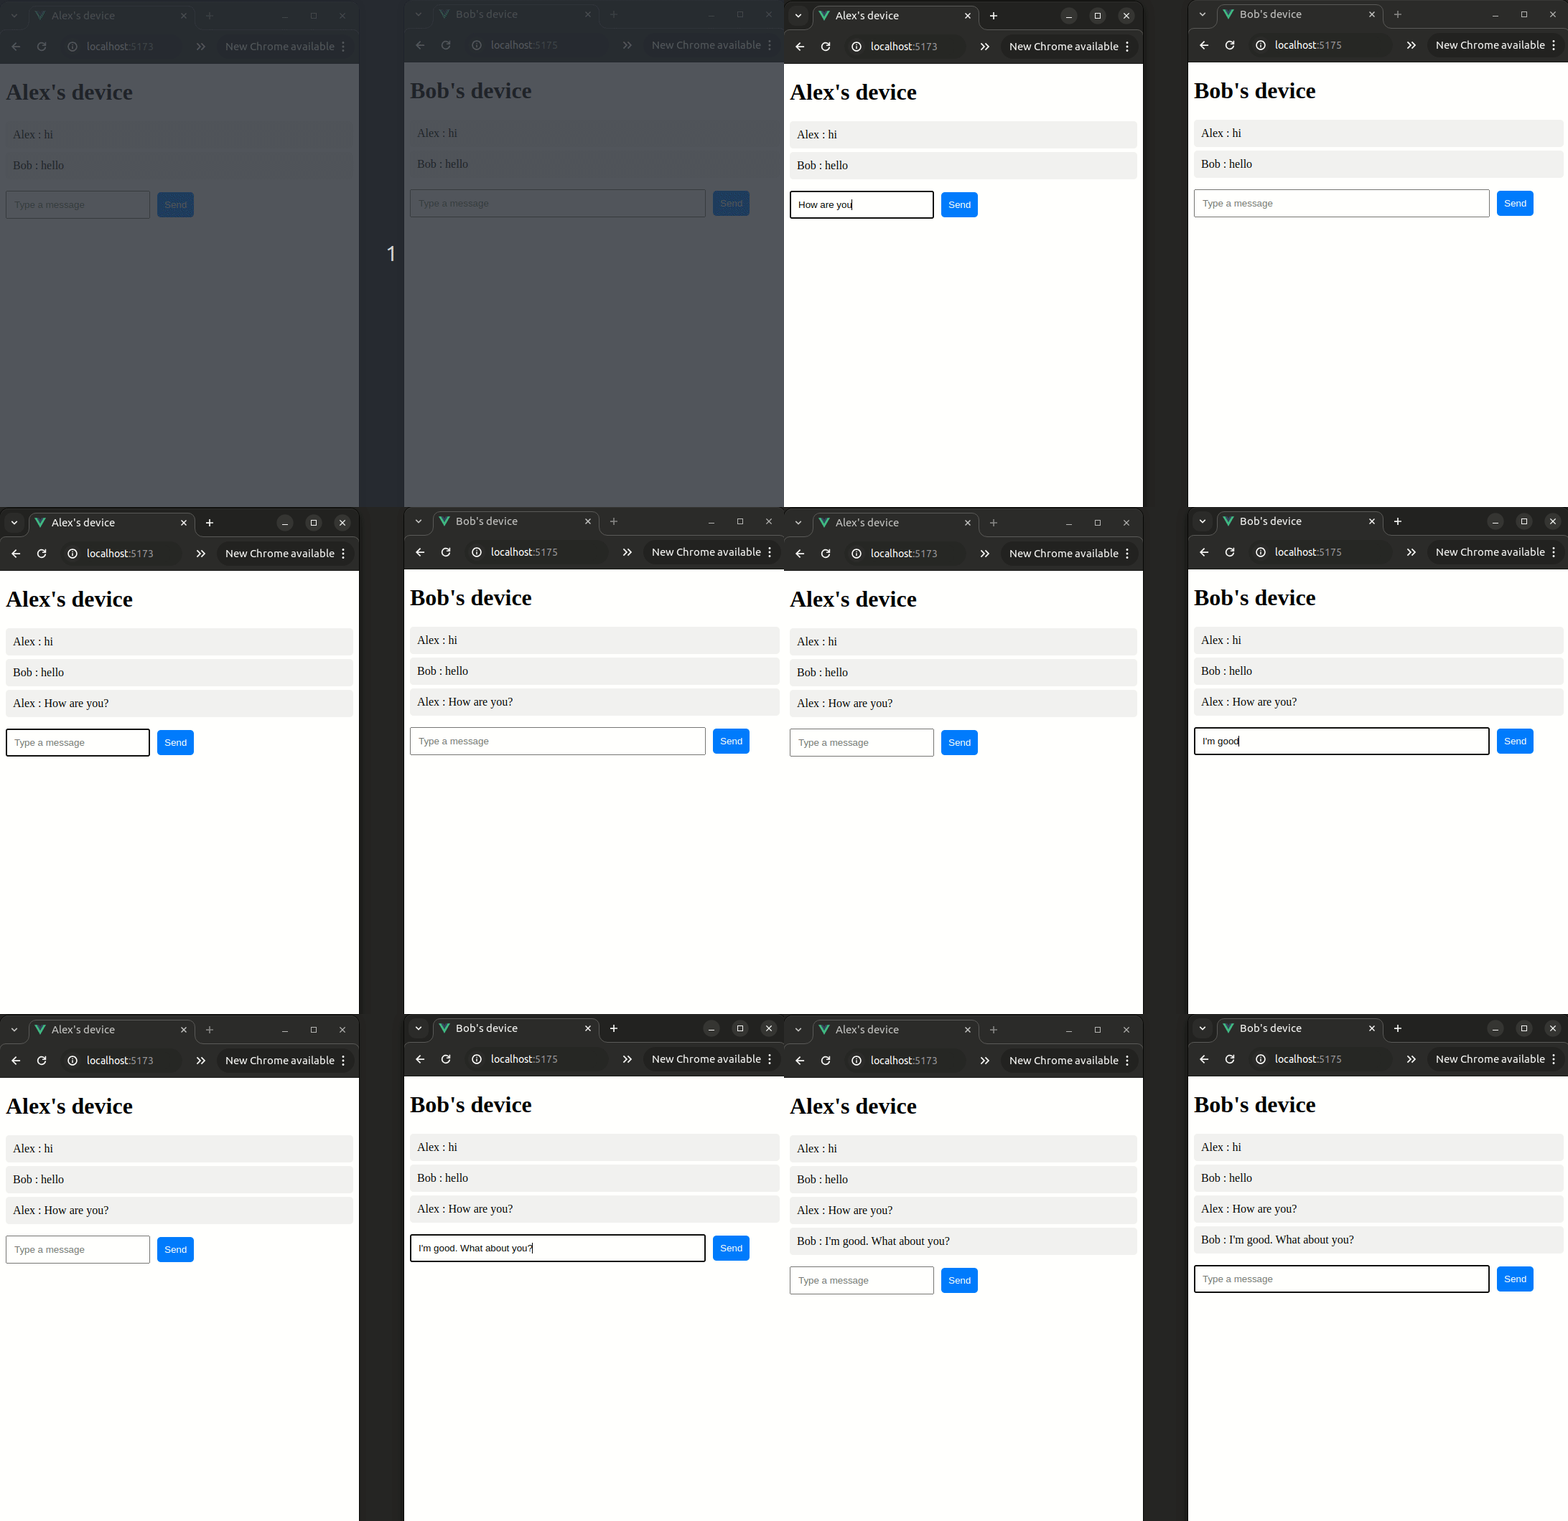
In this blog, we have created two web apps only, but similar can be done for web and mobile combo or two mobile apps as well.
Conclusion
- Integrating Firestore for real-time events listening opens up a world of possibilities for building dynamic, responsive applications.
- From chat apps to collaborative tools, real-time data synchronization ensures that users have the most up-to-date information without needing to refresh their pages.
- Firestore offers a robust, scalable, and easy-to-use solution for real-time applications, making it a compelling alternative to WebSockets.
- Its simplicity, offline support, built-in security, and seamless integration with the Firebase ecosystem can significantly speed up development and enhance your application’s functionality.
In this blog, we went through how to set up Firestore, with the Vue project to listen to real-time events, and even create two different applications that can communicate through Firestore.
So, go ahead and start building your next real-time application with Firestore and your favorite platform. The sky’s the limit!
References
- How to add the Firebase project in the app — https://firebase.google.com/docs/web/setup
- What is Firestore? — https://firebase.google.com/docs/firestore
- Basic CRUD operations with Firestore — https://firebase.google.com/docs/firestore/quickstart
- Real-time event listening — https://firebase.google.com/docs/firestore/query-data/listen
Similar Articles

