How to Send Emails with Cloud Functions & Firestore in Firebase
Background
Welcome to our blog where we'll talk about using cloud technology to make sending emails easier. Imagine you have a website where people sign up for newsletters. When someone signs up, you want to send them a welcome email. Cloud functions help with this - they can automatically send emails, making sure users get a warm welcome right away.
Imagine a scenario where a user has a question or feedback about an app feature and wishes to communicate this directly to the developer.
By focusing on the Firebase-send-mail extension for handling email communication, we aim to showcase the practicality and efficiency of using cloud functions for enhancing user support functionalities within your applications.
Sponsored
We are what we repeatedly do. Excellence, then, is not an act, but a habit. Try out Justly and start building your habits today!
Step 1: Set Up Your Firebase Project
Before you use any Firebase extensions, you need to have a Firebase project set up. If you haven't already, follow these steps:
1. Create a Firebase Project:
- Go to the Firebase console: Firebase Console.
- Click on "Add project," and follow the on-screen instructions to create a new Firebase project.
2. Configure Firebase CLI:
- Install the Firebase CLI by running
npm install -g firebase-toolsin your command line. - Firebase CLI reference - Authenticate the CLI by running
firebase loginand following the prompts.
Step 2: Install the firebase-send-email Extension
To install the extension, you can follow either of the methods detailed below:
Using the Firebase Console:
- Navigate to the Firebase console.
- Locate and select the Extensions tab.
- Search for and choose the Firestore Trigger Email extension.
- Follow the on-screen instructions to install it.
Using the Firebase CLI:
Run the following command in your command line interface:
firebase ext:install firebase/firestore-send-email --project=your-project-idReplace your-project-id with your actual Firebase project ID. This command will guide you through the installation process directly from your terminal.
When installing the Firestore Trigger Email extension, whether through the Firebase console or using the CLI, you'll need to provide some basic configuration details to set it up correctly.
Here's a guide on the essential configurations you'll need to provide:
1. SMTP Connection URI:
- This is a critical parameter that allows the extension to connect to your SMTP server for sending emails.
- It should follow the format:
smtp://USERNAME:PASSWORD@HOST:PORT or smtp://USERNAME@HOST:PORT
For example: smtp://example@example.com:password@smtp.example.com:465
2. Firebase Collection Name:
- Specify the name of the Firestore collection that the extension will monitor to trigger email sends. By default, this is usually set to
mail, but you can name it according to your preference. - This collection will need to contain documents with fields matching your email template requirements, such as
to,subject, andmessage
3. Default From Address:
- This configuration sets the default email address from which all outgoing emails will be sent. This email address must be verified with your SMTP provider to ensure successful delivery of emails.
- Example:
noreply@yourdomain.com
4. SMTP Password:
Part of your SMTP connection URI, is the password for the SMTP account you are using to send emails.
To generate a password:
- go to
https://myaccount.google.com/-> Security - Turn on the 2-step verification
- Go to "App passwords"
- Provide a name for the app password
- You will get one popup showing your password, copy it
- Go back to firebase console -> extensions -> Trigger email extension -> click reconfigure and add your password in
SMTP password(Optional)field.
Once you've completed the basic configuration, you are all set to begin sending emails.
Step 3: Write Cloud Functions to Send Email
With the firebase-send-email extension installed and configured, the next step is to write callable Cloud Functions that leverage the firebase-send-email extension to send emails.
Specifically, we'll create a callable Cloud Function that triggers upon the submission of a contact request by the client.
1. Setting Up Firebase Cloud Functions:
Before we begin writing our Cloud Function, ensure you have the Firebase CLI installed and your project initialized.
If not, you can install it via npm and initialize your project by running firebase init functions in your terminal.
2. Writing the Cloud Function:
We'll write a callable Cloud Function triggered by a client request to submit a contact request. This function will extract the necessary information from the request body and use the firebase-send-email extension to send an email.
const {onCall, HttpsError} = require("firebase-functions/v2/https");
const admin = require("firebase-admin");
// Initialize the default Firebase app
admin.initializeApp();

exports.sendSupportRequest = onCall(async (request) => {

    const db = admin.firestore();
    var data = request.data;

    await db.collection('support_requests')
        .add({
            to: ["example@gmail.com"],
            message: {
                subject: "Support Request",
                html: <HTML TEMPLET goes here>,
            },
        }).then(() => console.log('Queued email for delivery!'));

});
The sendSupportRequest function, triggered by a client call, adds a document to the Firestore collection support_requests. This document contains email details, such as recipient and message content, essential for processing support requests.
The firebase-send-email extension monitors the support_requests collection. Once the document is added to Firestore, the extension detects the new document and extracts the email details from it.
It then utilizes the configured email service provider to send an email to the specified recipients, using the content provided in the Firestore document.
Here's how you can trigger the above cloud function with the required details in your Android application.
val data = mapOf(
            "title" to title,
            "description" to description,
            "device_name" to device.deviceName(),
            "app_version" to device.getAppVersionCode().toString(),
            "device_os" to device.getDeviceOsVersion(),
            "user_id" to userId,
            "attachments" to attachments.map { it.toString() }
        )

functions.getHttpsCallable("sendSupportRequest").call(data).await()
Configure HTML template
When sending emails through Cloud Functions, there are two methods to include templates:
- Direct Input: You can pass the template directly into your Cloud Function.
- Firebase-Send-Email Extension: Utilize the Firebase-Send-Email extension. Specify the collection and create a document containing the HTML template and other necessary fields.
Specify the template in the cloud function
We can easily specify the email template within our Cloud Function. Here's how to showcase requested data in a table:
await db.collection('support_requests')
    .add({
       to: ["example@gmail.com"],
        message: {
            subject: "Support Request",
             html: `
             <!DOCTYPE html>
            <html lang="en">
            <head>
                <meta charset="UTF-8">
                <meta name="viewport" content="width=device-width, initial-scale=1.0">
                <meta http-equiv="X-UA-Compatible" content="IE=edge,chrome=1">
                <meta name="HandheldFriendly" content="true">
                <style>
                    table {
                        width: 80%;
                        border-collapse: collapse;
                    }

                    table, th, td {
                        border: 1px solid black;
                    }

                    th {
                        font-weight: bold;
                    }

                    th, td {
                        height: 30px;
                        text-align: center;
                    }
                </style>
            </head>
            <body>
            <br>
            <table>
                <tbody>
                    <tr>
                        ${Object.entries(data).map((entry, index) => {
                            const key = entry[0];
                            const value = Array.isArray(entry[1]) ? entry[1].join("</p><p>") : entry[1]; // Handle arrays specially
                            return `<tr><td>${key}</td><td>${value}</td></tr>`;
                        }).join('')}
                    </tr>
                </tbody>
            </table>
            </body>
            </html>
                `,
            },
        }).then(() => console.log('Queued email for delivery!'));
Setting Up Templates in the Firebase Console
Here's how you can set up your templates:
- Navigate to the Firebase console and locate the configurations for the
firebase-send-emailextension. - Within the extension configurations, specify the name of the Firestore collection in the "Templates collection(Optional)" field where your email templates will reside. This collection will store documents representing different email templates.
- Each document within the template collection should follow a predefined structure, with fields representing various components of the email template, such as subject, HTML content, etc.
- Optionally, you can include predefined data within the template documents, such as placeholders for dynamic content like user names, support request details, etc.
Create one collection called email_templates (use the same name that is specified in the extension)and add one doc with the id support_request in Firestore.
The HTML content will look like this,
<!DOCTYPE html>
<html lang="en">
<head>
    <meta charset="UTF-8">
    <meta name="viewport" content="width=device-width, initial-scale=1.0">
    <meta http-equiv="X-UA-Compatible" content="IE=edge,chrome=1">
    <meta name="HandheldFriendly" content="true">
    <style>
        table {
            width: 80%;
            border-collapse: collapse;
        }

        table, th, td {
            border: 1px solid black;
        }

        th {
            font-weight: bold;
        }

        th, td {
            height: 30px;
            text-align: center;
        }
    </style>
</head>
<body>
<br>
<table>
    <tbody>
        {{#each request}}
        <tr>
            <td>{{@key}}</td>
            <td>{{this}}</td>
        </tr>
        {{/each}}
    </tbody>
</table>
</body>
</html>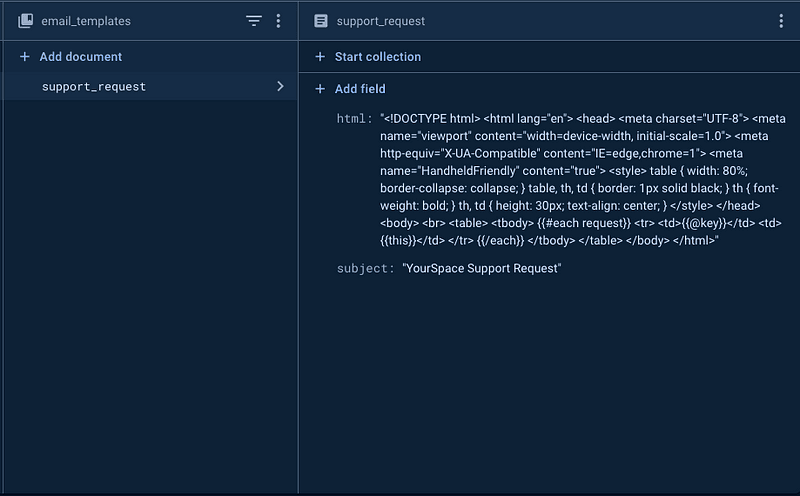
Here, our support request has dynamic data, so to add dynamic content to a template we have used HandlerBar.
With these steps, you'll have your templates set up and ready to be utilized by the Firebase-Send-Email extension.
Now, let's modify our cloud function to use the above-predefined template.
exports.sendSupportRequest = onCall(async (request) => {

    const db = admin.firestore();
    var data = request.data;

    await db.collection('support_requests')
        .add({
            to: ["example@gmail.com"],
            template: {
                name: "support_request",
                data: {
                   request: data
                },
            },
        }).then(() => console.log('Queued email for delivery!'));

});
Run this command to deploy your functions:
firebase deploy --only functions:sendSupportRequestWe're ready to send our first email. 🍻
Conclusion
Thanks for joining us as we explore the simplicity and effectiveness of utilizing cloud functions for email automation. With the Firebase-send-mail extension seamlessly integrated into your app, providing prompt user support and communication becomes a breeze.
Stay tuned for more insights on optimizing your application's functionalities with cloud technology.
Related Articles

'%3e%3crect%20opacity='0.3'%20width='253.333'%20height='256.667'%20rx='10'%20transform='matrix(0.898794%200.438371%20-0.425364%200.905022%20109.961%20230.004)'%20fill='%23F2709C'%20fill-opacity='0.2'/%3e%3crect%20opacity='0.3'%20width='211.667'%20height='188.333'%20rx='15'%20transform='matrix(0.987688%200.156434%20-0.151006%200.988533%20-40.0391%201715)'%20fill='%23FF9472'%20fill-opacity='0.2'/%3e%3crect%20opacity='0.3'%20width='150'%20height='150'%20rx='10'%20transform='matrix(0.669131%200.743145%20-0.730788%200.682605%202111.64%201603.34)'%20fill='%23F2709C'%20fill-opacity='0.2'/%3e%3crect%20opacity='0.3'%20width='165'%20height='165'%20rx='15'%20transform='matrix(-0.669131%20-0.743145%20-0.730788%200.682605%201998.3%20643.336)'%20fill='%236CCAFF'%20fill-opacity='0.2'/%3e%3crect%20opacity='0.3'%20width='128.333'%20height='128.333'%20rx='50'%20transform='matrix(0.669131%200.743145%20-0.730788%200.682605%20379.961%20958.336)'%20fill='%23B66CFF'%20fill-opacity='0.2'/%3e%3crect%20opacity='0.3'%20width='128.333'%20height='128.333'%20rx='50'%20transform='matrix(0.669131%200.743145%20-0.730788%200.682605%201859.97%202311.67)'%20fill='%23B66CFF'%20fill-opacity='0.2'/%3e%3crect%20opacity='0.3'%20width='156.667'%20height='158.333'%20rx='10'%20transform='matrix(0.891007%200.453991%20-0.440801%200.897605%20938.312%202176.67)'%20fill='%23B66CFF'%20fill-opacity='0.2'/%3e%3c/g%3e%3c/svg%3e)
