
SwiftLint Integration in Xcode and GitLab CI
Background
SwiftLint — A linting tool that enforces Swift style and conventions, loosely based on GitHub’s Swift Style Guide.
When you're working on a project that has a big team, it could be hard to maintain code style & standards, also manual code style check is always a tedious task.
Thus, it’s better to let a tool and CI do the job for us by enforcing everyone in the team to follow community standards.
The code review plays a vital role in
- Discovering the bugs before the deployment stage can save both time and money.
- Maintain a consistent coding style across all company applications.
- Equip the team members with a greater knowledge of each other’s skill sets and weaknesses, becoming more responsive to greater issues and discrepancies.
SwiftLint enforces the style guide rules that are generally accepted by the Swift community. These rules are well described in popular style guides like Ray Wenderlich’s Swift Style Guide. In short, it is a source code execution engine that follows the styles and rules of the Swift language.
SwiftLint hooks into Clang and SourceKit to use the AST representation of your source files for more accurate results. It is a tool for making your code clean and maybe avoiding bugs.
In this article, you will learn how to set up SwiftLint in your Xcode project, and how to add custom lint rules and integrate them with CI.
Get Started!
To integrate SwiftLint into the project, we need to perform the following steps:
- Installation
- Set up in XCode Project
- Integration process verification
- Configure rules
Installation
You can install it in many different ways such as installing it in your machine or adding it to your CocoaPods repo.
Install via BREW
$ brew install swiftlint
Install via Cocoapods
pod ‘SwiftLint’
Install via Mint
$ mint install realm/SwiftLint
Install using SPM
You can download and install the pre-build package SwiftLint.pkg from Github.
Set up into Xcode project
If you’ve installed SwiftLint via CocoaPods, the script should look like this:
"${PODS_ROOT}/SwiftLint/swiftlint"SwiftLint can automatically correct certain violations by adding a single command. Your script could run the below command in the script instead of just swiftlint.
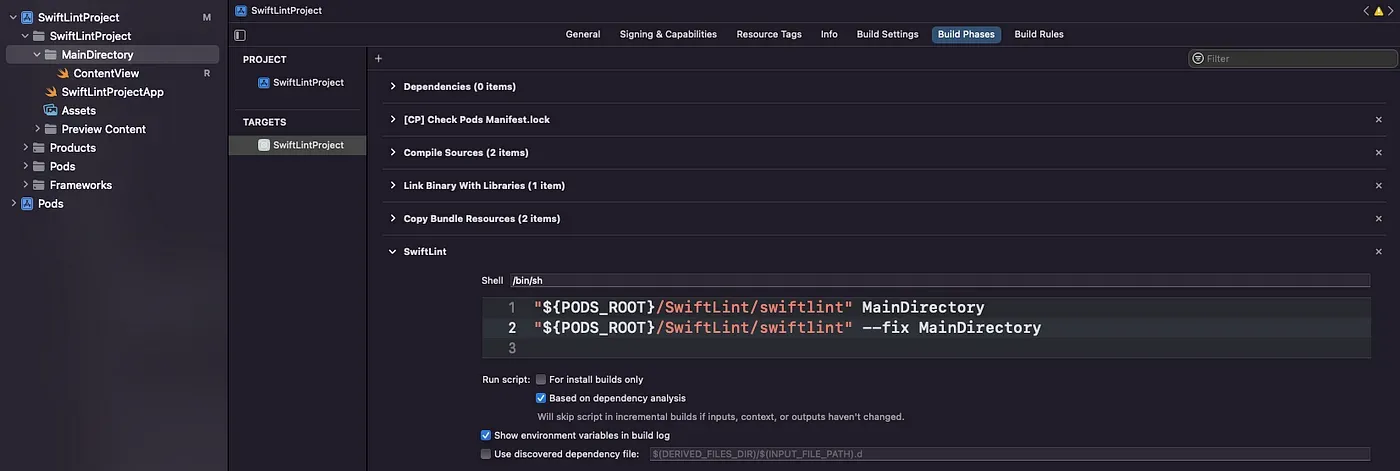
"${PODS_ROOT}/SwiftLint/swiftlint" --fixIf you want to run lint only for a specific directory, then you can do it by adding the directory name just after the script. For example, If we only want to run the lint rules on one target module named MainDirectory then the script will be like,
"${PODS_ROOT}/SwiftLint/swiftlint" MainDirectory
"${PODS_ROOT}/SwiftLint/swiftlint" --fix MainDirectory
We can run lint code checks in two ways, one by simply running the command in the terminal, and the second one by adding script.
To add a script, click the Project in the file navigator, then click the primary app target, and go to Build Phases. Click the + and select “New Run Script Phase”. Insert the above script and you can rename it as SwiftLint,
Integration Process
We’ve integrated SwiftLint into our project. Now it’s time to verify the integration.
To check your integration, build your application Product > Build (⌘B) and you will see lots of warnings/errors in your project.
That’s it. We have successfully integrated SwiftLint into our project.
You can check out all the rules on the terminal with, $ Pods/SwiftLint/swiftlint rules command. You can also use $ Pods/SwiftLint/swiftlint lint the command to list out all errors in the terminal. It works the same as the command we use, or runs without the lint keyword.
Configure Rules with file
The heart of SwiftLint tuning
We can configure what rules to check or not when using Swiftlint. To configure it, all you have to do is create a new file inside your project folder with the name .swiftlint.ymlusing the following commands.
$ touch .swiftlint.yml
$ open .swiftlint.yml
Here is the general .swiftlint.yml file. For detailed information about all these rules, you can refer to this blog or checkSwiftlint rules file.
disabled_rules:
   - trailing_whitespaceopt_in_rules:
   - empty_count
   - empty_stringexcluded:
   - Carthage
   - Pods
   - SwiftLint/Common/3rdPartyLibline_length:
    warning: 150
    error: 200
    ignores_function_declarations: true
    ignores_comments: true
    ignores_urls: truefunction_body_length:
    warning: 300
    error: 500function_parameter_count:
    warning: 6
    error: 8type_body_length:
    warning: 300
    error: 500file_length:
    warning: 1000
    error: 1500
    ignore_comment_only_lines: truecyclomatic_complexity:
    warning: 15
    error: 25reporter: "xcode"
Now, Save the configuration file and build. You will see that the number of warnings and errors is now reduced.
Which rule should be resolved first?
You can start with any of the rules and choose any order you like. There is only one point to consider, it is better to resolve line_length, function_body_length, and file_length respectively.
The reason is that while you update your project to have the right balance of line length, it probably increases the body of type length and then file length too.
Thus, it can make your work double if you do not keep this order for resolving the lint issues.
Hide Pod Warnings
You may find many Pod warnings of all third-party dependencies, to hide them you can add inhibit_all_warnings! in Pod File. If you want to hide warnings of a specific dependency then use :inhibit_warnings => true with dependency name as below.
platform :ios# ignore all warnings from all dependencies
inhibit_all_warnings!# ignore warnings from a specific dependency
pod 'FBSDKCoreKit', :inhibit_warnings => true
Then run pod install , that’s it.
Strict mode
SwiftLint with strict mode helps us to find rule violations immediately. By default, when we violate a linting rule, it raises warnings. But we’re more likely to ignore that warning by not taking it seriously. So, strict mode comes here to the rescue. Which raises errors immediately when any rule violation occurs.
swiftlint — config “$SRCROOT/.swiftlint.yml” — strictCI Setup
To make sure that the code written by all team members is in the right place with linting, you should set up SwiftLint in your continuous integration tools.
For this you just have to add one command into your CI build phase, here I’m using GitLab as a CI tool and for that, I've to use the .gitlab-ci.yml file.
The command will be the same as the command that you run in the terminal. so the command is like, Pods/SwiftLint/swiftlint where you can also add the directory name and use an auto-correct command too.
Here's our .gitlab-ci.yml as an example:
stages:
  - build
  - test
  - deploy

variables:
  LANG: "en_US.UTF-8"

build_project:
  stage: build
  script:
    - pod install --repo-update
    - Pods/SwiftLint/swiftlint
    - xcodebuild clean build -workspace "Project.xcworkspace" -scheme "Project" CODE_SIGNING_REQUIRED=NO CODE_SIGNING_ALLOWED="NO" | xcpretty --c
Keep Formatting & Keep Coding !!!
Related Useful Articles