iOS — Drag and Drop using CollectionView
Background
SwiftUI has made many things easier. With UIKit, a few things are still complicated to implement such as working with UICollectionView.
Don’t worry though, it’s a normal thing almost every fresher developer feels at the beginning.
In this blog post, we will implement drag-and-drop functionality with UICollectionView using Swift.
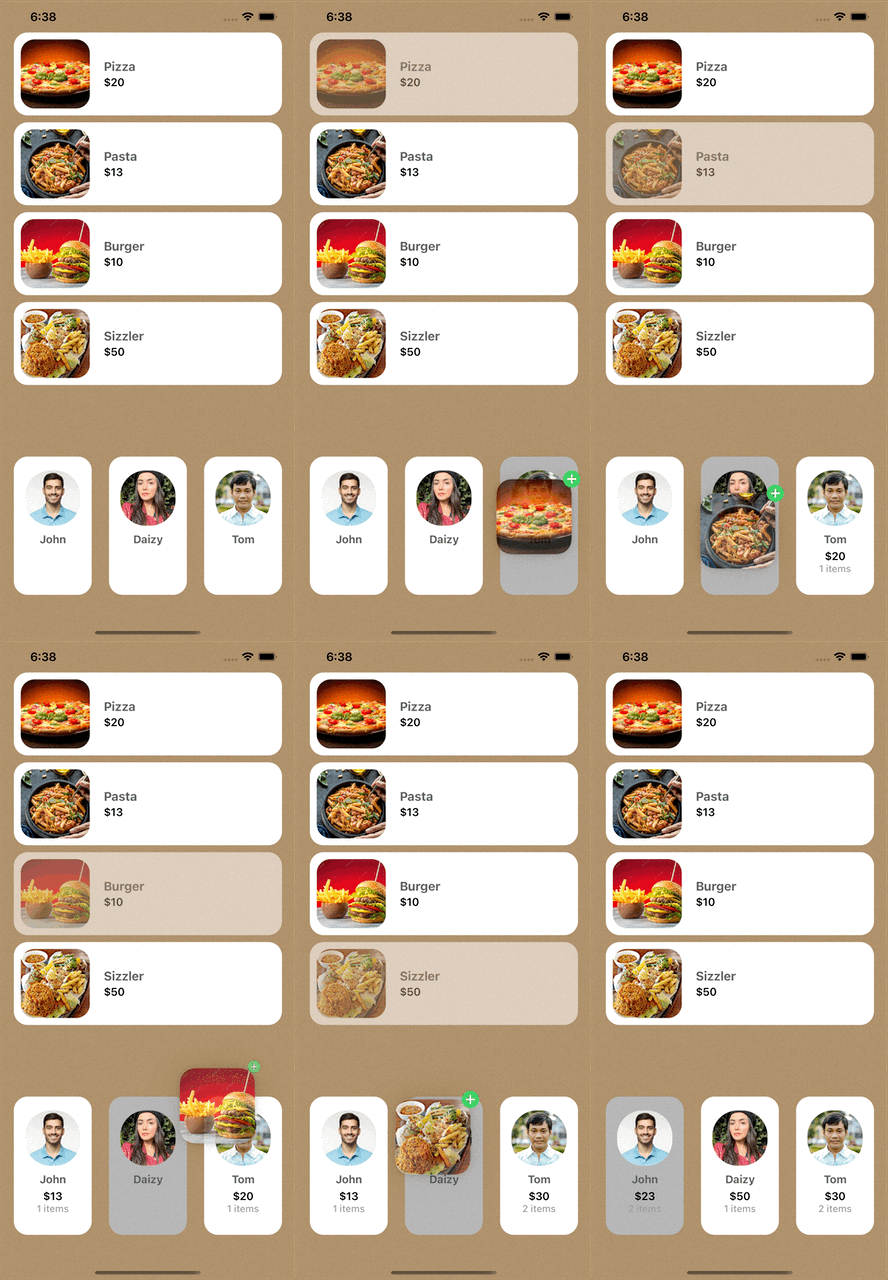
Today, we’ll create a food order book, that shows a list of food items with the list of persons. Users can select food items and drop them off to the person paying for them.
I’ve tried to make this Drag and Drop functionality easy.
At the end of this blog post, we’ll have UI something like this,
If not interested in implementation? Here’s the source code for you.
1. Design Views to show food items and users
We’ll first add two collection views to the main storyboard.
Then we’ll create a FoodItemCollectionViewCell card to show a single food item.
Basically, this card will have an ImageView for displaying the food image, one label view for showing the food name, and another label view for showing the food price.
After that, we’ll create a UserCollectionViewCell card to show user details. This card will have details like user photo, user name, the total amount to pay, and the number of total collected items.
I assume that you are able to design both cards. I’ve added them using XIBs. You can get more details on the GitHub repository.
Here, we’ve used two structs.
struct Food {
    let id: Int
    let name: String
    let price: Int
    let image: String
}

struct User {
    let id: Int
    let name: String
    let image: String
    var amount: Int
    var items: Int
    var isHighlighted: Bool = false
}
We’ll use static data to show food and user details.
let foods: [Food] = [.init(id: 1, name: "Pizza", price: 20, image: "pizza"),
					 .init(id: 2, name: "Pasta", price: 13, image: "pasta"),
					 .init(id: 6, name: "Burger", price: 10, image: "burger"),
					 .init(id: 7, name: "Sizzler", price: 50, image: "sizzler")]

var users: [User] = [.init(id: 1, name: "John", image: "person1", amount: 0, items: 0),
					 .init(id: 2, name: "Daizy", image: "person2", amount: 0, items: 0),
					 .init(id: 3, name: "Tom", image: "person3", amount: 0, items: 0)]
Don’t forget to add images in the Assets bundle class.
Now let’s take the outlet of both collection views for further implementation.
@IBOutlet weak var foodCollectionView: UICollectionView!
@IBOutlet weak var userCollectionView: UICollectionView!
Let’s register both FoodItemCollectionViewCell and UserCollectionViewCell cells to the collection views respectively at the time of initialization of the main view.
foodCollectionView.register(FoodItemCollectionViewCell.NIB, forCellWithReuseIdentifier: FoodItemCollectionViewCell.ID)
userCollectionView.register(UserCollectionViewCell.NIB, forCellWithReuseIdentifier: UserCollectionViewCell.ID)
Now you may be wondering what NIB and ID are, so basically, these are the variables that identify the added view from the bundle. We don't need to set different identifiers for all the collection view cells.
class var ID: String { String(describing: Self.self) }
class var NIB: UINib { .init(nibName: String(describing: Self.self), bundle: .main) }
Let’s also set the delegates for both collection views.
foodCollectionView.delegate = self
foodCollectionView.dataSource = self
userCollectionView.delegate = self
userCollectionView.dataSource = self
Now let’s set data to the collection view using its UICollectionViewDataSource protocol which manages data and represents the data model in the collection view.
Let’s add ViewController extensions with the implementation of Datasource and Delegate protocol methods and set data in both collection views.
// MARK: - UICollectionViewDataSource Methods
extension ViewController: UICollectionViewDataSource {

    func collectionView(_ collectionView: UICollectionView, numberOfItemsInSection section: Int) -> Int {
        if collectionView == foodCollectionView {
            return foods.count
        } else {
            return users.count
        }
    }

    func collectionView(_ collectionView: UICollectionView, cellForItemAt indexPath: IndexPath) -> UICollectionViewCell {
        if collectionView == foodCollectionView {
            return foodCollectionView(collectionView, cellForItemAt: indexPath)
        } else {
            return userCollectionView(collectionView, cellForItemAt: indexPath)
        }
    }

    private func foodCollectionView(_ collectionView: UICollectionView, cellForItemAt indexPath: IndexPath) -> UICollectionViewCell {
        let cell = collectionView.dequeueReusableCell(withReuseIdentifier: FoodItemCollectionViewCell.ID, for: indexPath) as! FoodItemCollectionViewCell
        cell.layer.cornerRadius = 20
        cell.name.text = foods[indexPath.item].name
        cell.price.text = "$" + String(foods[indexPath.item].price)
        cell.imageView.image = UIImage(named: foods[indexPath.item].image)
        return cell
    }

    private func userCollectionView(_ collectionView: UICollectionView, cellForItemAt indexPath: IndexPath) -> UICollectionViewCell {
        let cell = collectionView.dequeueReusableCell(withReuseIdentifier: UserCollectionViewCell.ID, for: indexPath) as! UserCollectionViewCell
        cell.layer.cornerRadius = 20
        cell.userName.text = users[indexPath.item].name
        cell.totalAmount.isHidden = users[indexPath.item].amount == 0
        cell.totalAmount.text = "$" + String(users[indexPath.item].amount)
        cell.itemLabel.isHidden = users[indexPath.item].amount == 0
        cell.itemLabel.text = String(users[indexPath.item].items) + " items"
        cell.imageView.image = UIImage(named: users[indexPath.item].image)
        cell.containerView.backgroundColor = users[indexPath.item].isHighlighted ? .lightGray : .white
        return cell
    }
}

// MARK: - UICollectionViewDelegateFlowLayout Methods
extension ViewController: UICollectionViewDelegateFlowLayout {

    // To put inset to the collectionView
    func collectionView(_ collectionView: UICollectionView, layout collectionViewLayout: UICollectionViewLayout, insetForSectionAt section: Int) -> UIEdgeInsets {
        return .init(top: 0, left: 20, bottom: 0, right: 20)
    }
}
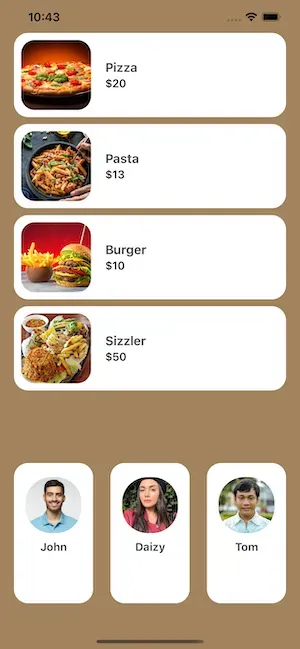
Run the app now and you will have a screen like this,
Let’s go ahead with interesting stuff — DRAGGING
2. Implement drag delegate
Now let’s start with enabling the drag operation of the food card.
First, we have to add aUICollectionViewDragDelegate protocol that is used to initiate drag from the collection view.
Then we need to set its drag delegate at the init section to enable the drag operation of the collection view cell. However, make sure that you enable delegate of the collection view from which you want to drag the cell, not the other one!
foodCollectionView.dragDelegate = selfWith the protocol, we have to implement its method itemsForBeginning() method to set the drag item of the selected cell.
extension ViewController: UICollectionViewDragDelegate {

    // Get dragItem from the indexpath
    func collectionView(_ collectionView: UICollectionView, itemsForBeginning session: UIDragSession, at indexPath: IndexPath) -> [UIDragItem] {
        let itemPrice = String(foods[indexPath.item].price)
        let itemProvider = NSItemProvider(object: itemPrice as NSString)
        let dragItem = UIDragItem(itemProvider: itemProvider)
        dragItem.localObject = itemPrice
        return [dragItem]
    }
}
As we need the price from the dragged item we will make an item with the price field.
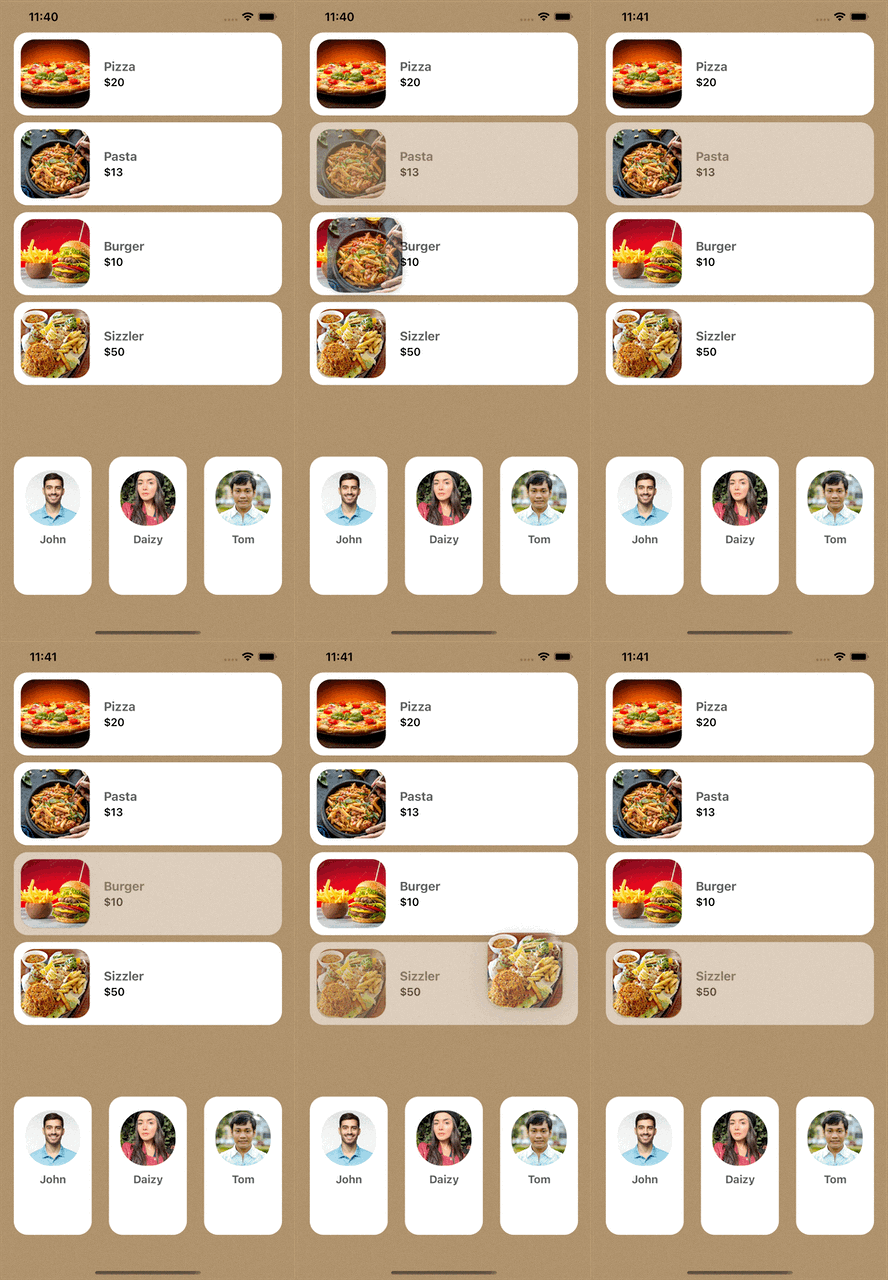
But with that, the whole cell will be draggable, which looks weird.
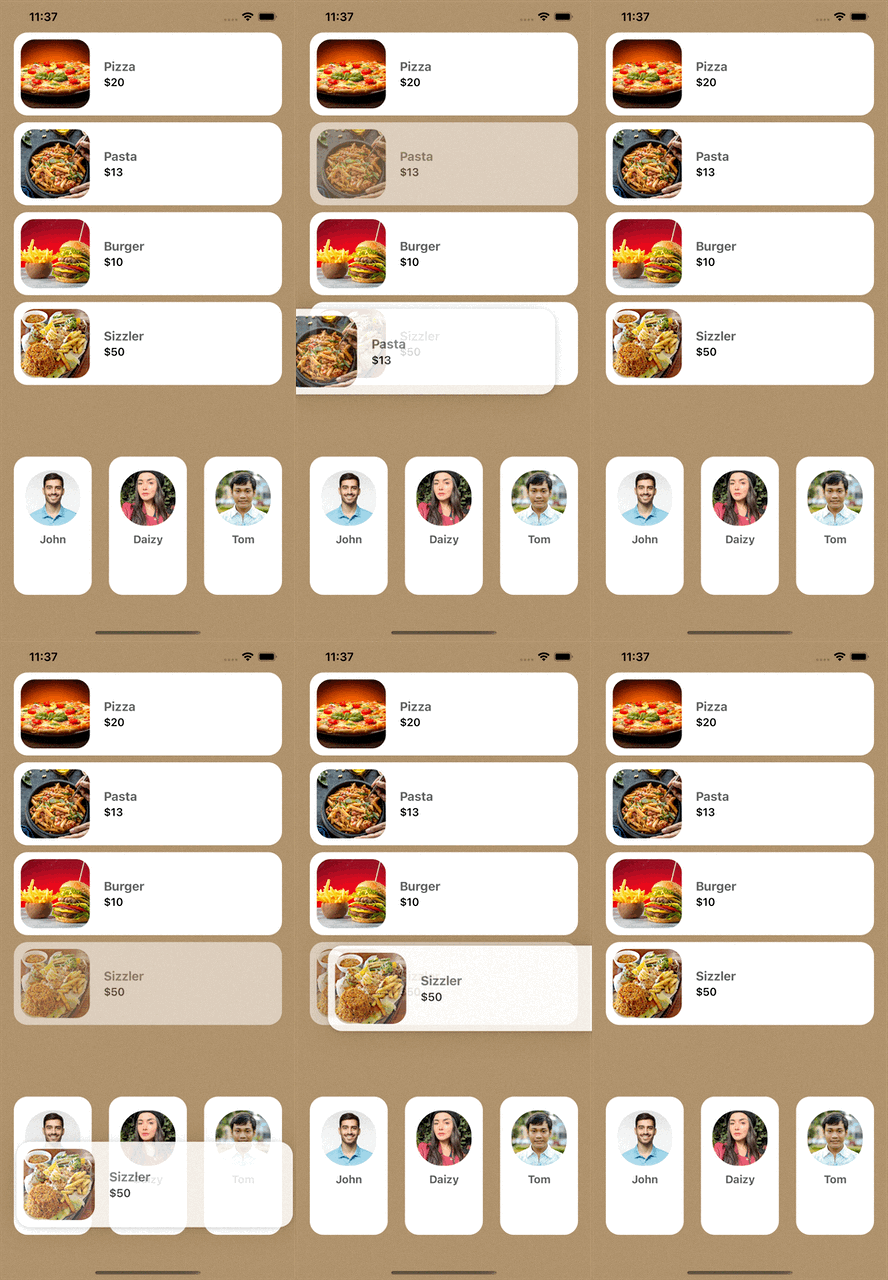
To make it pretty we will only allow the food image to drag by adding one more drag delegate protocol method dragPreviewParametersForItemAt().
Let’s add the below method to the UICollectionViewDragDelegate extension.
// To only select needed view as preview instead of whole cell
func collectionView(_ collectionView: UICollectionView, dragPreviewParametersForItemAt indexPath: IndexPath) -> UIDragPreviewParameters? {
    if collectionView == foodCollectionView {
        let cell = collectionView.dequeueReusableCell(withReuseIdentifier: FoodItemCollectionViewCell.ID, for: indexPath) as! FoodItemCollectionViewCell
        let previewParameters = UIDragPreviewParameters()
        previewParameters.visiblePath = UIBezierPath(roundedRect: CGRect(x: cell.imageView.frame.minX, y: cell.imageView.frame.minY, width: cell.imageView.frame.width + 30, height: cell.imageView.frame.height + 30), cornerRadius: 20)
        return previewParameters
    }
    return nil
}
Now, looking more pretty right?
3. Implement drop delegate
Let’s add the implementation of dropping the dragged food item cell to another collection view.
Now just like the drag protocol, we have to add aUICollectionViewDropDelegate protocol to the collection view that is used to incorporate dropped data.
userCollectionView.dropDelegate = selfNow the drop delegate protocol provides the performDropWith() method to initiate drop operation. This provides us with a destination index path, so we can do changes according to our needs at the destination cell.
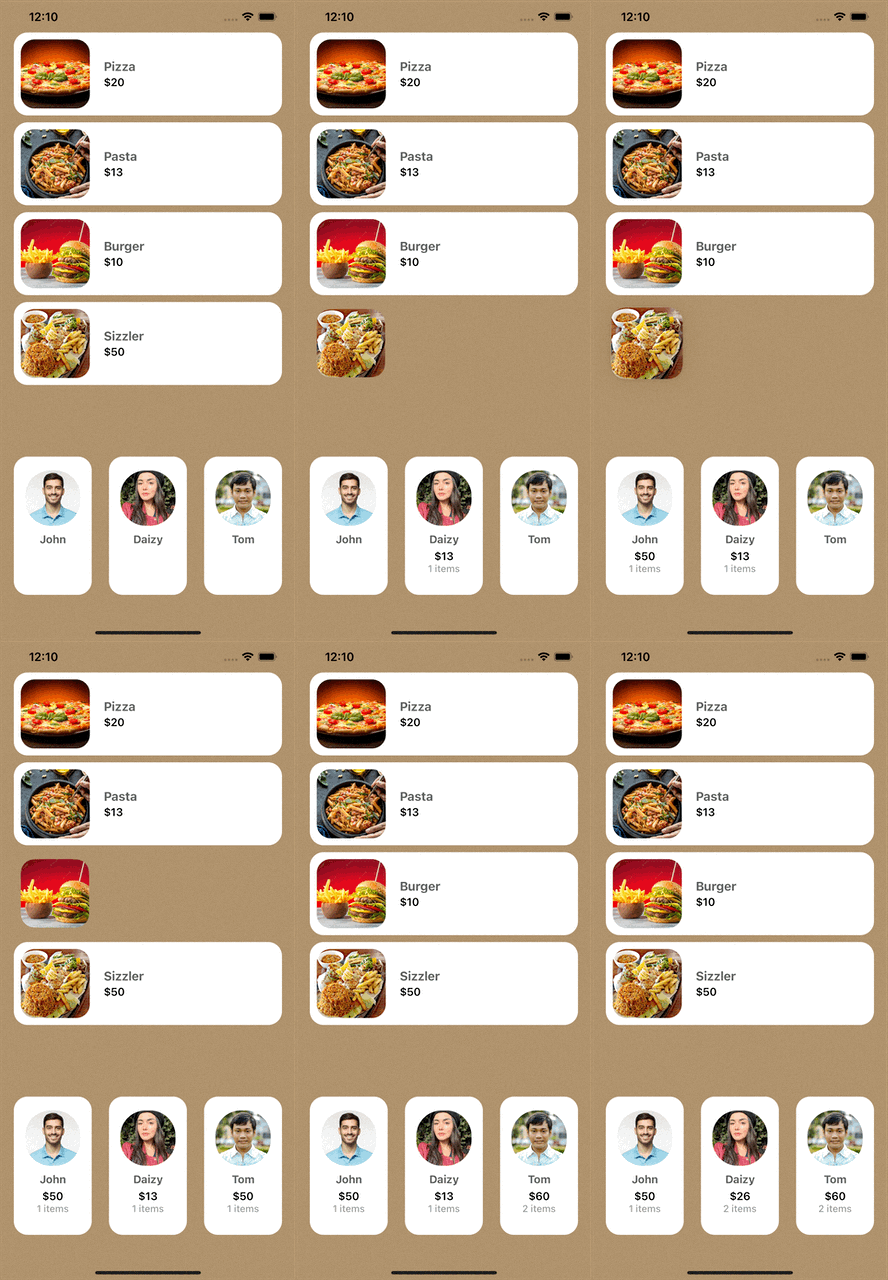
Here we are adding food price to the user amount by dropping the cell to the user cell.
Let’s implement that method.
// MARK: - UICollectionViewDropDelegate Methods
extension ViewController: UICollectionViewDropDelegate {

    // Called when the user initiates the drop operation
    func collectionView(_ collectionView: UICollectionView, performDropWith coordinator: UICollectionViewDropCoordinator) {
        var destinationIndexPath: IndexPath
        if let indexPath = coordinator.destinationIndexPath {
            destinationIndexPath = indexPath
        } else {
            let row = collectionView.numberOfItems(inSection: 0)
            destinationIndexPath = IndexPath(item: row - 1, section: 0)
        }

        if collectionView == userCollectionView {
            if coordinator.proposal.operation == .copy {
                copyItems(coordinator: coordinator, destinationIndexPath: destinationIndexPath, collectionView: collectionView)
            }
        }
    }

    // Actual logic which perform after drop the view
    private func copyItems(coordinator: UICollectionViewDropCoordinator, destinationIndexPath: IndexPath, collectionView: UICollectionView) {
        collectionView.performBatchUpdates {
            for (_, item) in coordinator.items.enumerated() {
                if collectionView === userCollectionView {
                    let productPrice = item.dragItem.localObject as? String
                    if let price = productPrice, let intPrice = Int(price) {
                        users[destinationIndexPath.item].amount += intPrice
                        users[destinationIndexPath.item].items += 1
                        UIView.performWithoutAnimation {
                            collectionView.reloadSections(IndexSet(integer: 0))
                        }
                    }
                }
            }
        }
    }
}
Let’s run.
Try to drop the food item into the user cell and you can see the result same as below.
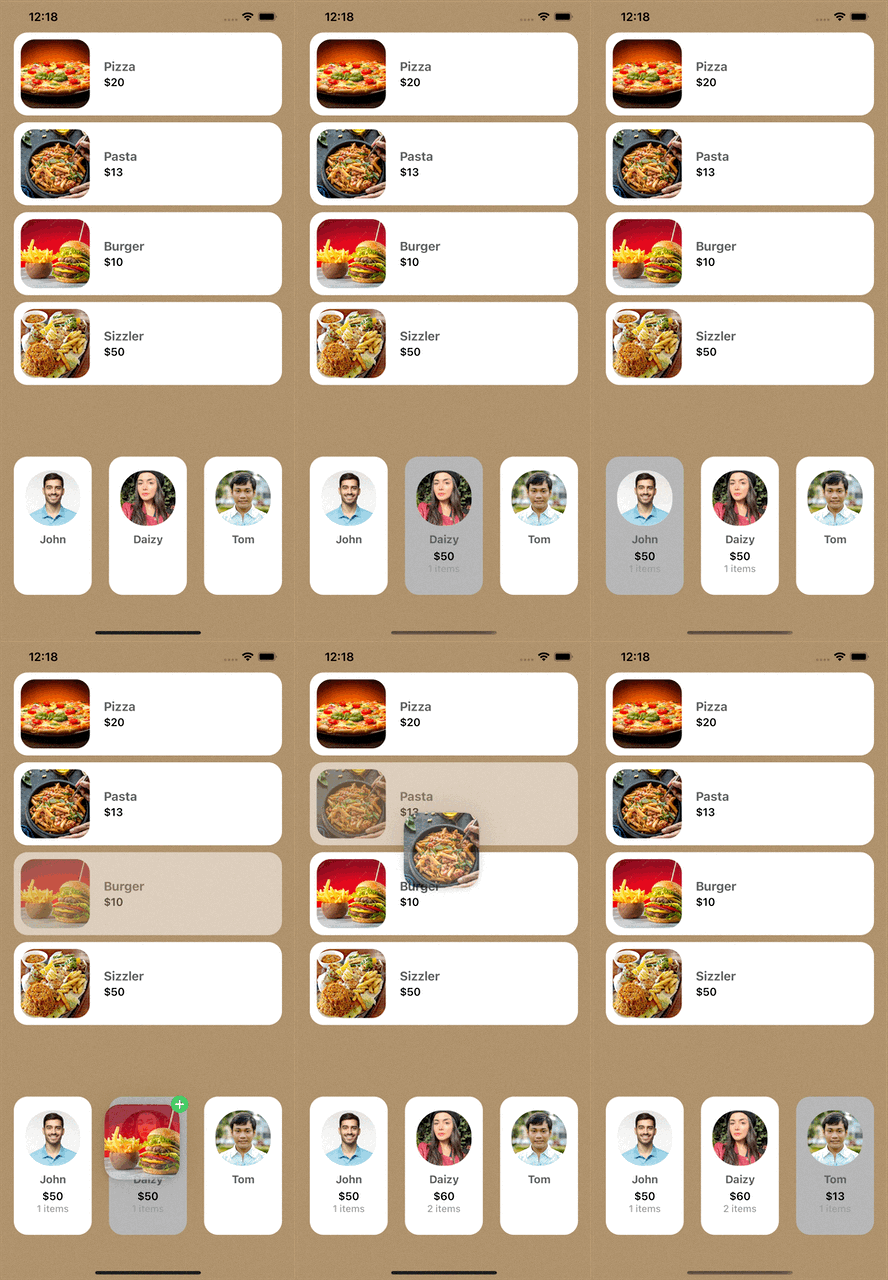
We are done with the implementation now but as an extra, nice-to-have thing, if you want to highlight the droppable cell of the collection view then that is also possible.
The collection view drop delegate also provides a dropSessionDidUpdate() protocol method that is used to get the position of dragged data over the collection view.
Let’s add the methods below in the UICollectionViewDropDelegate extension for highlighting the cell.
// Get the position of the dragged data over the collection view changed
func collectionView(_ collectionView: UICollectionView, dropSessionDidUpdate session: UIDropSession, withDestinationIndexPath destinationIndexPath: IndexPath?) -> UICollectionViewDropProposal {
    if collectionView == userCollectionView, let indexPath = destinationIndexPath {
        users.indices.forEach { users[$0].isHighlighted = false }
        users[indexPath.item].isHighlighted = true
        collectionView.reloadData()
    }
    return UICollectionViewDropProposal(operation: .copy)
}

// Update collectionView after ending the drop operation
func collectionView(_ collectionView: UICollectionView, dropSessionDidEnd session: UIDropSession) {
    users.indices.forEach { users[$0].isHighlighted = false }
    collectionView.reloadData()
}
Tadda !!! We are done now !!
Conclusion
Hopefully, this will give you a basic idea of how Swift's drag-and-drop works with UICollectionView.
The full source code of the above implementation is also available on GitHub, feel free to check it out. As always, suggestions and feedback are more than welcome.
That’s it for today. Keep dragging. Keep coding. 🍻🍾
Related Popular Articles


Let's Work Together
Not sure where to start? We also offer code and architecture reviews, strategic planning, and more.
