Golang: Interacting with Google spreadsheets
Introduction
It’s not wondering if we can update Google edits from the backend. Google is providing APIs to interact with Google spreadsheets. We can easily access those services and add or update the same using APIs.
Let’s update the Google spreadsheet with its stuff — the so-called Golang.
Sponsored
Overview
Today, we will learn some case studies with spreadsheets as follow,
- Authentication and creating spreadsheet service
- Append data to the spreadsheet
- Update cells of the spreadsheet
- Append data with a background color to a spreadsheets
We will use the google SDK library implemented in Golang.
These are some basic demonstrations by using sheet API, you can explore google’s spreadsheet API reference in depth.
Video
Prerequisites
We need a service account on the google cloud platform for server authentication.
Follow this guide to create a service account, download the key, convert it to base64, and store it as an environment variable. This way, you can secure your keys.
Note: It’s necessary to share the spreadsheet with
client_emailof the service account to access it. Otherwise, you will get403 forbidden. You can findclient_emailin the downloaded key’s json file.
Follow me to start with APIs.
Authentication and creating spreadsheet service
Import golang.org/x/oauth2/google and google.golang.org/api/sheets/v4 to use sheet API.
Authentication is a must for accessing any services of google. The following snippet shows the authentication flow for sheet APIs.
// create api context
ctx := context.Background()

// get bytes from base64 encoded google service accounts key
credBytes, err := b64.StdEncoding.DecodeString(os.Getenv("KEY_JSON_BASE64"))
if err != nil {
	log.Error(err)
	return
}

// authenticate and get configuration
config, err := google.JWTConfigFromJSON(credBytes, "https://www.googleapis.com/auth/spreadsheets")
if err != nil {
	log.Error(err)
	return
}

// create client with config and context
client := config.Client(ctx)

// create new service using client
srv, err := sheets.NewService(ctx, option.WithHTTPClient(client))
if err != nil {
	log.Error(err)
	return
}
Let’s go through it…
Authentication :
DecodeStringconvertsbase64key string tobytes.JWTConfigFromJSONauthenticates usingbytesandauth-urland returns config data of the user like client_email, scopes, etc…
Service creation :
Clientcreates client usingcontextandconfig.NewServicecreates service from the created client.
Append data to the spreadsheet
// https://docs.google.com/spreadsheets/d/<SPREADSHEETID>/edit#gid=<SHEETID>
sheetId := <SHEETID>
spreadsheetId := <SPREADSHEETID>

// Convert sheet ID to sheet name.
response1, err := srv.Spreadsheets.Get(spreadsheetId).Fields("sheets(properties(sheetId,title))").Do()
if err != nil || response1.HTTPStatusCode != 200 {
	log.Error(err)
	return
}

sheetName := ""
for _, v := range response1.Sheets {
	prop := v.Properties
	if prop.SheetId == int64(sheetId) {
		sheetName = prop.Title
		break
	}
}

//Append value to the sheet.
row := &sheets.ValueRange{
	Values: [][]interface{}{{"1", "ABC", "abc@gmail.com"}},
}

response2, err := srv.Spreadsheets.Values.Append(spreadsheetId, sheetName, row).ValueInputOption("USER_ENTERED").InsertDataOption("INSERT_ROWS").Context(ctx).Do()
if err != nil || response2.HTTPStatusCode != 200 {
	log.Error(err)
	return
}
Credit goes to this thread for this code.
Let’s go through it…
- Get sheet id and spreadsheet id: Both ids can be found from the spreadsheet URL as given in the snippet.
- Get sheet name: To append data, you must have the sheet name. You can directly use the sheet name, but if you are uncertain about its name, then you can get it by using
GetAPI. - Prepare data: The
Appendmethod usesValueRangeand accepts data in[][]interface{}{}format. Each value will be appended in each cell row-wise. We can append multiple data to the sheet. - Append data: We will use
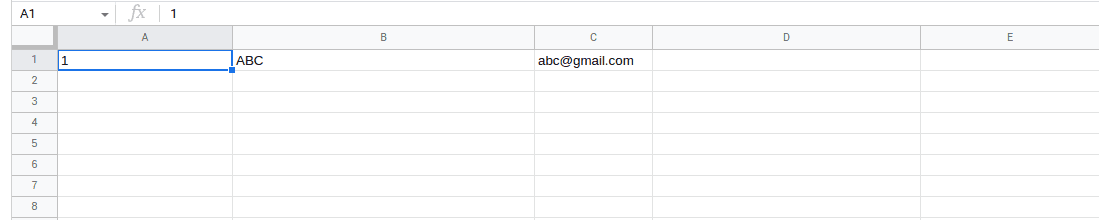
Values.Appendon service to append data. If the response will be successful then it will append data as below,
Update cells of the spreadsheet
For updating cells, we need some range in which we want to update certain cells or rows.
Values.Update method used for updating cells of the spreadsheet. Review the given code below,
// https://docs.google.com/spreadsheets/d/<SPREADSHEETID>/edit#gid=<SHEETID>
spreadsheetId := <SPREADSHEETID>
// The A1 notation of cells range to update.
range2 := "A1:C1"
// prepare data for update cells
row := &sheets.ValueRange{
Values: [][]interface{}{{"2", "XYZ", "xyz@gmail.com"}},
}
// update cells in given range
_, err = srv.Spreadsheets.Values.Update(spreadsheetId, range2, row).ValueInputOption("USER_ENTERED").Context(ctx).Do()
if err != nil {
log.Fatal(err)
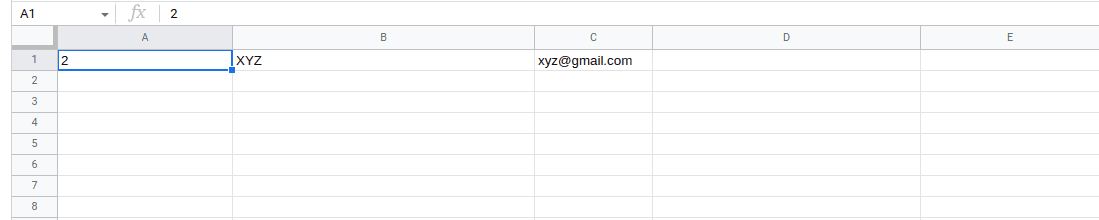
}The output will be…
Append data with the background color to a spreadsheet
We can format cells using sheet API. CellFormat is providing properties to set the format of cells like background color, border color, text alignment , etc…
Use the below snippet to prepare a cell with background color,
func prepareCells(records []string) []*sheets.RowData {
	// init cells array
	cells := []*sheets.CellData{}

	bgWhite := &sheets.Color{ // green background
		Alpha: 1,
		Blue:  0,
		Red:   0,
		Green: 1,
	}

	// prepare cell for each records and append it to cells
	for i := range records {
		data := &sheets.CellData{
			UserEnteredValue: &sheets.ExtendedValue{
				StringValue: &(records[i]), // add value
			},
			UserEnteredFormat: &sheets.CellFormat{ // add background color
				BackgroundColor: bgWhite,
			},
		}
		cells = append(cells, data)
	}

	// prepare row from cells
	return []*sheets.RowData{
		{Values: cells},
	}
}
In CellData, Add value in UserEnteredValue and format in UserEnteredFormat .
We will use batchUpdate method to append data to a sheet.
// https://docs.google.com/spreadsheets/d/<SPREADSHEETID>/edit#gid=<SHEETID>
sheetId := <SHEETID>
spreadsheetId := <SPREADSHEETID>

records := []string{"1", "ABC", "abc@gmail.com"}

// create the batch request
batchUpdateRequest := sheets.BatchUpdateSpreadsheetRequest{
	Requests: []*sheets.Request{
		{
			AppendCells: &sheets.AppendCellsRequest{
				Fields:  "*",  // for adding data in all cells
				Rows:    prepareCells(records),  // get formatted cells row
				SheetId: int64(sheetId),  // use sheetID here
			},
		},
	},
}

// execute the request using spreadsheetId
res, err := srv.Spreadsheets.BatchUpdate(spreadsheetId, &batchUpdateRequest).Context(ctx).Do()
if err != nil || res.HTTPStatusCode != 200 {
	log.Error(err)
	return
}- BatchUpdateSpreadsheetRequest contains Requests. We can prepare multiple requests with it. For appending data, we will use
AppendCells, In which passFields(that we want to append),Rows(from prepareCells()) andsheetId.
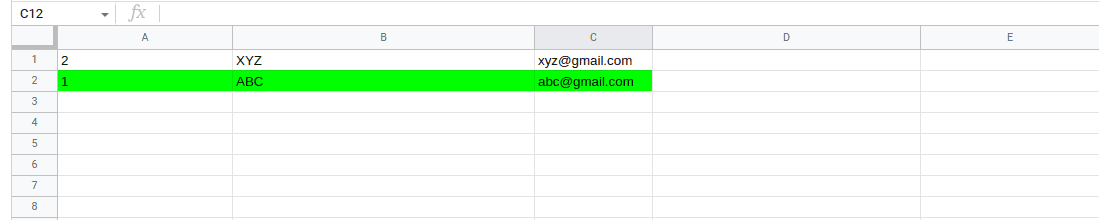
The output will be like this,
Wrapping up
Documentation also provides solutions in various technologies like nodejs and python. You can play with some more examples from it.
We’re Grateful to have you with us on this journey!
Suggestions and feedback are more than welcome!
Please reach us at Canopas Twitter handle @canopassoftware with your content or feedback. Your input enriches our content and fuels our motivation to create more valuable and informative articles for you!
Related articles