All about Google Maps in Jetpack compose
Background
Integrating Google Maps into your Jetpack Compose application can significantly enhance the user experience by providing interactive and dynamic geographical information.
In this blog post, we'll show you how to add a map to your app, control the camera position, and draw various elements on the map. From setting targets and animating zoom levels to handling boundaries and drawing markers, circles, and polylines, you'll learn how to leverage the powerful features of Google Maps in Jetpack Compose.
If you're looking for a practical implementation of the techniques we will discuss in this blog, check out GroupTrack open-source location sharing and tracking application. Feel free to explore and use it as a reference for your projects.
Let's dive in and start integrating Google Maps into your app!
Configure a Map
Requirements
- A Google account with billing
- A Map API key - follow this guide to get your API key
Add Dependency
Add the following dependency to your module gradle.build file,
implementation 'com.google.maps.android:maps-compose:X.X.X'Add your Map API key in the manifest file,
<meta-data
        android:name="com.google.android.geo.API_KEY"
        android:value="${YOUR_MAPS_API_KEY}" />
Add GoogleMap composable
To render a map you need to use Google Composable. Let's have a quick look at it.
@Composable
public fun GoogleMap(
    mergeDescendants: Boolean = false,
    modifier: Modifier = Modifier,
    cameraPositionState: CameraPositionState = rememberCameraPositionState(),
    contentDescription: String? = null,
    googleMapOptionsFactory: () -> GoogleMapOptions = { GoogleMapOptions() },
    properties: MapProperties = DefaultMapProperties,
    locationSource: LocationSource? = null,
    uiSettings: MapUiSettings = DefaultMapUiSettings,
    indoorStateChangeListener: IndoorStateChangeListener = DefaultIndoorStateChangeListener,
    onMapClick: ((LatLng) -> Unit)? = null,
    onMapLongClick: ((LatLng) -> Unit)? = null,
    onMapLoaded: (() -> Unit)? = null,
    onMyLocationButtonClick: (() -> Boolean)? = null,
    onMyLocationClick: ((Location) -> Unit)? = null,
    onPOIClick: ((PointOfInterest) -> Unit)? = null,
    contentPadding: PaddingValues = NoPadding,
    content: (@Composable @GoogleMapComposable () -> Unit)? = null,
)
Basic Setup:
modifier: Apply visual styling to your map container.cameraPositionState: Manage the map's viewpoint (zoom level and location).
Customization Options:
googleMapOptionsFactory: Fine-tune the initial map behavior (e.g., zoom controls, map type).properties: Set additional map attributes like compass position and zoom gestures.locationSource: Integrate location tracking features (if needed).uiSettings: Control UI elements like zoom buttons or the compass.
Event Listeners:
onMapClick: Respond to user clicks on the map (e.g., display location info).onMapLongClick(New!): Handle long presses on the map (coming soon!).onMapLoaded: Execute code when the map finishes loading.onMyLocationButtonClick: Handle clicks on the "My Location" button.onMyLocationClick: Respond to user clicks on their current location marker.onPOIClick: Capture user interactions with points of interest (POIs) on the map.
Adding Content:
contentPadding: Define padding around the map edges to avoid overlapping with other UI elements.content: This is where you add your visual elements, like markers or overlays, on top of the map.
Let's first render the Map, and then talk about map properties, type and UI settings.
@Composable
fun SimpleMap() {
val latLng = LatLng(-33.852334, 151.211245) // Any Coordinates
val cameraPositionState = rememberCameraPositionState {
position = CameraPosition.fromLatLngZoom(latLng, 14f) // Set zoom level
}
GoogleMap(
modifier = Modifier.fillMaxSize(), // Fill the entire screen
cameraPositionState = cameraPositionState
)
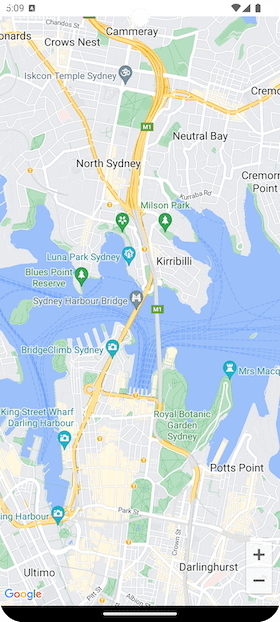
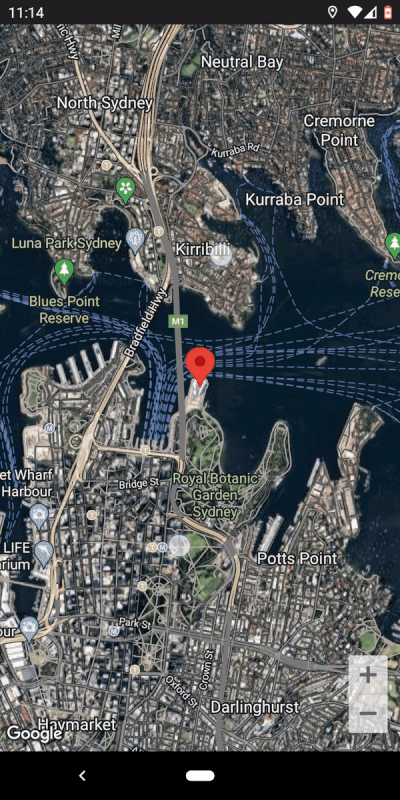
}Run your app and voila! You should see a centered map of Sydney.
Map Properties
Now, let’s delve deeper into the MapProperties class, which allows you to refine your map's visual and interactive aspects.
public class MapProperties(
    public val isBuildingEnabled: Boolean = false,
    public val isIndoorEnabled: Boolean = false,
    public val isMyLocationEnabled: Boolean = false,
    public val isTrafficEnabled: Boolean = false,
    public val latLngBoundsForCameraTarget: LatLngBounds? = null,
    public val mapStyleOptions: MapStyleOptions? = null,
    public val mapType: MapType = MapType.NORMAL,
    public val maxZoomPreference: Float = 21.0f,
    public val minZoomPreference: Float = 3.0f,
)
Building and Indoor Maps:
isBuildingEnabled: Show or hide 3D building overlays (default: false).isIndoorEnabled: Enable viewing indoor maps of supported locations (default: false).
Location and Traffic:
isMyLocationEnabled: Allow users to see their current location on the map (default: false).isTrafficEnabled: Overlay real-time traffic information on the map (default: false).
Map Appearance and Behavior:
latLngBoundsForCameraTarget: Define a specific area for the map to focus on initially.mapStyleOptions: Apply custom map styles to change the visual appearance (e.g., map theme).mapType: Choose between different map types like normal, satellite, or hybrid (default: NORMAL).maxZoomPreference: Set the maximum zoom level users can reach (default: 21.0f).minZoomPreference: Set the minimum zoom level users can reach (default: 3.0f).
Let’s render our previous map along with map properties:
@Composable
fun SimpleMap() {
val latLng = LatLng(-33.852334, 151.211245) // Any Coordinates
val cameraPositionState = rememberCameraPositionState {
position = CameraPosition.fromLatLngZoom(latLng, 14f) // Set zoom level
}
val mapProperties = remember(isDarkMode) {
MapProperties(
latLngBoundsForCameraTarget = LatLngBounds(
latLng,
LatLng(-33.852334 + 0.1, 151.211245 + 0.1)
),
mapType = MapType.HYBRID,
)
}
GoogleMap(
modifier = Modifier.fillMaxSize(), // Fill the entire screen
cameraPositionState = cameraPositionState,
properties = mapProperties,
)
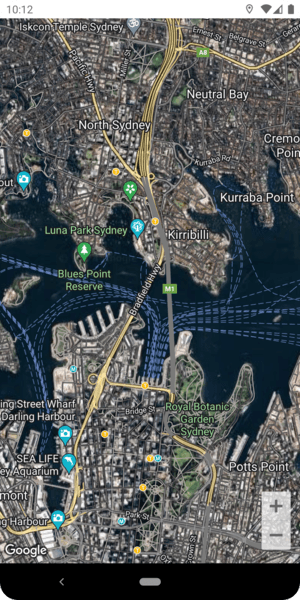
}So, after applying the above mapProperties, your app will look like this:
Map UI settings
Now, let's delve into MapUiSettings, which empowers you to fine-tune the user interaction experience with the map.
Key Settings in MapUiSettings:
Basic Controls:
compassEnabled: Show or hide the compass for directional reference (default: true).mapToolbarEnabled: Enable or disable the default map toolbar with zoom and other controls (default: true).myLocationButtonEnabled: Control whether the "My Location" button is displayed (default: true).
Note: you must have location permission to show your location on the map
Gesture Controls:
rotationGesturesEnabled: Allow users to rotate the map by swiping (default: true).scrollGesturesEnabled: Enable panning the map by dragging (default: true).scrollGesturesEnabledDuringRotateOrZoom: Allow scrolling while rotating or zooming (default: true).tiltGesturesEnabled: Enable tilting the map view (default: true).zoomControlsEnabled: Show or hide the zoom buttons for easy zooming (default: true).zoomGesturesEnabled: Allow users to zoom in and out using pinch gestures (default: true).
Let’s integrate map ui settings in our SimpleMap composable:
@Composable
fun SimpleMap() {
  val latLng = LatLng(-33.852334, 151.211245) // Any Coordinates
  val cameraPositionState = rememberCameraPositionState {
    position = CameraPosition.fromLatLngZoom(latLng, 14f) // Set zoom level
  }

  val mapProperties = remember(isDarkMode) {
        MapProperties(
            latLngBoundsForCameraTarget = LatLngBounds(
                latLng,
                LatLng(-33.852334 + 0.1, 151.211245 + 0.1)
            ),
            mapType = MapType.HYBRID,
        )
    }

  GoogleMap(
    modifier = Modifier.fillMaxSize(), // Fill the entire screen
    cameraPositionState = cameraPositionState,
    properties = mapProperties,
    uiSettings = MapUiSettings(
      myLocationButtonEnabled = false,
      compassEnabled = false,
      mapToolbarEnabled = false
    ),
  )
}
Control the camera position
Controlling the camera position allows you to direct the user’s focus on specific areas of the map and animate movements for a better experience.
Let’s break down the core features and methods for handling camera position:
Core Functionality:
- Camera Position: Tracks the current position on the map, including the zoom level and target location.
- Camera Movement: Offers animated transitions for a smooth, polished experience when changing positions.
- User Interaction: Responds to interactions like panning, zooming, or tapping on specific map elements.
Key Methods:
- position: Get or set the camera’s current position, including the target coordinates and zoom level.
- animate: Move the camera to a new location with a smooth transition.
- move: Instantly move the camera to a new location without animation.
State Management:
- The camera position is linked to a single
GoogleMapcomposable at a time. - It automatically updates as the user interacts with the map by panning or zooming.
How to change/animate camera position
You can modify the camera position dynamically to zoom into a new location, set boundaries, or add custom animations.
Here are the key properties you can use to manipulate the camera:
- newCameraPosition: This allows you to directly set a new camera position by defining the latitude, longitude, zoom level, tilt, and bearing.
- newLatLng: This moves the camera to a new location without changing the zoom level.
- newLatLngZoom: This moves the camera to a new latitude and longitude, while also adjusting the zoom level.
- newLatLngBounds: This moves the camera to fit a set of latitude and longitude bounds within the viewport, ensuring that the defined geographical area is fully visible.
Here’s how you can use these properties to change or animate the camera position:
@Composable
fun SimpleMap() {
    val latLng = LatLng(-33.852334, 151.211245) // Any Coordinates
    val cameraPositionState = rememberCameraPositionState {
        position = CameraPosition.fromLatLngZoom(latLng, 14f) // Set zoom level
    }

    val mapProperties =
        remember(isDarkMode) {
            MapProperties(
                mapType = MapType.HYBRID,
            )
        }

    GoogleMap(
        modifier = Modifier.fillMaxSize(), // Fill the entire screen
        cameraPositionState = cameraPositionState,
        properties = mapProperties,
        uiSettings =
            MapUiSettings(
                myLocationButtonEnabled = false,
                compassEnabled = false,
                mapToolbarEnabled = false
            ),
        onMapClick = { clickedLatLng: LatLng? ->
            // Animate camera to the clicked location
            coroutineScope.launch {
                clickedLatLng?.let {
                    cameraPositionState.animate(
                        CameraUpdateFactory.newLatLng(clickedLatLng),
                        1000 // Animation duration in milliseconds
                    )
                }
            }
        }
    )

    // Button to move camera to a predefined position (e.g., Melbourne)
    Button(
        onClick = {
            val newLatLng = LatLng(-37.8136, 144.9631) // Melbourne coordinates
            coroutineScope.launch {
                cameraPositionState.animate(
                    CameraUpdateFactory.newLatLngZoom(newLatLng, 12f),
                    2000 // Animate over 2 seconds
                )
            }
        },
        modifier = Modifier.align(Alignment.TopEnd).padding(16.dp)
    ) {
        Text(
            "Move to Melbourne",
            style = AppTheme.appTypography.button.copy(color = AppTheme.colorScheme.onPrimary)
        )
    }
}
Setting Camera Boundaries and Radius
You can also define zoom limits, boundaries for camera movement, and other settings to restrict how users interact with the map.
- Zoom: Control the zoom level using
CameraUpdateFactory.newLatLngZoom(). - Boundary: Limit camera movement to within specific latitude/longitude bounds using
LatLngBounds. - Radius: Define a specific radius around a point to set the visible area of the map.
@Composable
fun SimpleMap(
) {
val latLng = LatLng(-33.852334, 151.211245) // Initial Coordinates
val cameraPositionState = rememberCameraPositionState {
position = CameraPosition.fromLatLngZoom(latLng, 14f)
}
val bounds = LatLngBounds(
LatLng(-33.942334, 151.111245), // South-West corner
LatLng(-33.762334, 151.311245) // North-East corner
)
GoogleMap(
modifier = Modifier.fillMaxSize(),
cameraPositionState = cameraPositionState,
properties = MapProperties(
latLngBoundsForCameraTarget = bounds, // Apply boundaries
minZoomPreference = 10f, // Minimum zoom level
maxZoomPreference = 18f // Maximum zoom level
)
)
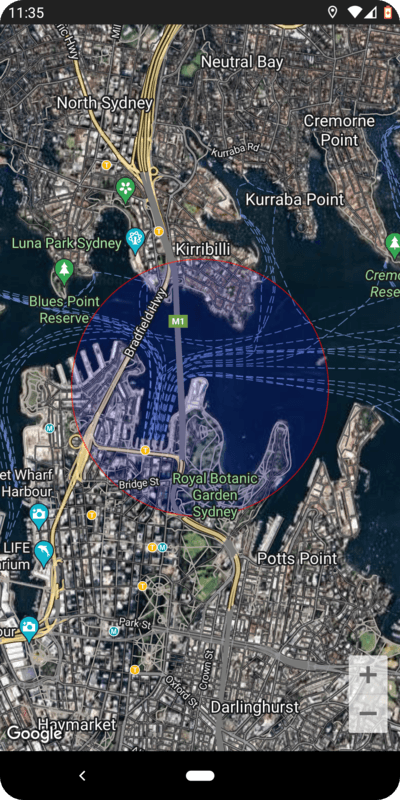
}As per this setup:
- The camera movement is restricted within specific boundaries (
LatLngBounds). - Users can zoom in and out only between zoom levels 10 and 18.
Drawing on Map
After controlling the camera, you may want to draw elements like markers, circles, or polylines on the map to represent points of interest, routes, or other data.
1. Markers
Markers are icons that pin-point specific locations on the map.
@Composable
fun SimpleMap(
) {
val latLng = LatLng( -33.8568, 151.2153) // Sydney Opera House lat lng
val cameraPositionState = rememberCameraPositionState {
position = CameraPosition.fromLatLngZoom(latLng, 14f)
}
val mapProperties = remember {
MapProperties(
mapType = MapType.HYBRID,
)
}
GoogleMap(
cameraPositionState = cameraPositionState,
properties = mapProperties,
uiSettings = MapUiSettings(
myLocationButtonEnabled = false,
compassEnabled = false,
mapToolbarEnabled = false
),
) {
Marker(
state = rememberMarkerState(position = latLng),
title = "Sydney Opera House",
snippet = "The most famous opera house in the world",
)
}
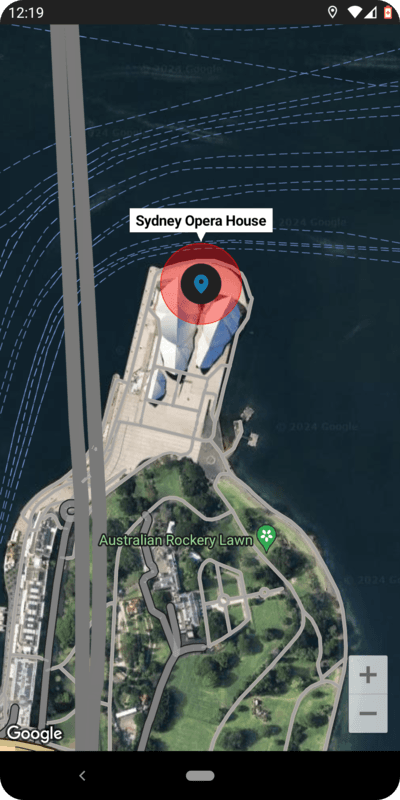
}In the above example:
- A marker is placed on the map at Sydney Opera House with a title and snippet that appears when clicked.
2. Custom Markers
To customize the markers, we’ll use the MarkerComposable instead of the standard Marker composable. The MarkerComposable allows you to render custom content as a marker by using Compose UI components, offering greater flexibility in design. In contrast, the standard Marker composable only lets you customize the marker icon but does not support more intricate layouts or styles.
@Composable
fun SimpleMap(
) {
    val latLng = LatLng( -33.8568, 151.2153) // Sydney Opera House lat lng

    val cameraPositionState = rememberCameraPositionState {
        position = CameraPosition.fromLatLngZoom(latLng, 14f)
    }
    val mapProperties = remember {
        MapProperties(
            mapType = MapType.HYBRID,
        )
    }
    GoogleMap(
        cameraPositionState = cameraPositionState,
        properties = mapProperties,
        uiSettings = MapUiSettings(
            myLocationButtonEnabled = false,
            compassEnabled = false,
            mapToolbarEnabled = false
        ),
    ) {
        MarkerComposable(
            state = rememberMarkerState(position = latLng),
            title = "Sydney Opera House"
        ) {
            Box(
                modifier = Modifier
                    .size(80.dp)
                    .background(
                        Color.Red.copy(alpha = 0.4f),
                        shape = CircleShape
                    )
                    .border(0.5.dp, Color.Red.copy(alpha = 0.8f), shape = CircleShape),
                contentAlignment = Alignment.Center
            ) {
                Box(
                    modifier = Modifier
                        .size(40.dp)
                        .background(
                            AppTheme.colorScheme.surface,
                            shape = CircleShape
                        ),
                    contentAlignment = Alignment.Center
                ) {
                    Icon(
                        painter = painterResource(id = R.drawable.ic_tab_places_filled),
                        contentDescription = null,
                        tint = AppTheme.colorScheme.primary,
                        modifier = Modifier.size(28.dp)
                    )
                }
            }
        }
    }
}
3. Circle
A Circle allows you to highlight a circular area on the map, usually centered around a specific location. You can customize the radius, stroke, and fill colors.
@Composable
fun SimpleMap(
) {
    val latLng = LatLng(-33.8568, 151.2153) // Sydney Opera House lat lng

    val cameraPositionState = rememberCameraPositionState {
        position = CameraPosition.fromLatLngZoom(latLng, 14f)
    }
    val mapProperties = remember {
        MapProperties(
            mapType = MapType.HYBRID,
        )
    }
    GoogleMap(
        cameraPositionState = cameraPositionState,
        properties = mapProperties,
        uiSettings = MapUiSettings(
            myLocationButtonEnabled = false,
            compassEnabled = false,
            mapToolbarEnabled = false
        ),
    ) {
        Circle(
            center = latLng,
            radius = 1000.0,
            strokeColor = Color.Red,
            fillColor = Color(0x220000FF),
            strokeWidth = 2f
        )
    }
}
4. Custom Circle (Bonus)
To further enhance the map, you can create a custom circle that adjusts its size based on the zoom level. This is done by converting the radius from meters to pixels and drawing the circle with a Canvas.
@Composable
fun CustomCircleMap() {
    val latLng = LatLng(-33.8568, 151.2153) // Sydney Opera House lat lng

    val cameraPositionState = rememberCameraPositionState {
        position = CameraPosition.fromLatLngZoom(latLng, 15f)
    }
    val mapProperties = remember {
        MapProperties(
            mapType = MapType.HYBRID,
        )
    }

    // Define the initial radius in meters
    val radiusMeters by remember {
        mutableDoubleStateOf(200.0)
    }

    // Compute the circle's radius in pixels based on the current zoom level
    val projection = cameraPositionState.projection
    val points = projection?.toScreenLocation(cameraPositionState.position.target) ?: Point(0, 0)
    val radiusInPixels = convertZoneRadiusToPixels(
        cameraPositionState.position.target,
        radiusMeters,
        projection
    )

    Box(modifier = Modifier.fillMaxSize()) {
        GoogleMap(
            cameraPositionState = cameraPositionState,
            properties = mapProperties,
            uiSettings = MapUiSettings(
                myLocationButtonEnabled = false,
                compassEnabled = false,
                mapToolbarEnabled = false
            ),
        )

        Box(
            modifier = Modifier
                .clipToBounds(),
            contentAlignment = Alignment.Center
        ) {
            val color = AppTheme.colorScheme.primary.copy(alpha = 0.6f)
            Canvas(modifier = Modifier.fillMaxSize()) {
                drawCircle(
                    color = color,
                    radius = radiusInPixels.toFloat(),
                    center = Offset(points.x.toFloat(), points.y.toFloat())
                )
            }

            Box(
                modifier = Modifier
                    .size(40.dp)
                    .align(Alignment.Center)
                    .background(AppTheme.colorScheme.surface, CircleShape),
                contentAlignment = Alignment.Center
            ) {
                Icon(
                    painter = painterResource(id = R.drawable.ic_tab_places_filled),
                    contentDescription = "",
                    modifier = Modifier.size(20.dp),
                    tint = AppTheme.colorScheme.primary
                )
            }
        }
    }
}

// Converts the radius from meters to pixels based on the current zoom level
private fun convertZoneRadiusToPixels(
    latLng: LatLng,
    radiusInMeters: Double,
    projection: Projection?
): Int {
    if (projection == null) return 0

    // Radius of the Earth in meters
    val EARTH_RADIUS = 6378100.0
    val lat1 = radiusInMeters / EARTH_RADIUS
    val lng1 = radiusInMeters / (EARTH_RADIUS * cos((Math.PI * latLng.latitude / 180)))

    // Compute the bounding latLng
    val lat2 = latLng.latitude + lat1 * 180 / Math.PI
    val lng2 = latLng.longitude + lng1 * 180 / Math.PI

    val p1: Point = projection.toScreenLocation(LatLng(latLng.latitude, latLng.longitude))
    val p2: Point = projection.toScreenLocation(LatLng(lat2, lng2))
    return abs((p1.x - p2.x).toDouble()).toInt()
}
In this example:
- A custom circle is drawn using
Canvas, which allows for dynamic adjustment based on zoom level. - The
convertZoneRadiusToPixelsfunction translates the radius from meters to pixels to ensure the circle’s size adjusts with the zoom level.
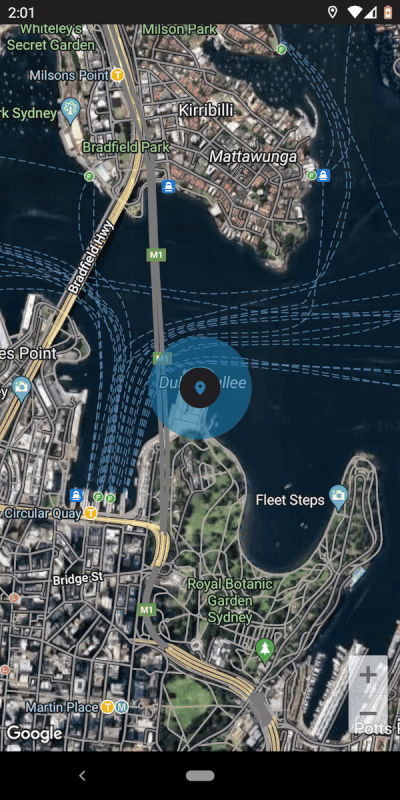
This provides both a standard and a more flexible, zoom-responsive way to highlight areas on the map.
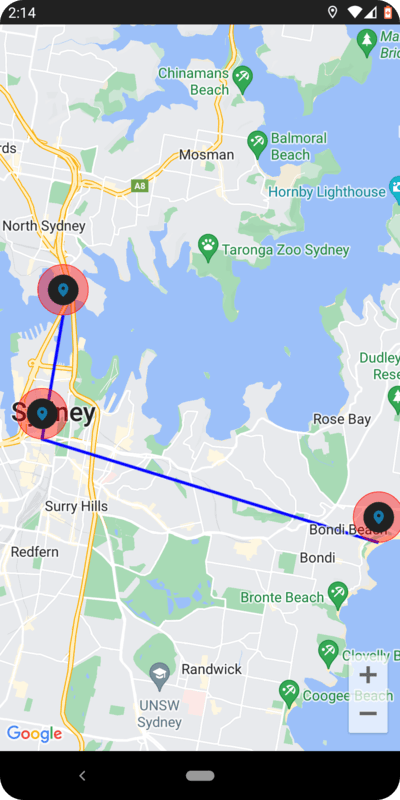
5. Polyline
A Polyline represents a series of connected lines between different points on the map, often used to display routes or boundaries.
@Composable
fun SimpleMap(
) {
    val latLng = LatLng(-33.8568, 151.2153) // Sydney Opera House lat lng

    val cameraPositionState = rememberCameraPositionState {
        position = CameraPosition.fromLatLngZoom(latLng, 14f)
    }
    val mapProperties = remember {
        MapProperties(
            mapType = MapType.NORMAL,
        )
    }

    val points = listOf(
        LatLng(-33.852334, 151.211245),  // Sydney Opera House
        LatLng(-33.873651, 151.2068896), // Sydney Tower Eye
        LatLng(-33.891475, 151.276684)   // Bondi Beach
    )

    GoogleMap(
        cameraPositionState = cameraPositionState,
        properties = mapProperties,
        uiSettings = MapUiSettings(
            myLocationButtonEnabled = false,
            compassEnabled = false,
            mapToolbarEnabled = false
        ),
    ) {
        Polyline(
            points = points,
            color = Color.Blue,
            width = 7f
        )

        CustomMarkers(
            latLng = points[0],
            title = "Sydney Opera House"
        )
        CustomMarkers(
            latLng = points[1],
            title = "Sydney Tower Eye"
        )
        CustomMarkers(
            latLng = points[2],
            title = "Bondi Beach"
        )
    }
}

@Composable
fun CustomMarkers(latLng: LatLng, title: String) {
    MarkerComposable(
        state = rememberMarkerState(position = latLng),
        title = title
    ) {
        Box(
            modifier = Modifier
                .size(50.dp)
                .background(
                    Color.Red.copy(alpha = 0.4f),
                    shape = CircleShape
                )
                .border(0.5.dp, Color.Red.copy(alpha = 0.8f), shape = CircleShape),
            contentAlignment = Alignment.Center
        ) {
            Box(
                modifier = Modifier
                    .size(30.dp)
                    .background(
                        AppTheme.colorScheme.surface,
                        shape = CircleShape
                    ),
                contentAlignment = Alignment.Center
            ) {
                Icon(
                    painter = painterResource(id = R.drawable.ic_tab_places_filled),
                    contentDescription = null,
                    tint = AppTheme.colorScheme.primary,
                    modifier = Modifier.size(20.dp)
                )
            }
        }
    }
}
Conclusion
Following this guide, you’ve successfully integrated Google Maps into your Jetpack Compose app, controlled the camera view, and added various map elements.
These features can significantly improve your app’s usability and appeal. Keep exploring and experimenting with Google Maps to unlock even more potential.
Check out GroupTrack — a location-sharing and tracking application. It covers all the features mentioned, including adding maps, controlling camera positions, and drawing markers, circles, and polylines.
Thanks for reading, and happy developing!
Popular Blogs

'%3e%3crect%20opacity='0.3'%20width='253.333'%20height='256.667'%20rx='10'%20transform='matrix(0.898794%200.438371%20-0.425364%200.905022%20109.961%20230.004)'%20fill='%23F2709C'%20fill-opacity='0.2'/%3e%3crect%20opacity='0.3'%20width='211.667'%20height='188.333'%20rx='15'%20transform='matrix(0.987688%200.156434%20-0.151006%200.988533%20-40.0391%201715)'%20fill='%23FF9472'%20fill-opacity='0.2'/%3e%3crect%20opacity='0.3'%20width='150'%20height='150'%20rx='10'%20transform='matrix(0.669131%200.743145%20-0.730788%200.682605%202111.64%201603.34)'%20fill='%23F2709C'%20fill-opacity='0.2'/%3e%3crect%20opacity='0.3'%20width='165'%20height='165'%20rx='15'%20transform='matrix(-0.669131%20-0.743145%20-0.730788%200.682605%201998.3%20643.336)'%20fill='%236CCAFF'%20fill-opacity='0.2'/%3e%3crect%20opacity='0.3'%20width='128.333'%20height='128.333'%20rx='50'%20transform='matrix(0.669131%200.743145%20-0.730788%200.682605%20379.961%20958.336)'%20fill='%23B66CFF'%20fill-opacity='0.2'/%3e%3crect%20opacity='0.3'%20width='128.333'%20height='128.333'%20rx='50'%20transform='matrix(0.669131%200.743145%20-0.730788%200.682605%201859.97%202311.67)'%20fill='%23B66CFF'%20fill-opacity='0.2'/%3e%3crect%20opacity='0.3'%20width='156.667'%20height='158.333'%20rx='10'%20transform='matrix(0.891007%200.453991%20-0.440801%200.897605%20938.312%202176.67)'%20fill='%23B66CFF'%20fill-opacity='0.2'/%3e%3c/g%3e%3c/svg%3e)
