How to Secure Your Supabase Database and Storage
Introduction
In the era of data breaches and cybersecurity threats, safeguarding sensitive information is paramount for businesses and developers.
With the rise of cloud-based databases and storage solutions, such as Supabase, Firebase, AWS, or Google Cloud Firestore ensuring the security of your data is more critical than ever.
Supabase is an open-source platform that provides developers with a set of tools to build scalable and secure web applications.
Leveraging PostgreSQL as its database engine and integrating with popular authentication providers like Auth0 and Firebase, Supabase offers a comprehensive solution for managing data and user access in modern web applications.
In this blog post, we’ll explore the best practices and strategies for securing your Supabase Database and Storage, helping you mitigate risks, and protecting your valuable data assets.
Sponsored
We believe that everyone deserves the opportunity to succeed and thrive, and Justly is designed to provide the guidance and support needed to make that a reality.
Database Security
A robust database security strategy is essential for protecting your data from unauthorized access, manipulation, or theft. Here are the step-by-step implementations to consider.
Create a table with the required fields
In Supabase, creating a table is straightforward. we can do this through the SQL editor provided in the Supabase dashboard.
Navigate to the SQL editor and execute a CREATE TABLE statement to define the structure of your "users" table. For example,
create table users (
  id bigint primary key generated always as identity,
  auth_uid text not null, // optional - to store auth user id from supabase.auth
  name text not null,
  email text not null,
  created_at timestamp with time zone default current_timestamp
);
In this definition, auth_uid field is optional. It will required if we want to grant access to all the supabase auth users. We’ll see later how it works.
Also, we can create it by using the Supabase table editor like,
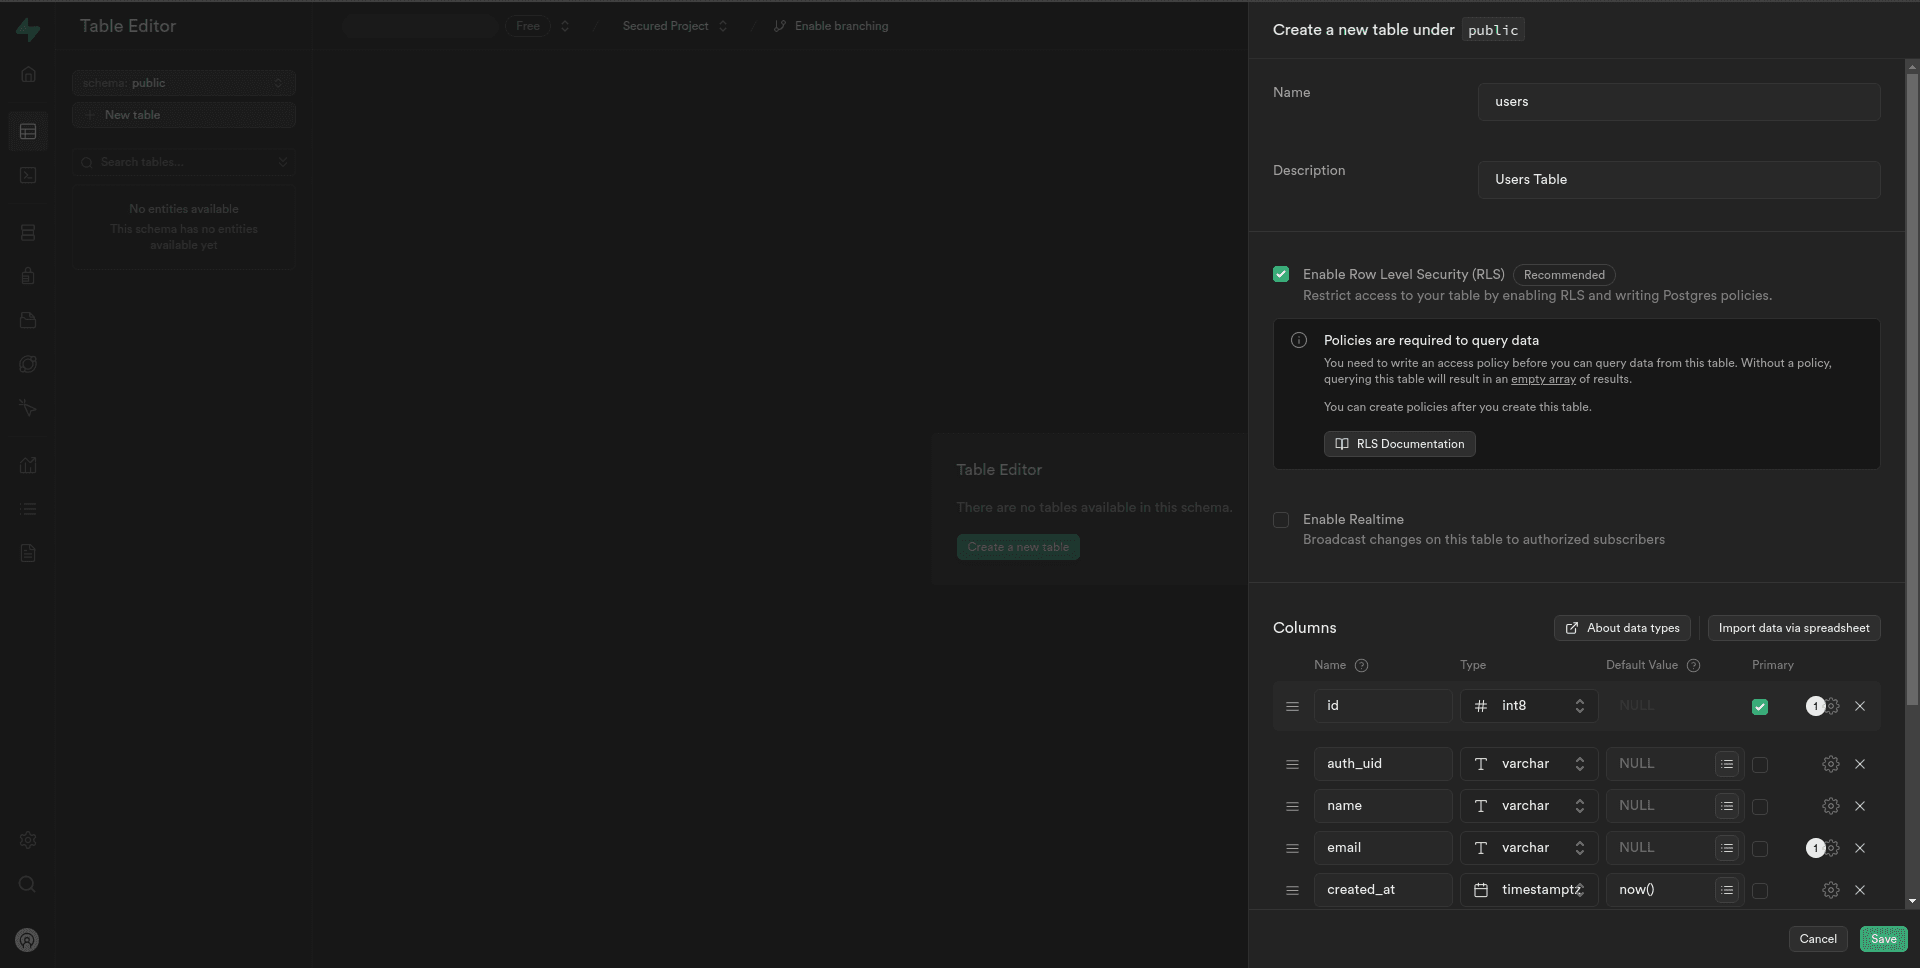
Customize the fields based on your application’s requirements. In this example, we have fields for user ID, name, email, and creation timestamp.
Create a user for authentication
The auth methods can be accessed via the supabase.auth namespace.
When we use supabase.auth to handle authentication in your application, it interacts directly with the Supabase authentication system.
This means that when a user signs up using your application's authentication flow (powered by supabase.auth), Supabase automatically creates a corresponding user record in the authentication system.
const { data, error } = await supabase.auth.signUp({
  email: 'example@email.com',
  password: 'example-password',
})
However, there might be scenarios where we need to manually create user records, such as during development or for administrative purposes.
In such cases, we can add users directly from the Supabase dashboard using the following steps:
1. Navigate to the Authentication tab in your Supabase dashboard.
2. Under the Users section, we can manually create a user by clicking the Add user — Create new user button.
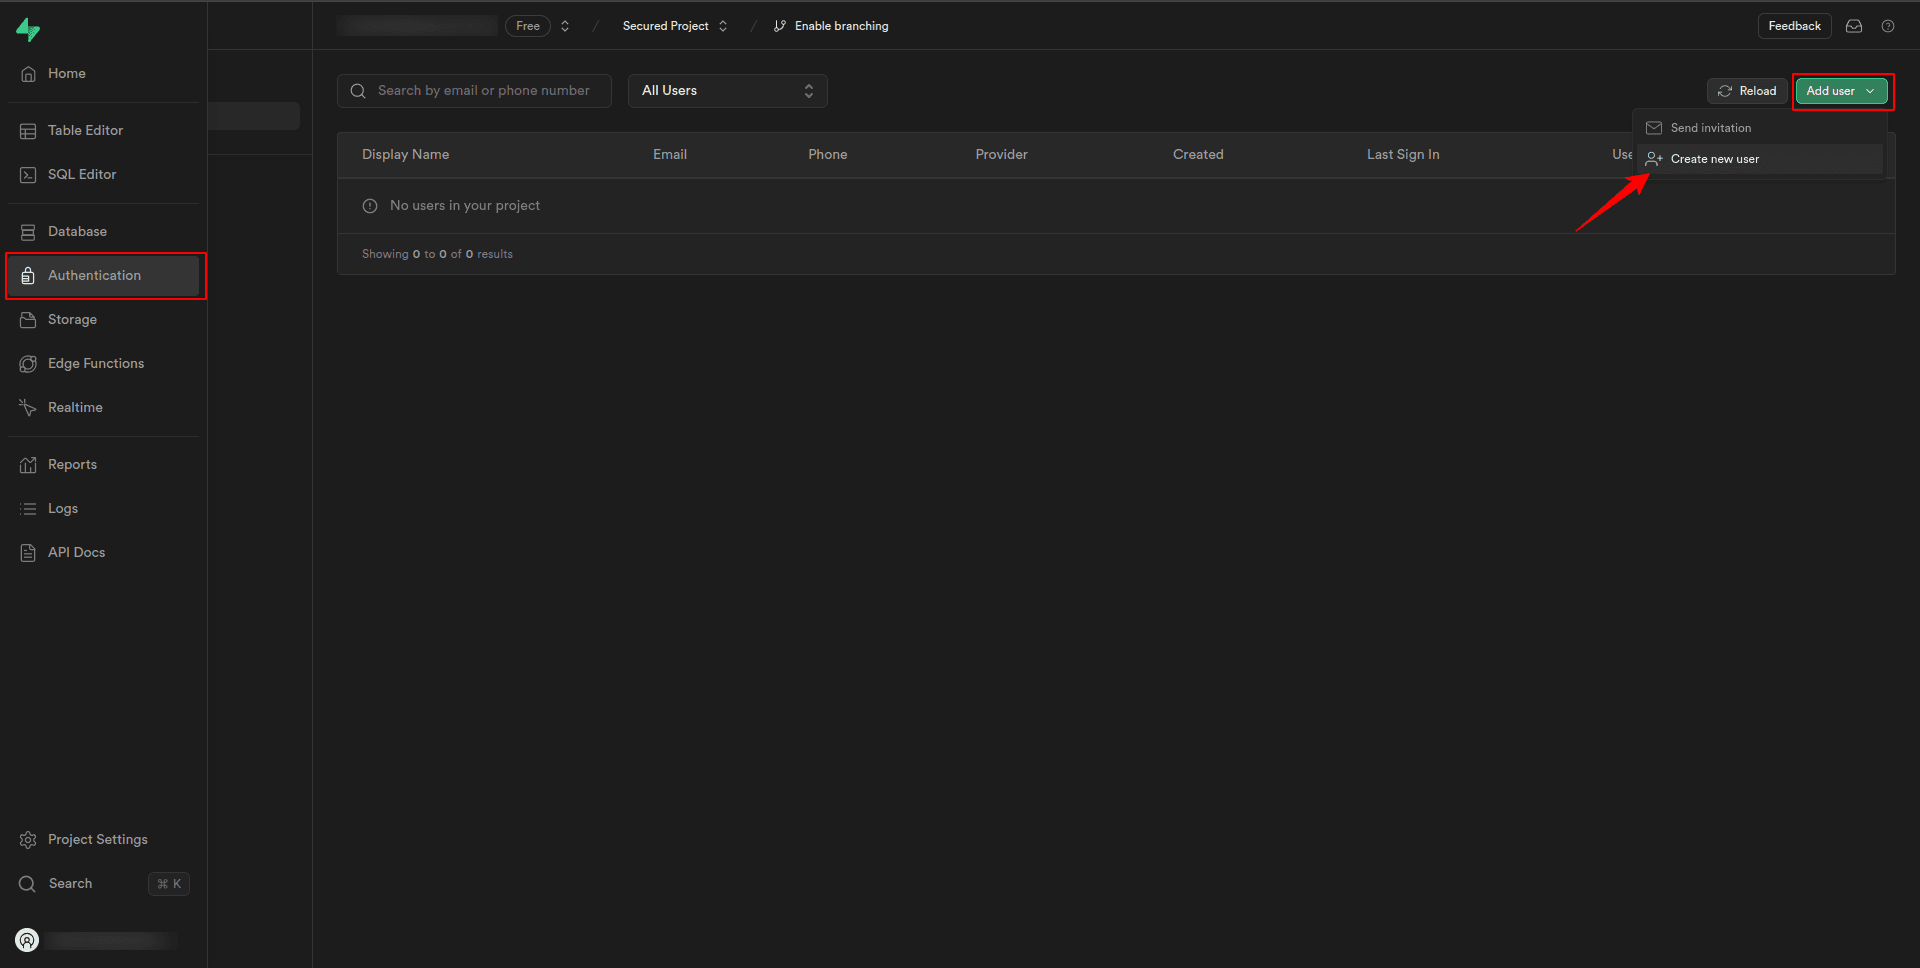
3. Fill in the required user details such as email and password to create a new user account.
This step simulates the creation of a user account in your application, allowing us to test authentication and access control policies.
Create policies for the users table
In the Supabase dashboard, navigate to the Policies section from the Authentication tab.
Here, you’ll find a list of tables in your database schema. Locate the “users” table that we created earlier.
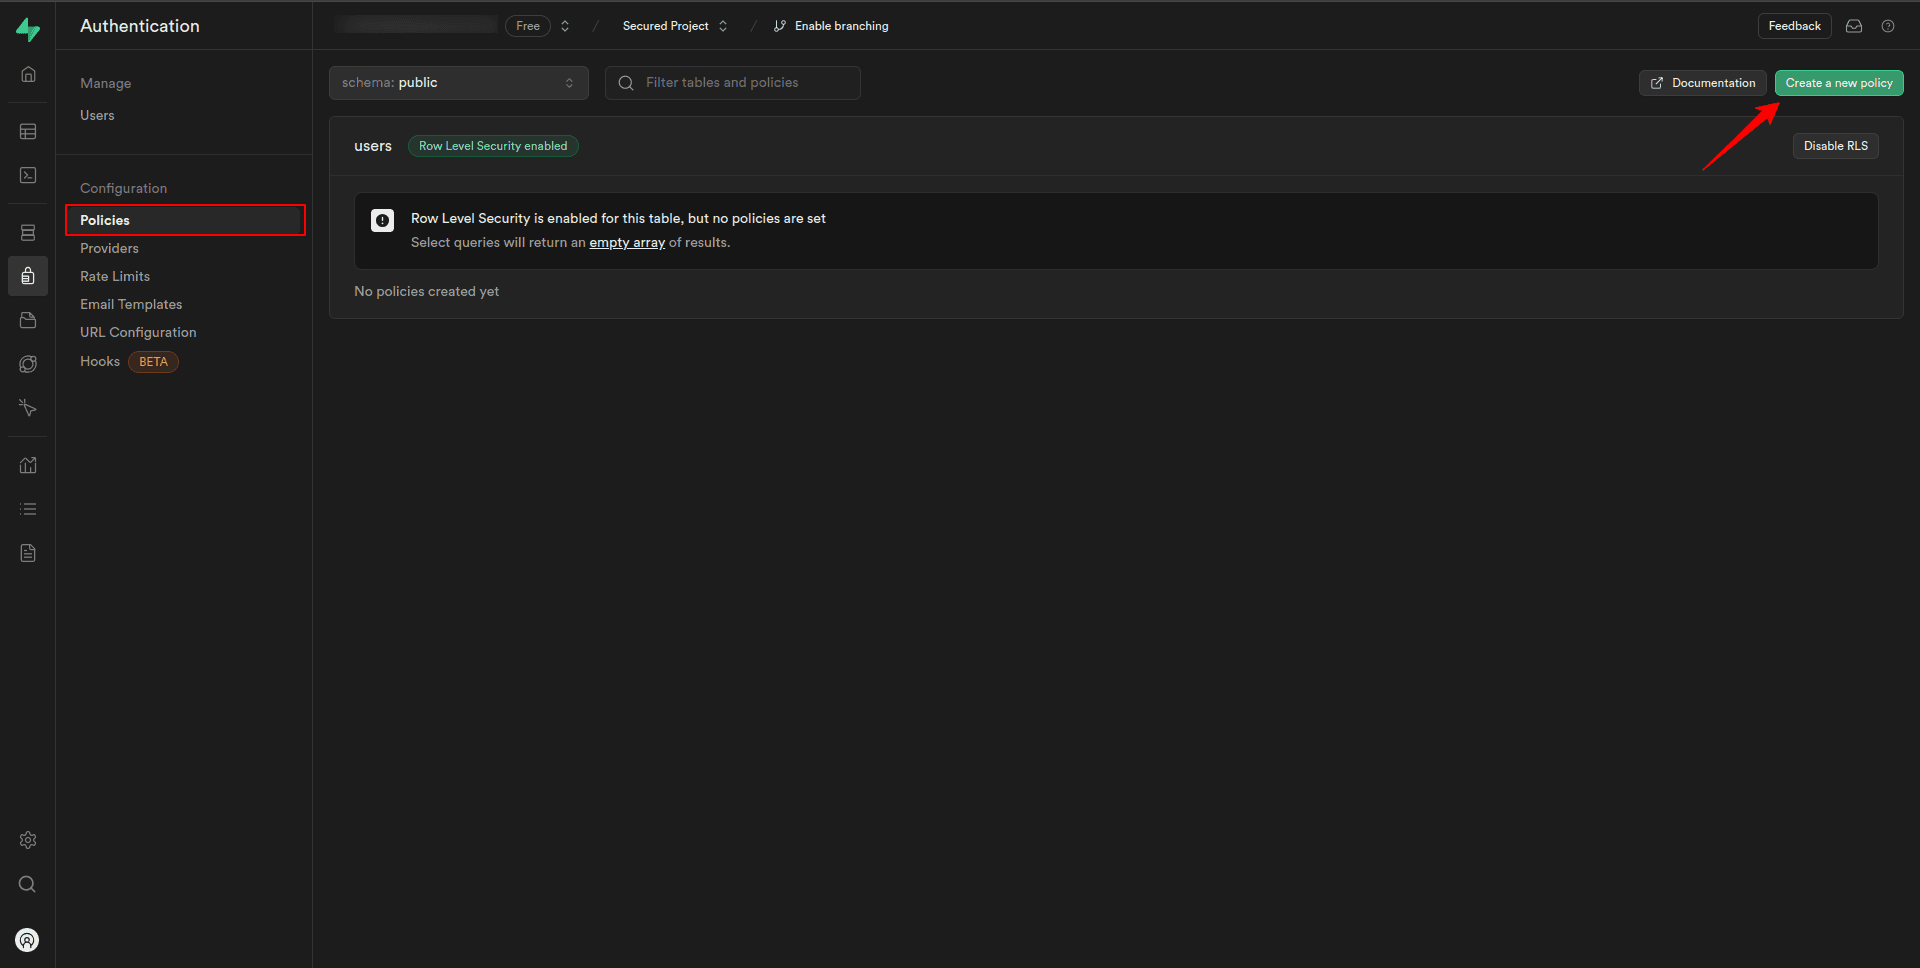
To create a policy for records from the “users” table, click on the “Add new policy” button.
This will open a dialogue box where we can specify the details of the new policy.
Select record policy
In the dialogue box, you’ll see a list of available policy templates.
Click on the first template labeled “Select” to create a select record policy.
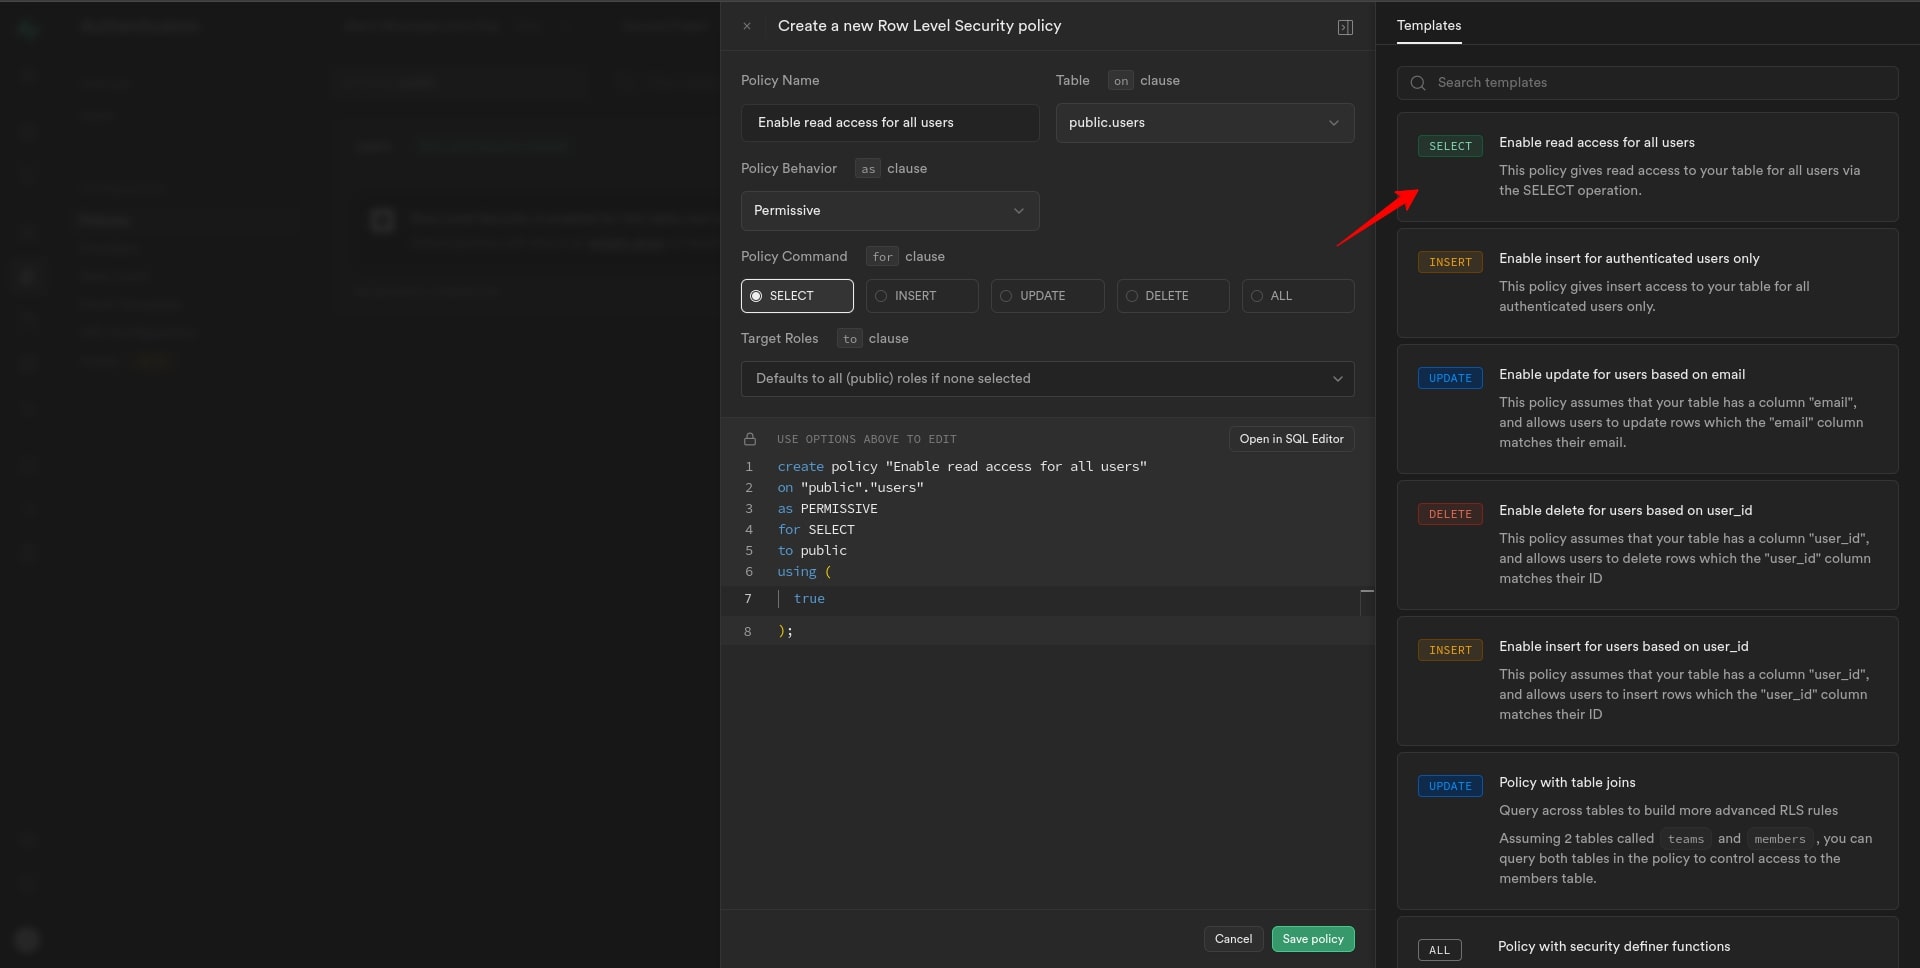
The policy name and required settings will be automatically populated based on the selected template. Review the settings to ensure they align with your requirements. We can customize the policy further if needed.
After configuring the policy settings, click on the “Save policy” button to save your changes.
Insert record policy
Now, let’s walk through the process of setting up an insert record policy for the “users” table.
In the dialogue box, click on the template labeled “Insert” to create an insert record policy.
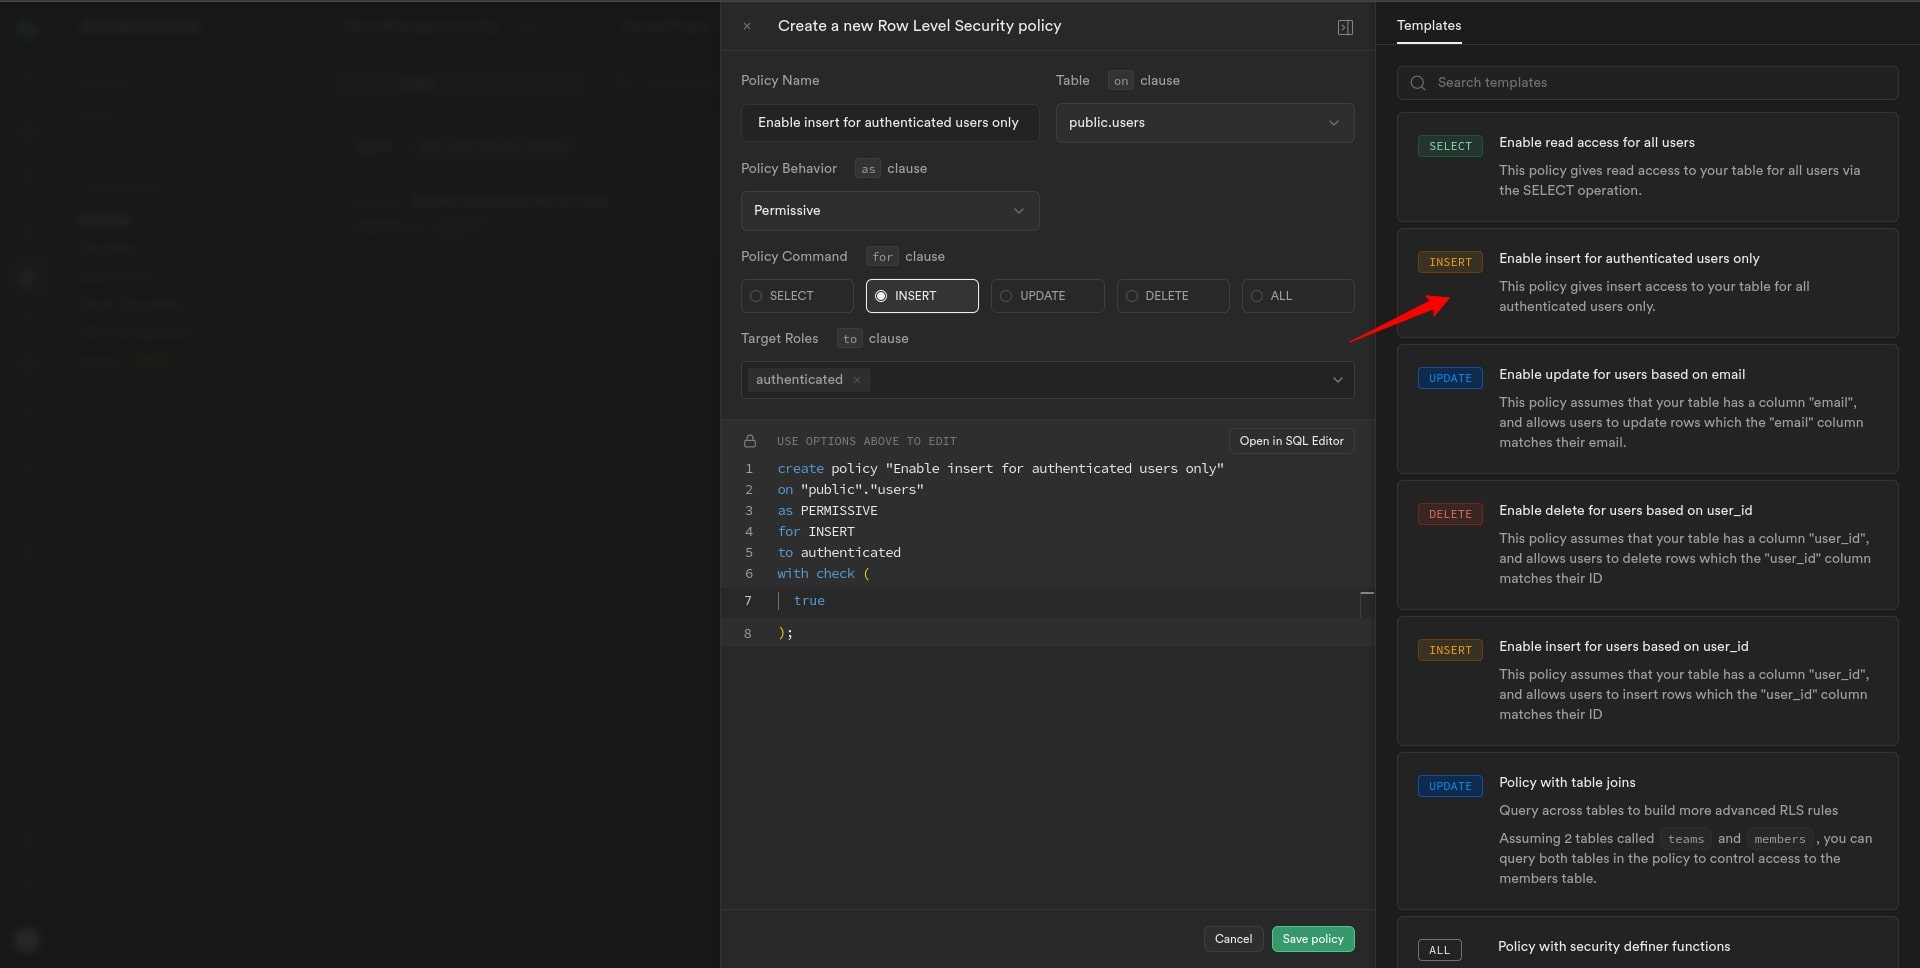
The policy name and required settings will be automatically populated based on the selected template. Review the settings to ensure they align with your requirements. We can customize the policy further if needed.
After configuring the policy settings, click on the “Save policy” button to save your changes.
Update record policy
Now, let’s outline the steps for implementing an update record policy for the “users” table, taking into account different scenarios:
— Granting access to all Supabase auth users
For all supabase auth users, setting up an update record policy is straightforward.
1. In the “Add new policy” dialogue box, select the template for updating records.
2. In the policy configuration, set the Target Roles to “Authenticated”.
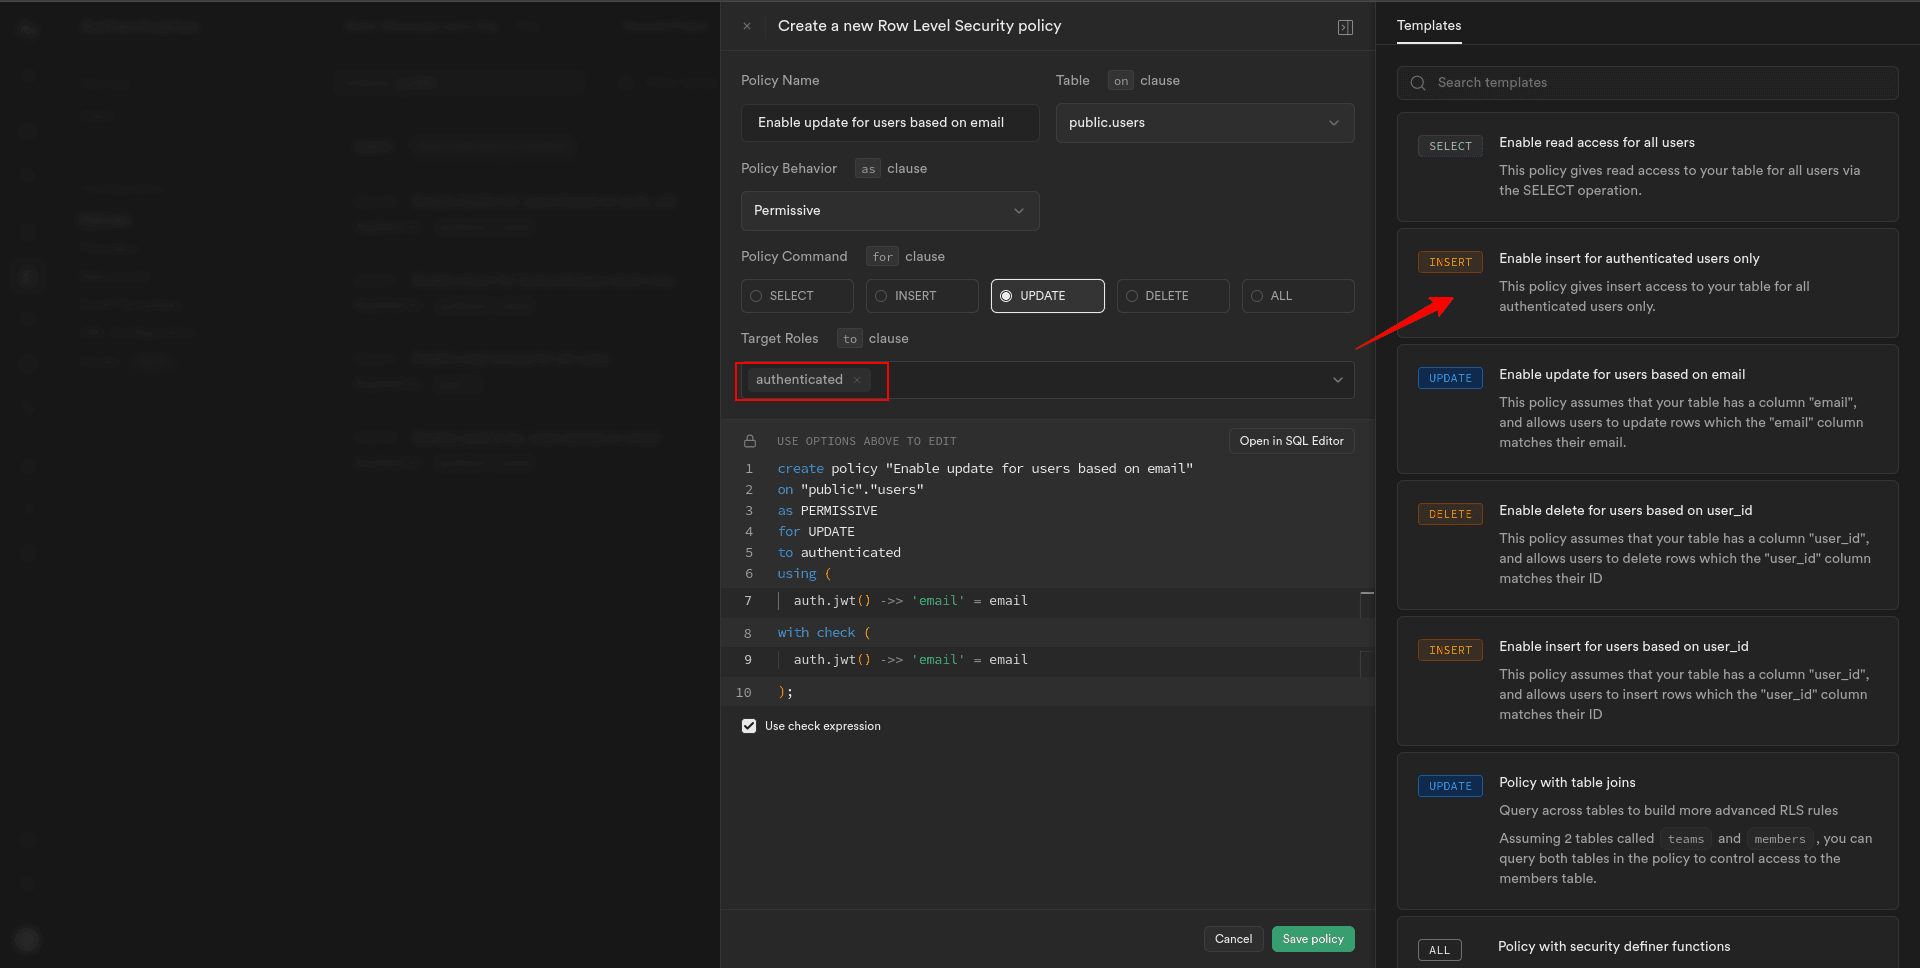
This allows any authenticated user, regardless of their specific role, to update the user record in the “users” table.
3. Save the policy to apply the update record restrictions for the “users” table.
— Granting access to the specific Supabase auth user
For the specific Supabase auth user, the process is slightly different.
The first and second points are the same as above described for all Supabase auth users.
Now, you’ll need to identify them based on unique identifiers such as their email address.
3. Set the appropriate conditions in the policy configuration to match the email address of the specific user attempting to update their record.

This allows only specified authenticated users, regardless of their specific role, to update the user record in the “users” table.
4. Save the policy to apply the update record restrictions for the “users” table.
Delete record policy
Now, let’s detail the steps for implementing a delete record policy for the “users” table, using the user’s ID:
— Granting access to all Supabase auth users
For all supabase auth users, configuring a delete record policy follows a similar process as before.
1. In the “Add new policy” dialogue box, select the template for deleting records.
2. In the policy configuration, set the Target Roles to “Authenticated”.
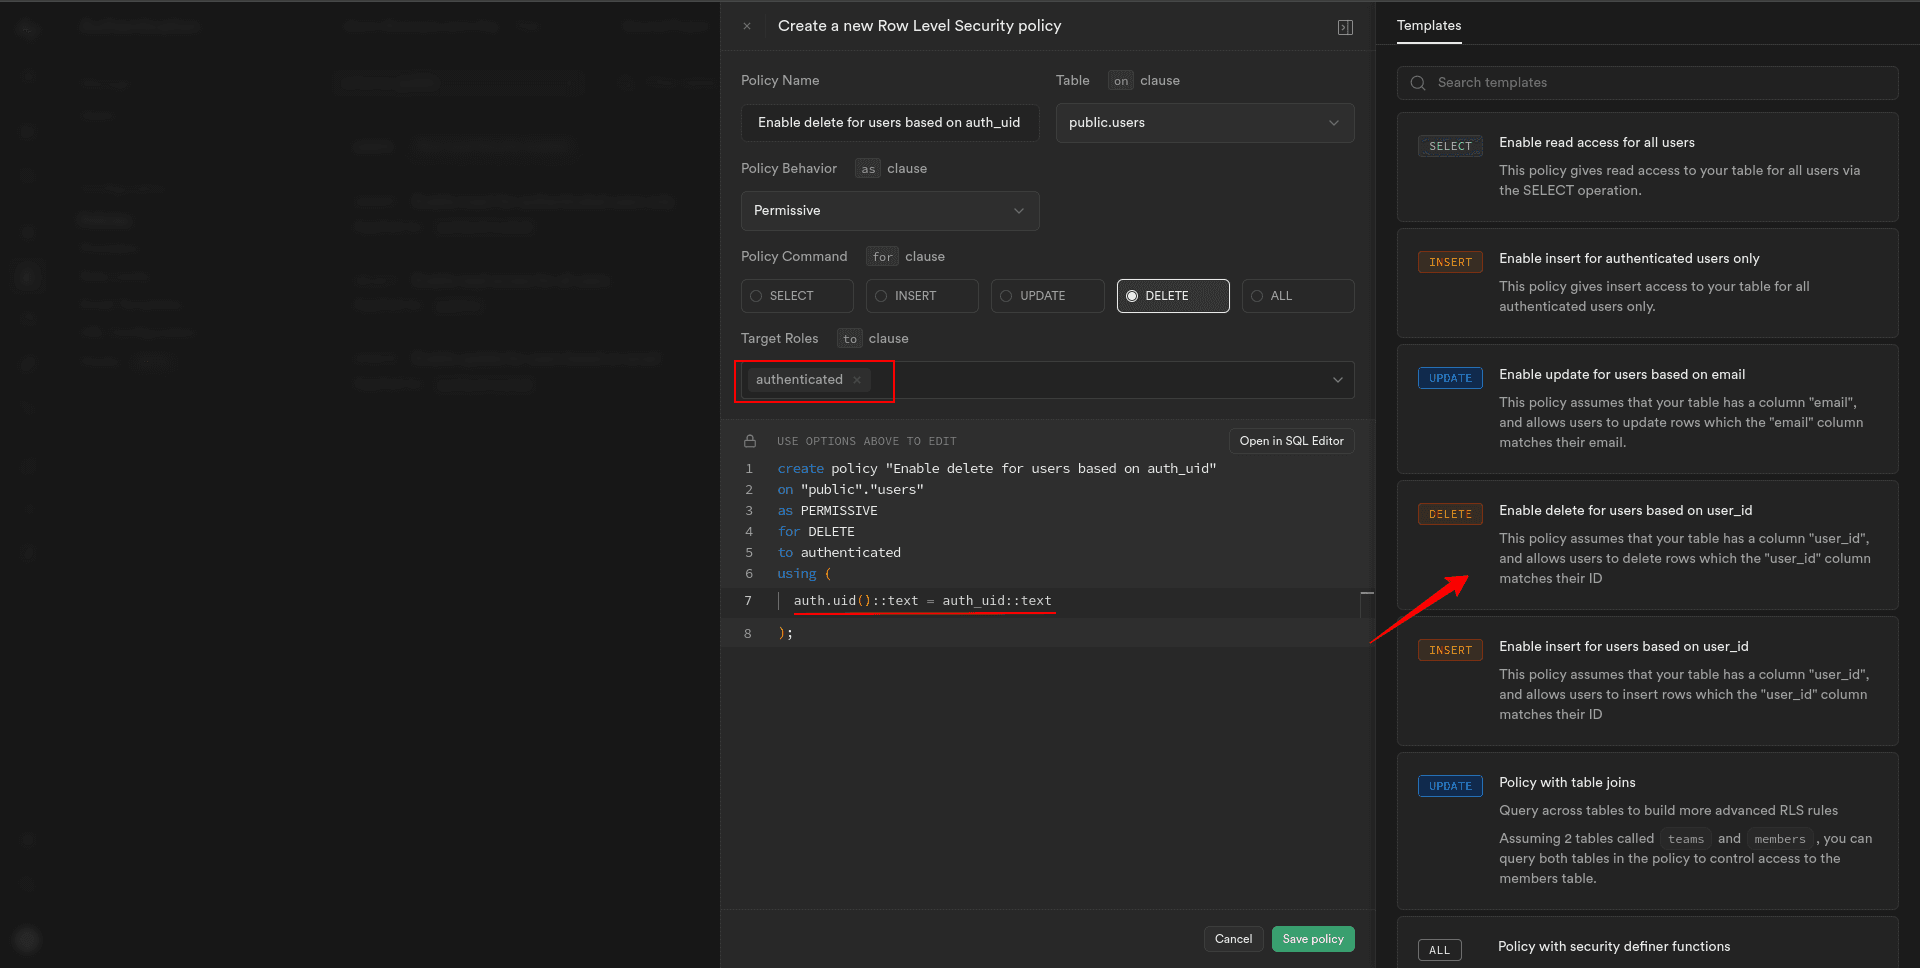
This allows any authenticated user, regardless of their specific role, to delete a user record in the “users” table.
3. Save the policy to apply the delete record restrictions for the “users” table.
— Granting access to the specific Supabase auth user
For the specific Supabase auth user, adjust the policy to use the user’s ID:
The first and second points are the same as above described for all Supabase auth users.
Now, for the specific user, you’ll need to identify them based on their user ID.
3. Set the appropriate conditions in the policy configuration to match the user ID of the user attempting to delete their record.
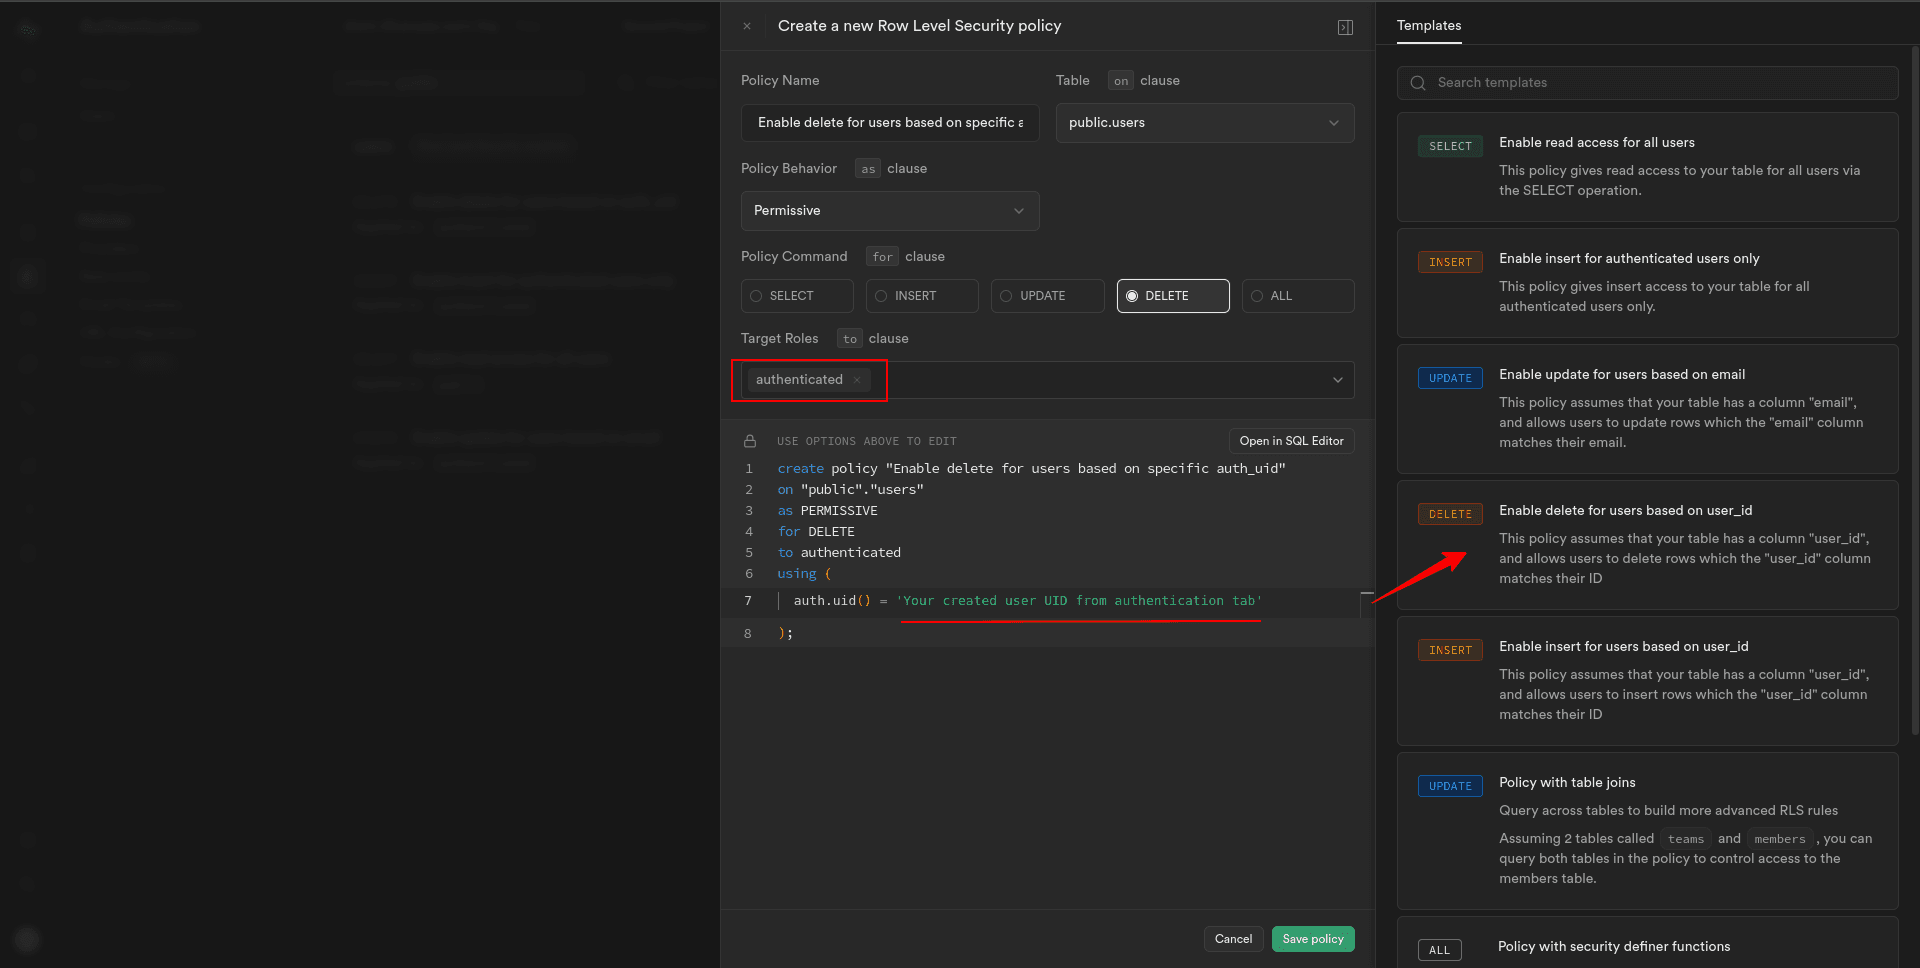
This allows only specified authenticated users, regardless of their specific role, to delete the user record in the “users” table.
4. Save the policy to apply the delete record restrictions for the “users” table.
Now, we can see we have Select, Insert, Update, and Delete policies for the “users” table. We can edit or delete it if we find any issues with it.
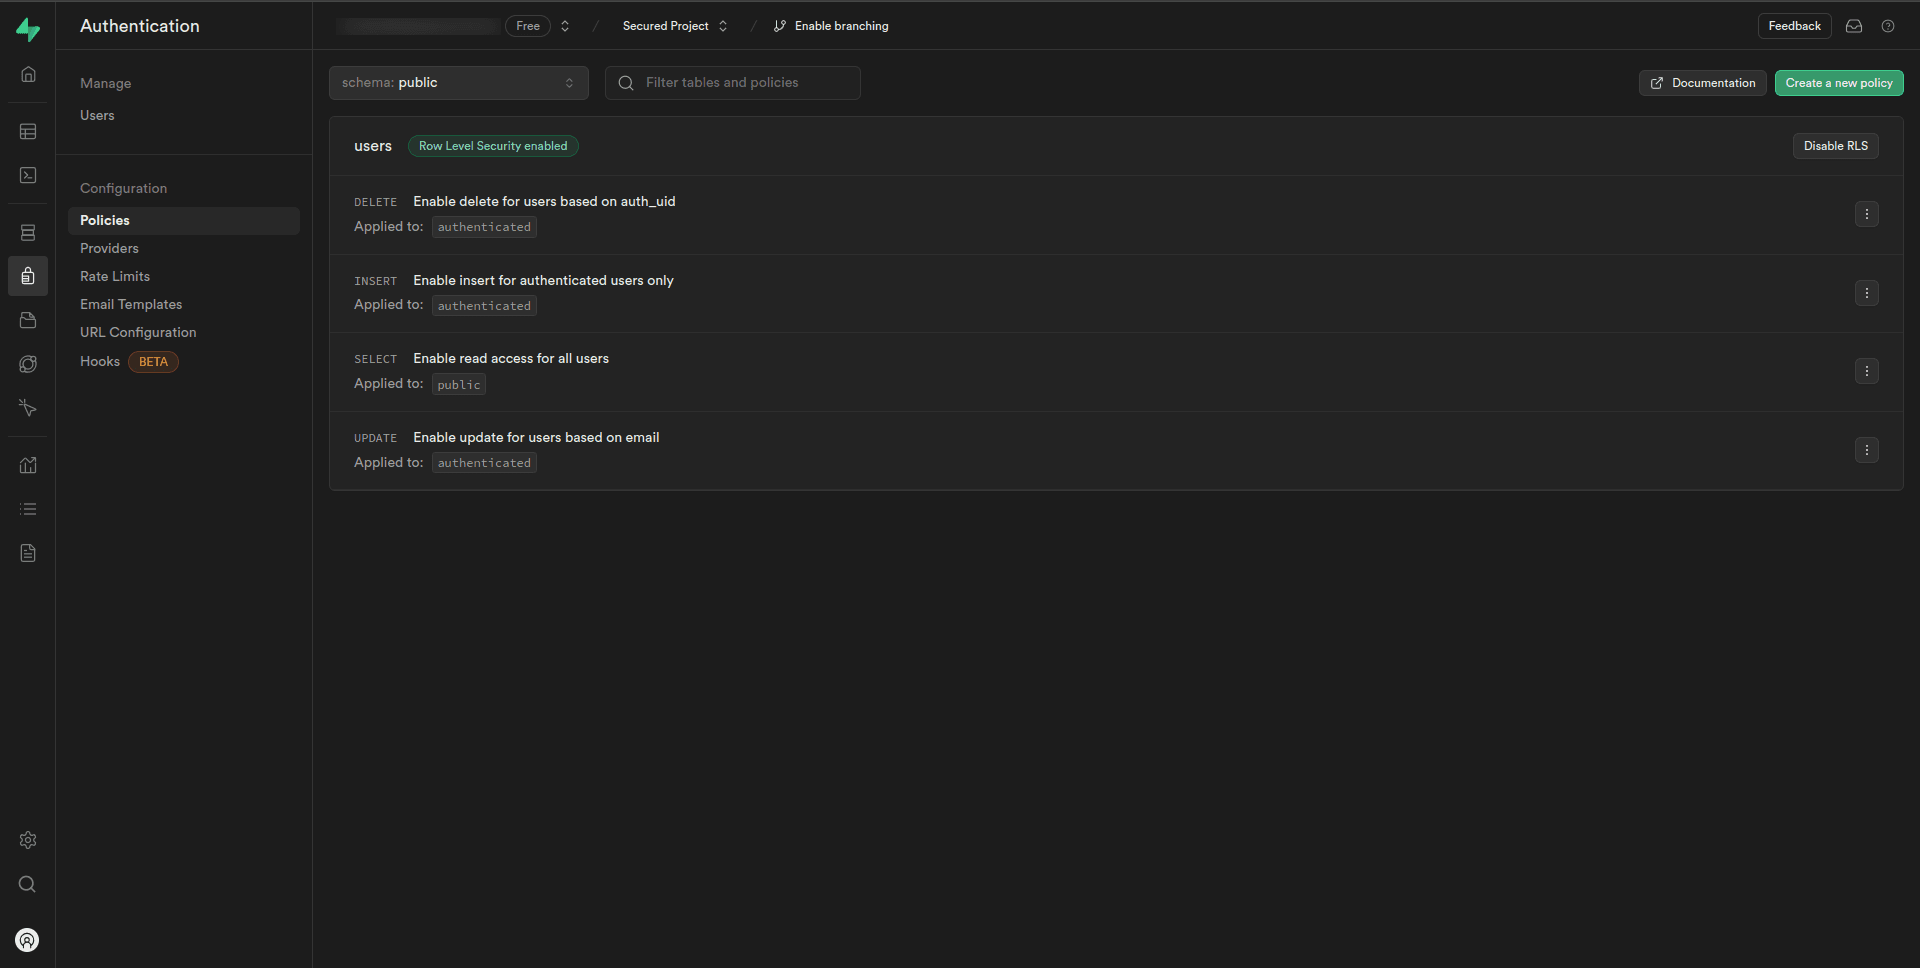
Awesome!!👌Now, our database is secured.
Customize the policy settings as needed, specifying which roles or users have permission to perform the operations on the “users” table.
Storage Security
In addition to database security, securing data stored in cloud storage is equally important. Here are step-by-step implementations for enhancing storage security.
Create a bucket
1. Click on the “Storage” from the Supabase dashboard.
2. In the storage sidebar, click New Bucket.
3. Add a name for your bucket, then set the Public bucket toggle to true to grant access for showing all the files from the bucket.
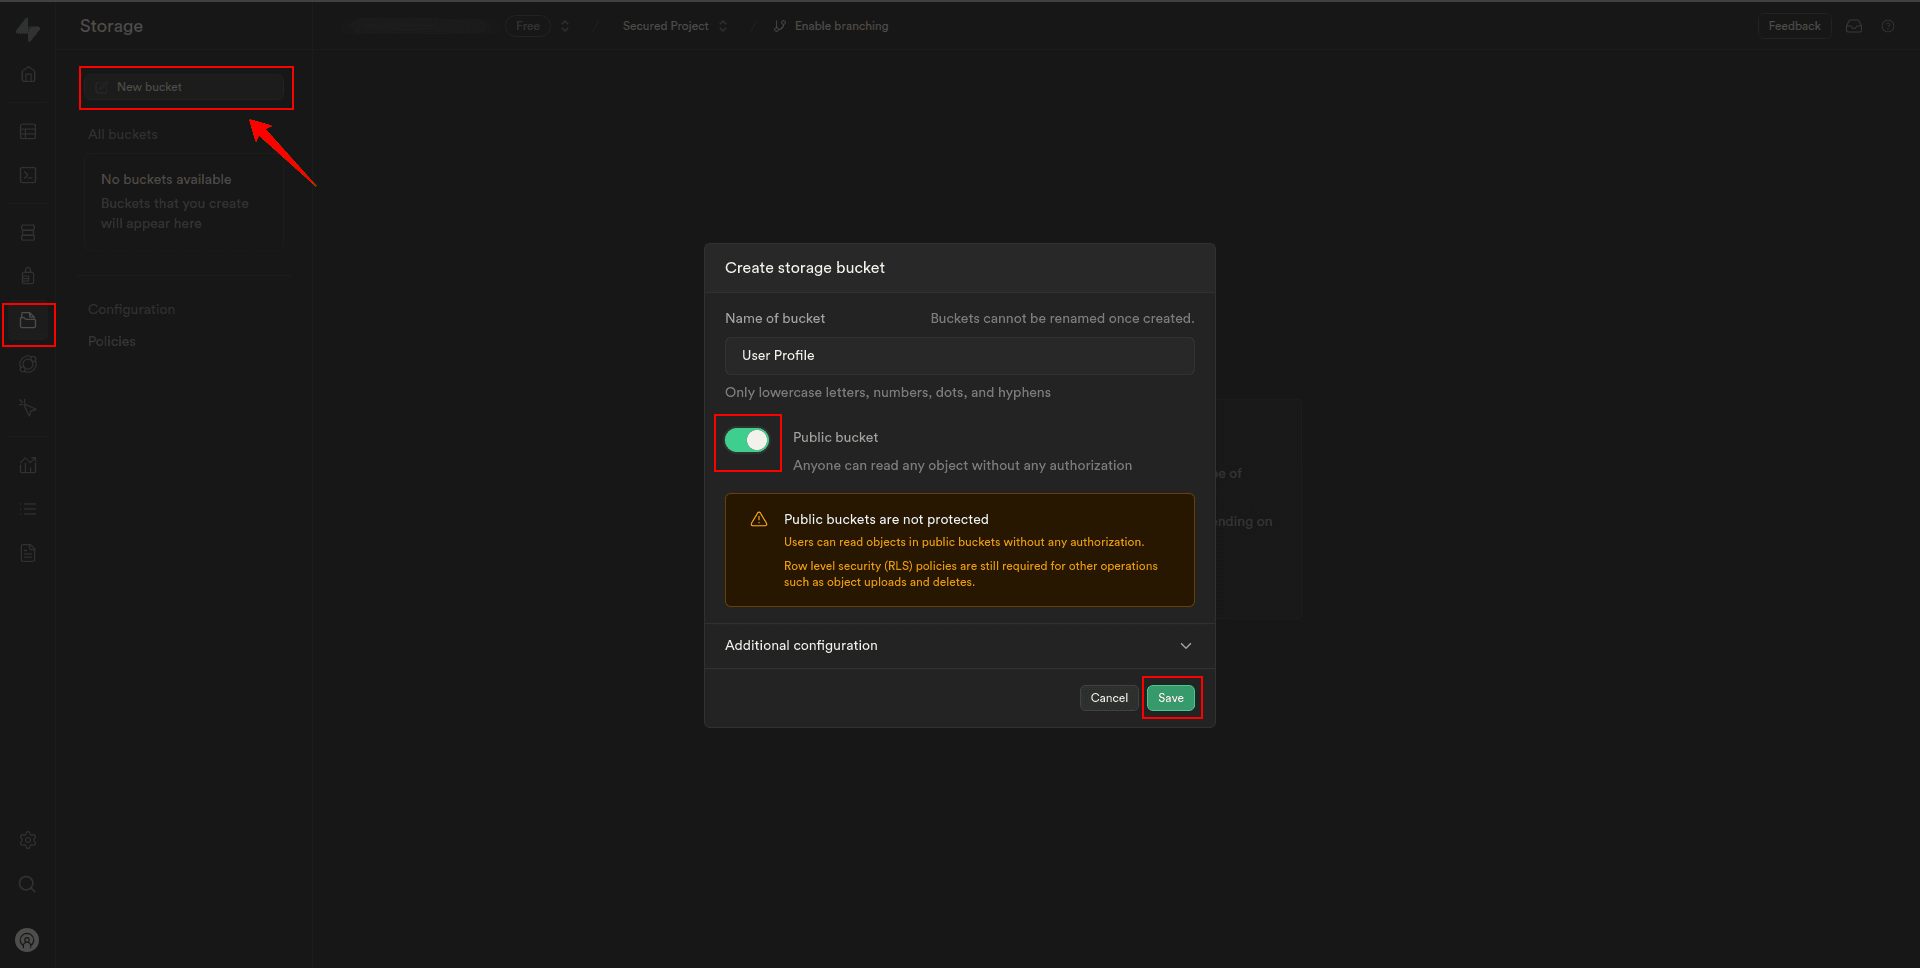
4. Click “Save” when done.
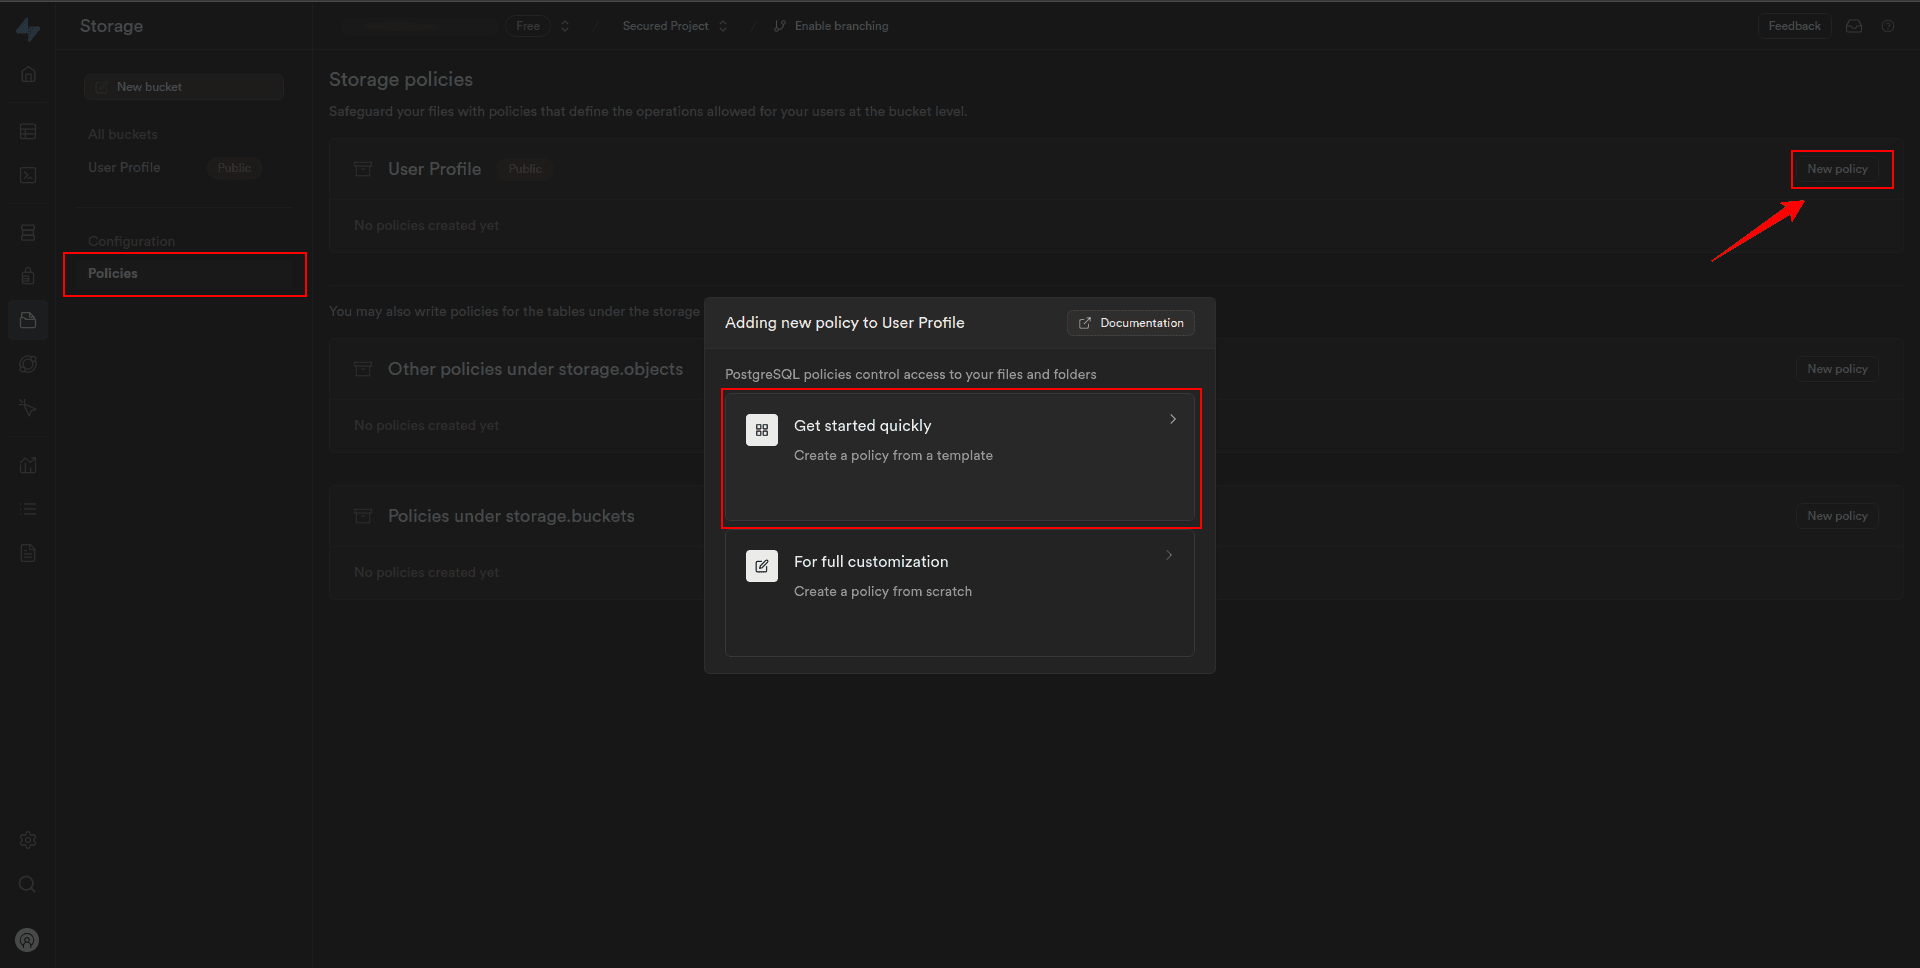
Create policies for the bucket
1. Back in the Storage sidebar, click Policies.
2. Under Storage Policies, locate the bucket we just created and click New Policy.
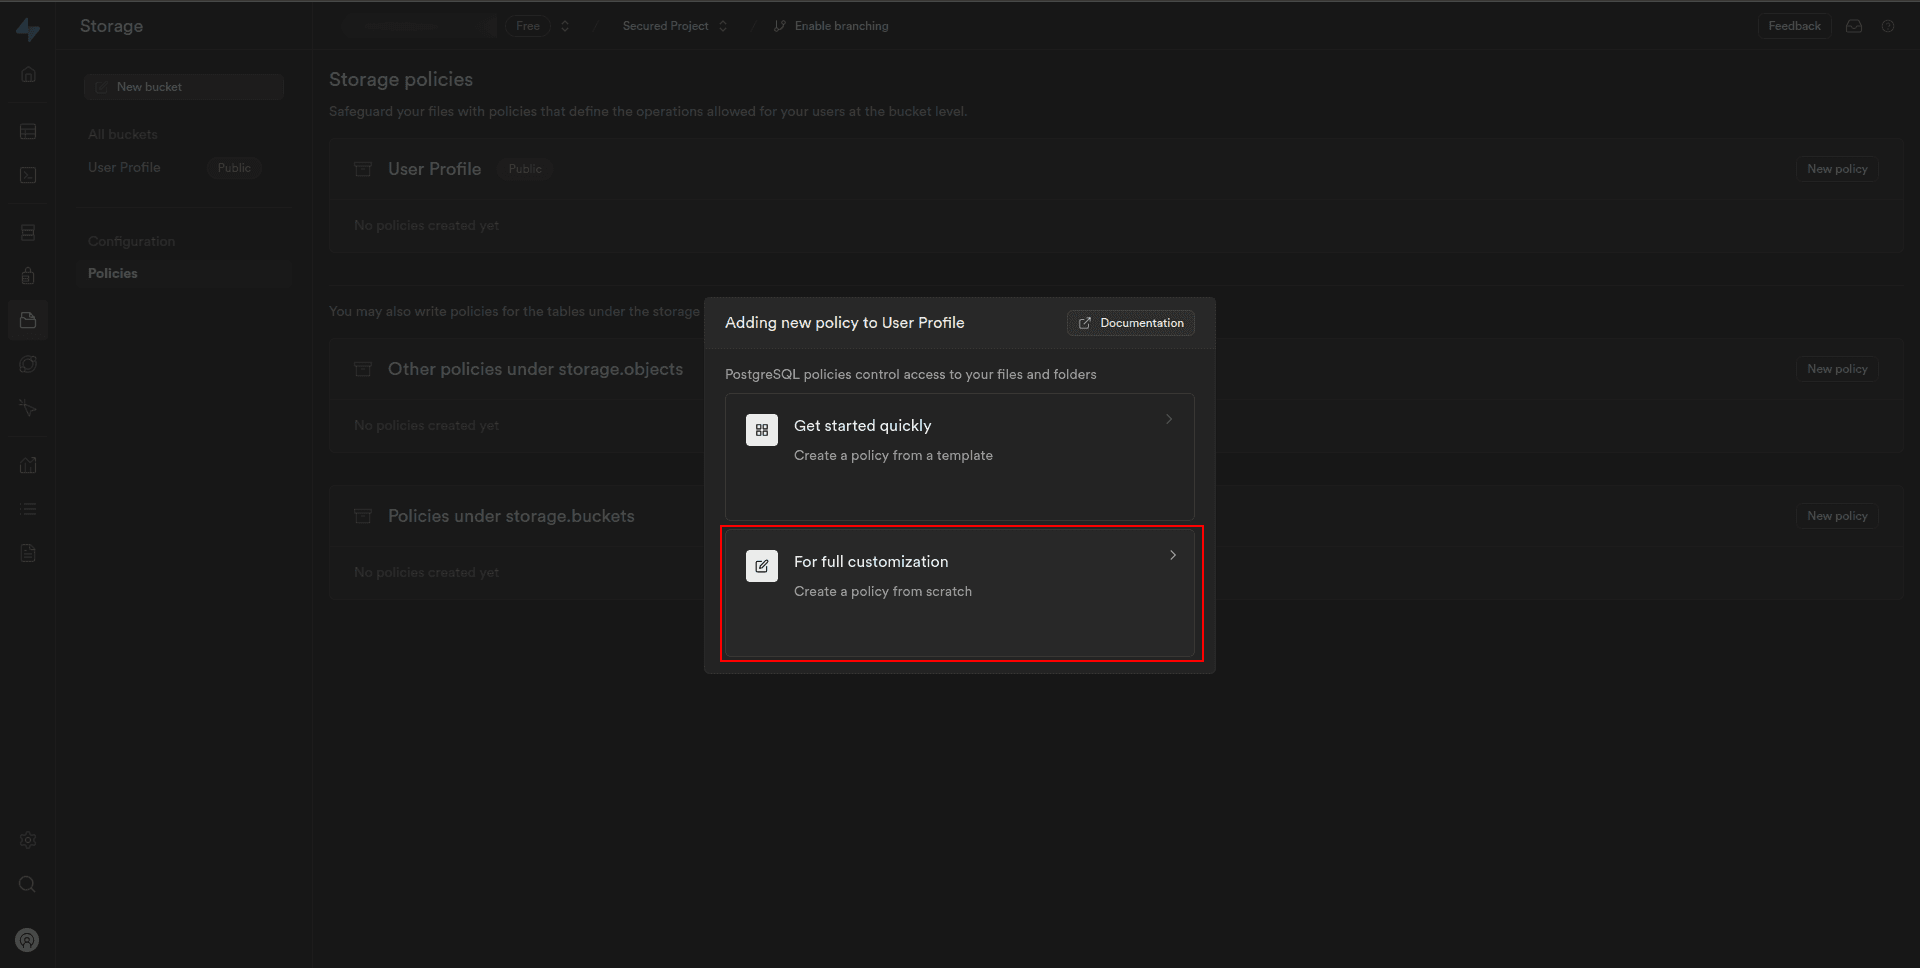
Now, we can see the dialogue has two options for creating the policy. Let’s go through both step by step:
Steps for Getting Started Quickly
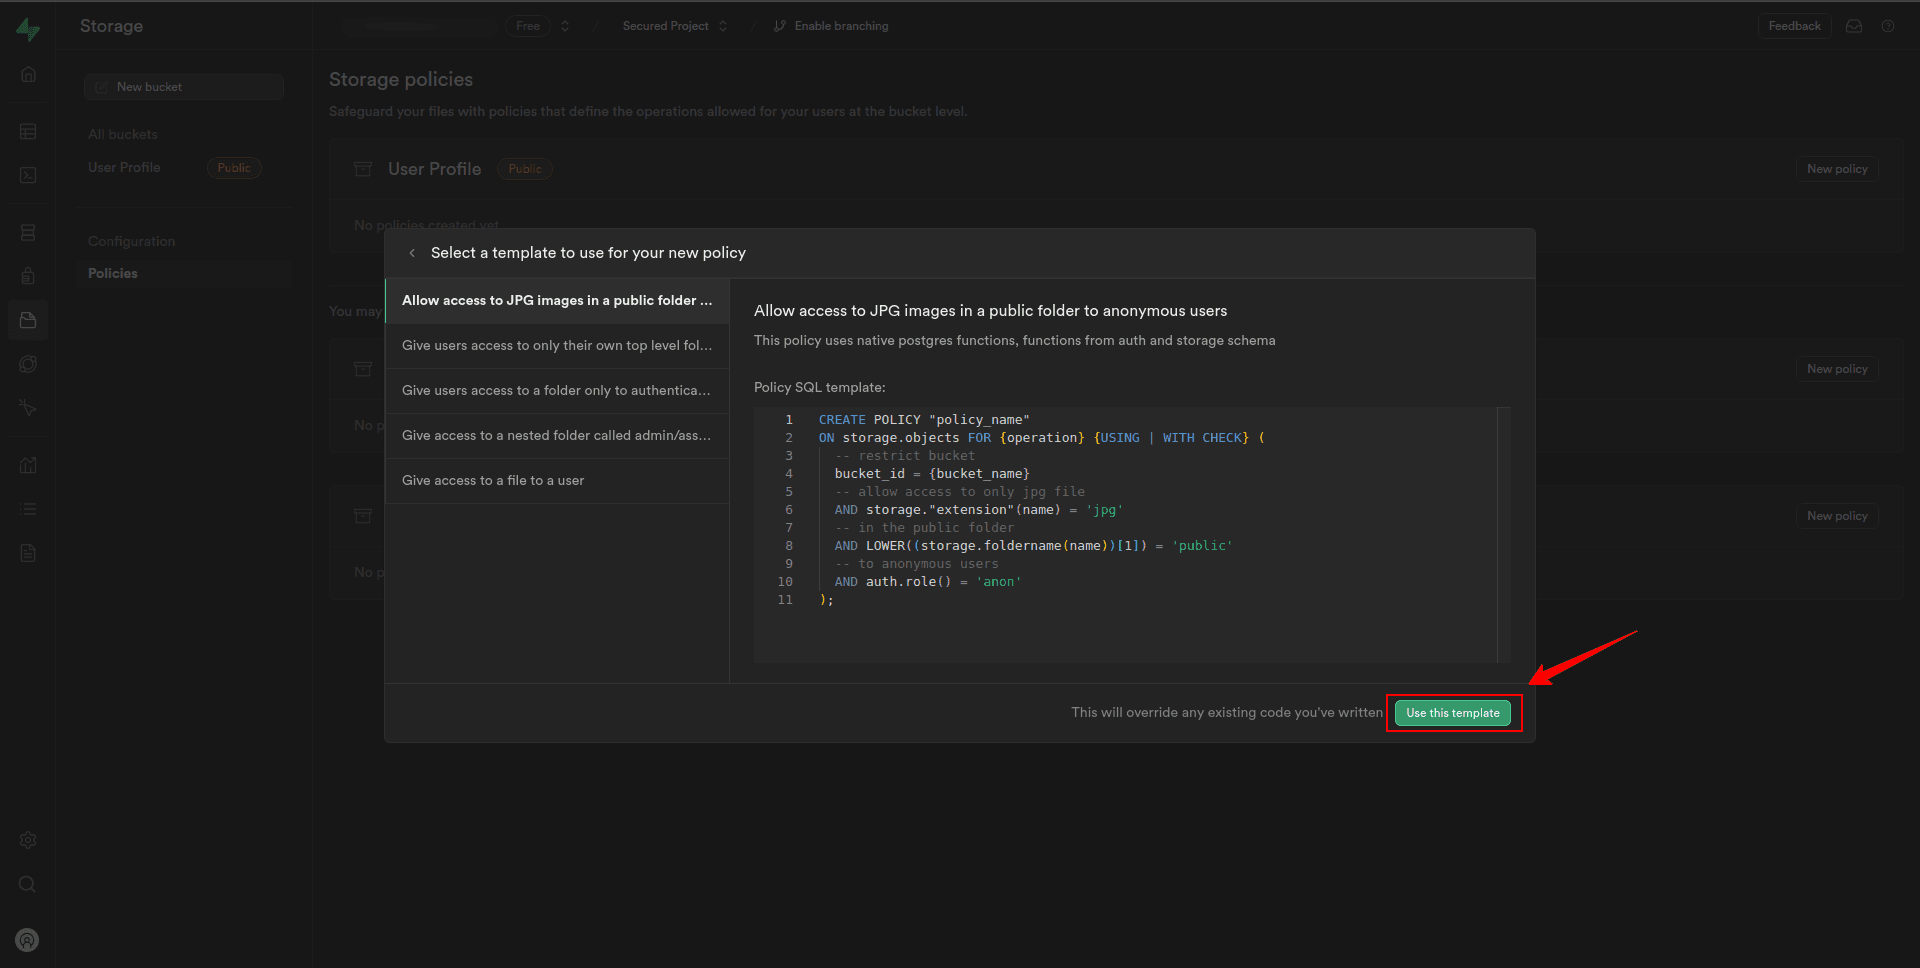
3. Click on the “Get started quickly: Create a policy from a template” to create a policy from the template.
4. In the modal sidebar, there are five templates to create a policy. We can select as per your requirement and click on Use this template.
5. On the next page, under Allowed operation, check the select, insert, and delete box to enable inserting and deleting of images into Storage.

6. Set the Target Roles to “Authenticated”.
7. Click on the Review.

8. Review the policies added using the template, and then click Save policy.
Steps for full customization
3. Click “For full customization: Create a policy from scratch” to create a policy from scratch.
4. On the next modal, under Allowed operation, check the select, insert, and delete box to enable inserting and deleting of images into Storage.
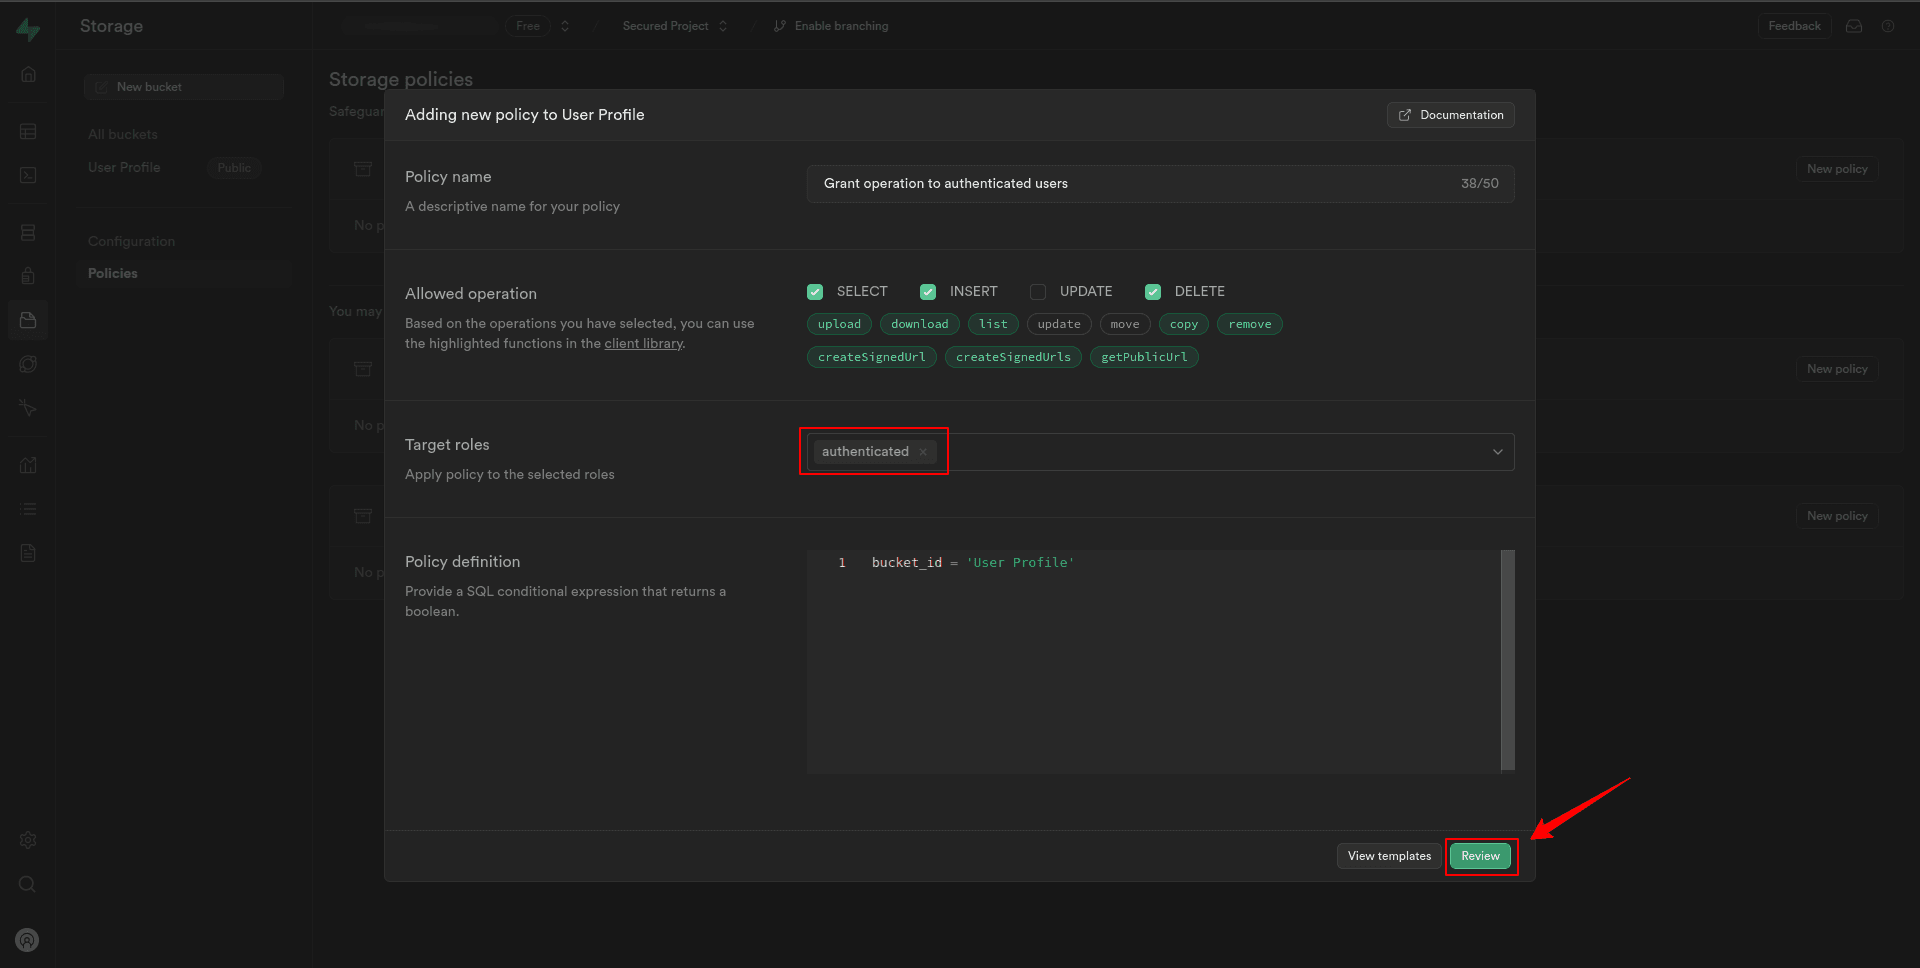
5. Set the Target Roles to “Authenticated”.
6. Click on the Review.
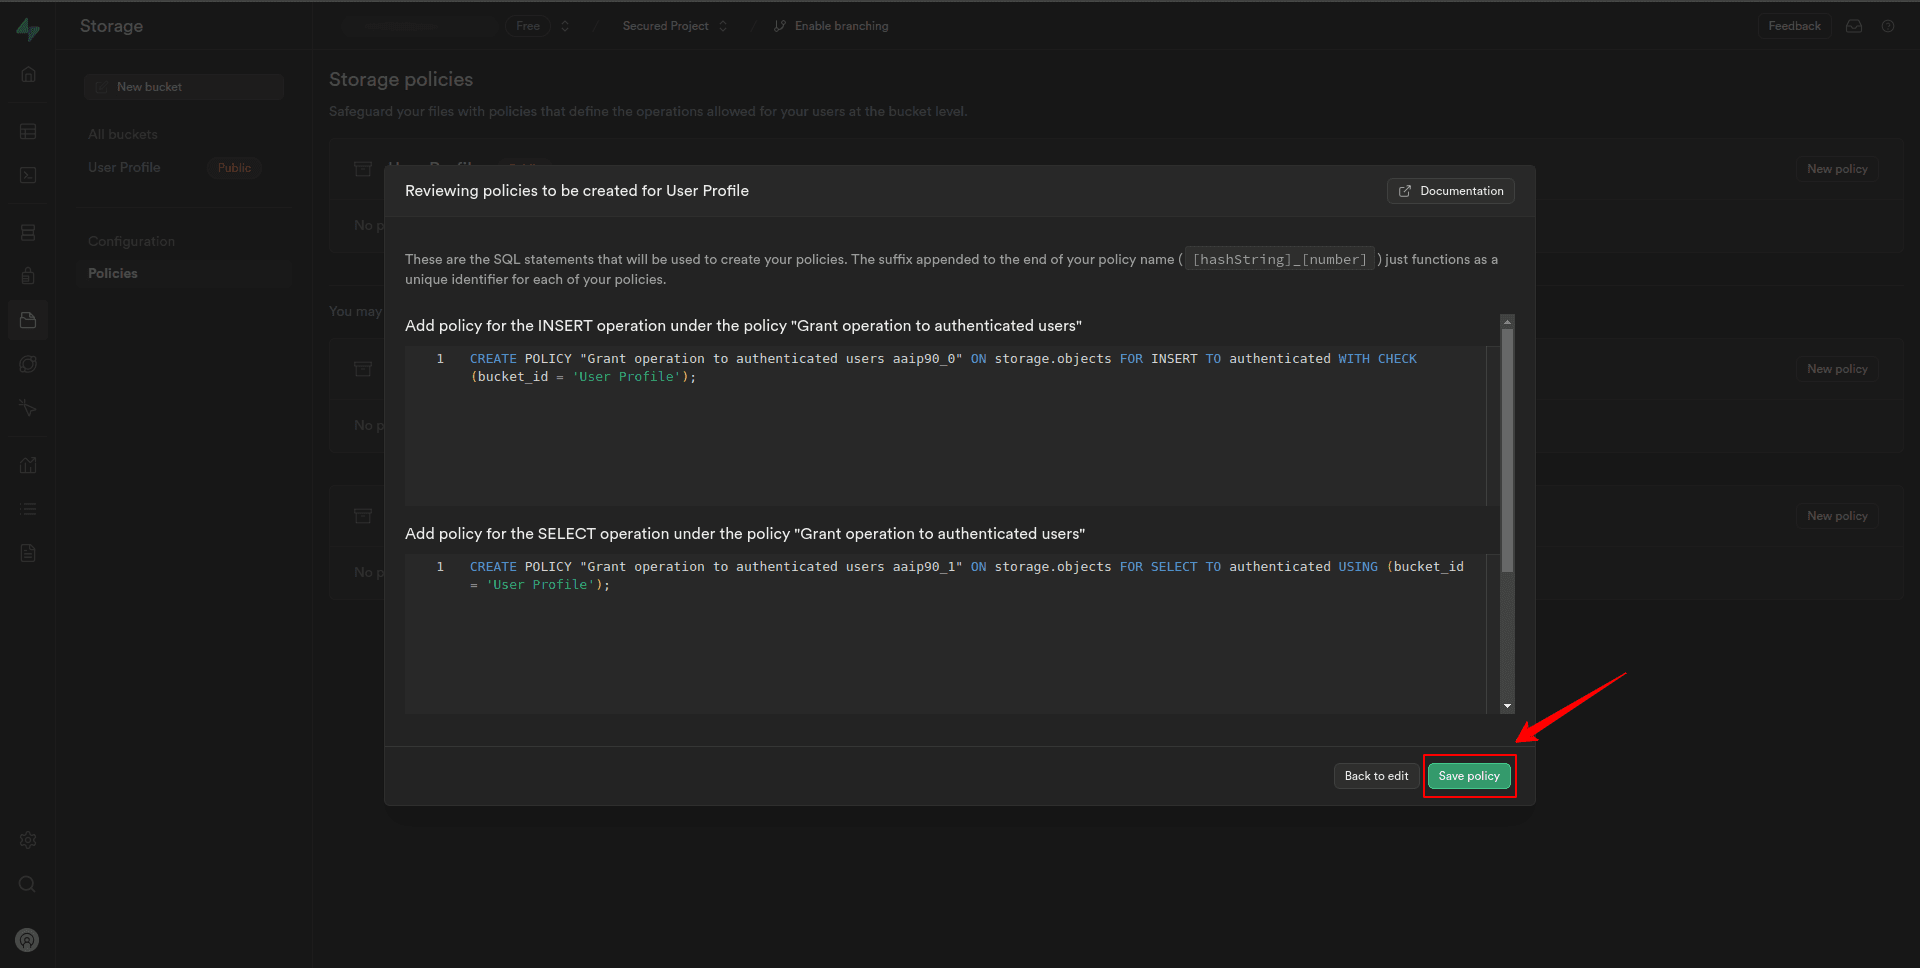
7. On the next page, review the policies we created, then click Save policy.
Now, we can see we have Select, Insert, and Delete policies for the “User Profile” bucket. We can edit or delete it if we find any issues with it.
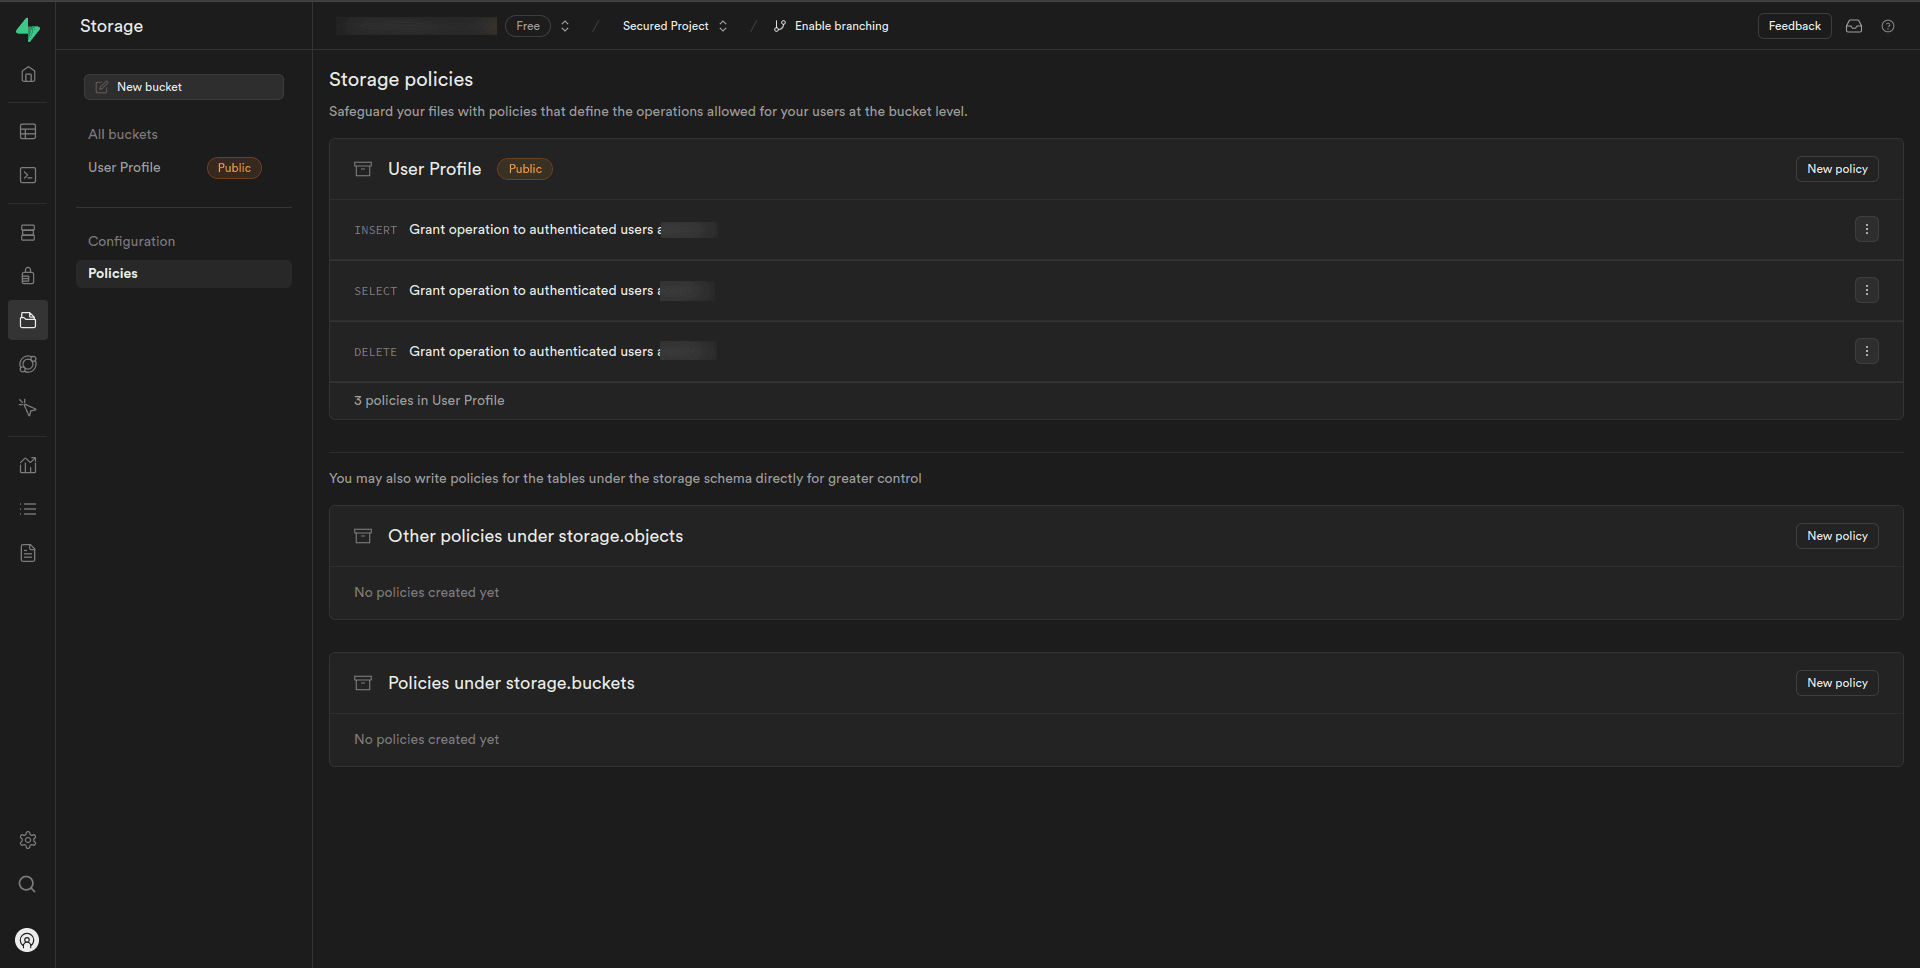
Customize the policy settings as needed, specifying which roles or users have permission to perform the operations on the “User Profile” bucket.
𝐓𝐚-𝐝𝐚!! 🎉 we have secured our supabase database and storage.
Thanks for reading!! 👋👋👋
Conclusion
Securing your data is not just a matter of compliance, it’s a fundamental aspect of building trust with your users and safeguarding your business reputation.
By implementing robust database security and storage security measures, we not only protect sensitive information but also demonstrate your commitment to data privacy and integrity.
Remember, data security is an ongoing journey, and continual evaluation and adaptation are key to staying ahead of emerging threats in the ever-changing landscape of cybersecurity.
Related Useful Articles

Whether you need...
- *High-performing mobile apps
- *Bulletproof cloud solutions
- *Custom solutions for your business.
