SwiftUI — Complex Navigation Made Easier With UIPilot
Introduction
Lately, I have been working on an iOS app that utilizes SwiftUI, which is an amazing thing that’s happened to iOS development in recent times. Having already worked on declarative frameworks on android (Jetpack compose), flutter and web (Vue.js, React), I was very happy to see a similar framework on iOS in place of traditional imperative UIKit.
And it’s been fun, I have really enjoyed working with swiftUI so far. However, navigation was the thing that always bothered me. I have used NavigationView for navigation so far and the fact that everything needs to be defined statically was deal-breaking. Why can’t we have easier navigation like Vue Router and Navigation Compose?
Well, I thought it’s time to contribute to the community and I have come up with an open-source project — UIPilot
In this post, we will implement very complex navigation using UIPilot as shown below and then we will give a thought about the complexity of that doing using NavigationView and NavigationLink
The app has 3 top-level screens:
- Welcome screen — That will allow the user to enable split-screen functionality and will redirect to split screen on button tap
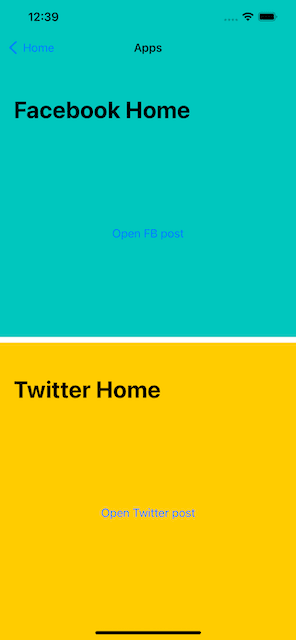
- Split screen — This screen has two sections — The top half for Facebook and the bottom half for Twitter. Each section has its own two-step navigation! Open in browser button will show full-screen Facebook/Twitter webview.
- Browser screen — This will show the webpage of Facebook/Twitter.
Sponsored
Stop the habit of wishful thinking and start the habit of thoughtful wishes with Justly.
Let’s get started!
Note: For simplicity and readability, I have removed customization related to font color, size, and background from the snippets.
Configuration of top-level routes
App has 3 top-level screens, let’s begin with an enum AppRoute to identify each route.
struct ContentView: View {
    @StateObject var pilot = UIPilot(initial: AppRoute.Home)

    var body: some View {
        UIPilotHost(pilot)  { route in
            switch route {
                case .Home: HomeView()
                case .Split: SplitView()
                case .Browser: WebView()
            }
        }
    }
}
Done, now let’s map each route with the respective views. Here ContentView is the root object of the app.
struct ContentView: View {
    @StateObject var pilot = UIPilot(initial: AppRoute.Home)

    var body: some View {
        UIPilotHost(pilot)  { route in
            switch route {
                case .Home: HomeView()
                case .Split: SplitView()
                case .Browser: WebView()
            }
        }
    }
}
The above snippet —
1. Defines pilot object of class UIPilot . UIPilot is the class responsible for holding and changing the state of the navigation. We provide Home route as an initial route.
2. Creates a view of type UIPilotHost and sets it as a root object for ContentView . UIPilotHost takes two arguments — UIPilot and a closure that will map each route with the respective views. We provide Views for all 3 routes.
And that’s it, we are done with the configuration!
Home screen
Now let’s define views for each route and see how we can navigate from Home to Split route.
struct HomeView: View {
    @EnvironmentObject var pilot: UIPilot<AppRoute>

    var body: some View {
        VStack {
            Button("Go to split screen", action: {
               pilot.push(.Split)
            })
        }
        .navigationTitle("Home")
    }
}
The above snippet —
- Declares
pilotas anEnvironmentObject. All views can declarepilotEnvironment object and it will be injected automatically byUIPilot - Defines view of the
HomeViewthat has a title and button. On button tap, we callpilot.pushwithSplitthe argument, that’s the way to redirect to another screen usingUIPilot.
If you have defined empty views for Split-screen and Browser screen and you run the app now, you will see the first screen, and tapping on the button will show the Split screen.
Split screen
This is the most complex screen of 3 as it has two subroutes for Facebook and Twitter. Let’s start by defining routes for both.
enum FacebookAppRoute: Equatable {
    case Home
    case Detail
}
enum TwitterAppRoute: Equatable {
    case Home
    case Detail
}
Pretty, simple isn’t it? Now let’s update Split screen view to add UIPilot for each of the routes.
struct SplitView: View {
    @EnvironmentObject var pilot: UIPilot<AppRoute>

    @StateObject var fbPilot = UIPilot(initial: FacebookAppRoute.Home)
    @StateObject var twitterPilot = UIPilot(initial: TwitterAppRoute.Home)

    var body: some View {
        VStack {
            UIPilotHost(fbPilot)  { route in
              switch route {
                  case .Home: FBHome()
                  case .Detail: FBDetail()
              }
            }
            UIPilotHost(twitterPilot)  { route in
              switch route {
                  case .Home: TwitterHome()
                  case .Detail: TwitterDetail()
              }
            }
        }
        .navigationTitle("Apps")
    }
}
The above snippet —
- Adds two new
UIPilotobjects for Facebook and Twitter - Sets
UIPilotHostfor Twitter and Facebook such that each of them gets half screens - Maps routes to respective views.
For simplicity, let’s assume those views are already defined and are empty. If you run the app now, you will see split-screen working.
Now let’s configure Home and Detail views for Facebook. You can configure twitter views the same way.
Facebook home screen
struct FBHome: View {
    @EnvironmentObject var pilot: UIPilot<FacebookAppRoute>

    var body: some View {
        VStack {
            Button("Open FB post", action: {
                pilot.push(.Detail)
            })
        }
        .navigationTitle("Facebook Home")
    }
}
Facebook detail screen
struct FBDetail: View {
    @EnvironmentObject var appPilot: UIPilot<AppRoute>

    var body: some View {
        VStack {
            Button("Open in browser", action: {
                appPilot.push(.Browser("https://facebook.com"))
            })
        }
        .navigationTitle("Facebook Post")
    }
}
The home screen was self-explanatory. However, you will notice two new behavior with the detail screen:
- It injects
UIPilotwithAppRouteinstead of theFacebookAppRouteand that’s totally valid. Views have access to outer routes as well and they can push/pop to it if required. As the Browser screen needs to be shown outside the Facebook split screen, it usesappPilotto pushBrowserscreen. - It passes the Facebook URL as an argument to
Browser. Arguments are supported inUIPilotand they are type-safe as well, meaning you will never passIntin place ofStringaccidentally.
Let’s update AppRoute and HomeView to support the URL argument.
enum AppRoute: Equatable {
    case Home
    case Split
    case Browser(_ url: String)
}
struct ContentView: View {
            ...
            case .Browser(let url): WebView(url: URL(string: url)!)
            ...
}
That’s it. Add an empty WebView and if you run the app now, you will see Facebook home, detail, and browser screen navigation working.
Browser screen
This is pretty easy to implement. We will use WKWebView inside SwiftUI view.
struct WebView: UIViewRepresentable {
  var url: URL

  func makeUIView(context: Context) -> WKWebView {
    return WKWebView()
  }

  func updateUIView(_ webView: WKWebView, context: Context) {
    let request = URLRequest(url: url)
    webView.load(request)
  }
}
and that should be it. If you run the app now, you will see the full sample working.
Final thoughts…
I hope you have a basic idea of how UIPilot navigation works. Now think of implementing the same behavior with NavigationView and NavigationLink and you will get an idea of how much boilerplate code you would have to write.
Note that the boilerplate code is still there even with UIPilot a library is just a wrapper around NavigationView but that’s inside the library now. That will help you allow declaring your routes with a clean and concise syntax.
What do you think of the UIPilot implementation? Does it help serve any use case? Is there any room for improvement? Please let me know in the response section below or open an issue on Github.
Github: UIPilot — The missing typesafe SwiftUI navigation library
Happy routing!
Related Articles

Whether you need...
- *High-performing mobile apps
- *Bulletproof cloud solutions
- *Custom solutions for your business.
