How to Maintain the state of BottomNavigationBar across tabs
Background
A BottomNavigationBar is a common navigation widget used in mobile applications to provide users with quick access to multiple screens or tabs.
However, one common issue with this widget is that the state of the navigation bar is not maintained across tabs. for example, you might have entered some text in a form on one tab, but when you switch to another tab and come back, the form is reset and your text is gone.
This is because by default, when you switch between tabs in a bottom navigation bar, Flutter destroys and rebuilds the widget tree for the new tab, which results in the loss of state.
Unlike other frameworks, Fluter doesn’t make any assumptions about how you want to handle the display of the screens. however, this can lead to poor user experience and make the app less responsive. Right?
In this article, we will explore different methods that keep the state intact while navigating through the bottom navigation tabs. So let’s dive in!
Sponsored
Positive thinking leads to positive outcomes. Try out Justly, build good habits, and start thinking positively today!
Getting Started
To demonstrate state restoration in action, let’s build a simple Flutter app with two screens accessible via a bottom navigation bar. The first screen contains a scrollable list of items, while the second screen has a TextField where the user can enter some text.

However, when switching between screens in the bottom navigation bar, you might notice that the scroll position is not preserved, and the text field is reset every time on the second screen.
Setup
This is our Parent widget with a bottom navigation bar containing two tabs.
void main() {
  runApp(const HomePage());
}

class HomePage extends StatefulWidget {
  const HomePage({Key? key}) : super(key: key);

  @override
  State<HomePage> createState() => _HomePageState();
}

class _HomePageState extends State<HomePage> {
  final list = [const ScreenA(), const ScreenB()];
  int _selectedIndex = 0;

  void onTap(int index) {
    if (_selectedIndex != index) {
      setState(() {
        _selectedIndex = index;
      });
    }
  }

  final bottomNavigationBarItems = const [
    BottomNavigationBarItem(icon: Icon(Icons.home), label: 'Screen A'),
    BottomNavigationBarItem(
        icon: Icon(Icons.account_balance_wallet), label: 'Screen B')
  ];

  @override
  Widget build(BuildContext context) {
    return MaterialApp(
      home: Scaffold(
        body: list[_selectedIndex],
        bottomNavigationBar: BottomNavigationBar(
            currentIndex: _selectedIndex,
            onTap: onTap,
            items: bottomNavigationBarItems
        ),
      ),
    );
  }
}
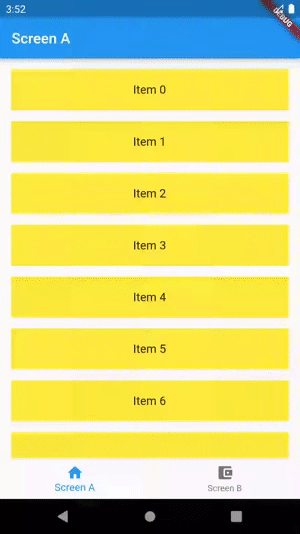
Screen A
ScreenA contains a ListView displaying the index inside a ListTile.
class ScreenA extends StatefulWidget {
  const ScreenA({Key? key}) : super(key: key);

  @override
  State<ScreenA> createState() => _ScreenAState();
}

class _ScreenAState extends State<ScreenA> {
  @override
  Widget build(BuildContext context) {
    return Scaffold(
      appBar: AppBar(
        title: const Text('Screen A'),
      ),
      body: Padding(
        padding: const EdgeInsets.all(15),
        child: ListView.separated(
          itemCount: 100,
          itemBuilder: (context, index) {
            return ListTile(
              tileColor: Colors.yellow,
              title: Center(child: Text('Item $index')),
            );
          },
          separatorBuilder: (context, index) {
            return const SizedBox(
              height: 15,
            );
          },
        ),
      ),
    );
  }
}
Screen B
ScreenB contains a TextField where the user can enter text.
class ScreenB extends StatefulWidget {
  const ScreenB({Key? key}) : super(key: key);

  @override
  State<ScreenB> createState() => _ScreenBState();
}

class _ScreenBState extends State<ScreenB> {
  late final TextEditingController controller;

  @override
  void initState() {
    super.initState();
    controller = TextEditingController();
  }

  @override
  void dispose() {
    controller.dispose();
    super.dispose();
  }

  @override
  Widget build(BuildContext context) {
    return Scaffold(
      appBar: AppBar(
        title: const Text('Screen B'),
      ),
      body: Padding(
        padding: const EdgeInsets.all(15.0),
        child: TextField(
          controller: controller,
          maxLines: 10,
          decoration: InputDecoration(
            contentPadding: const EdgeInsets.all(15),
            fillColor: Colors.grey[200],
            filled: true,
            border: OutlineInputBorder(
                borderRadius: BorderRadius.circular(20),
                borderSide: BorderSide.none),
            hintText: 'Enter some text',
          ),
        ),
      ),
    );
  }
}
Ok, nothing special so far. right?
Let’s look at how we can persist the state.
Maintain the State
IndexedStack
An IndexedStack is a widget in Flutter that allows you to display a single child from the list of children based on the index, it’s similar to a Stack, but only one child is visible at a time, and the visible child is determined by its index in the list.
class _HomePageState extends State<HomePage> {
....
 @override
  Widget build(BuildContext context) {
    return MaterialApp(
      home: Scaffold(
        body: IndexedStack(index: _selectedIndex, children: list),
        bottomNavigationBar: BottomNavigationBar(
          currentIndex: _selectedIndex,
          onTap: onTap,
          items: bottomNavigationBarItems,
        ),
      ),
    );
  }
}
This is self-explanatory, right? Here we pass IndexedStack in the body with two parameters, index simply tells the widget which child needs to be shown and the children is simply a list of widgets that need to be shown.
Let’s check the result,

Great!!👍
IndexedStack is easy to implement but all the children of the Indexedstack are built with parent widgets and kept in memory, regardless of which child is currently visible. This can lead to performance issues if you have a large number of children or if each child is heavy.
Therefore, IndexedStack is recommended for small and simple widgets with a small number of children.
AutomaticKeepAliveClientMixin
AutomaticKeepAliveClientMixin is a mixin with convenience methods for clients of AutomaticKeepAlive — which allows subtrees to request to be kept alive in a lazy list.
class _HomePageState extends State<HomePage> {
....
  final PageController _controller = PageController();

  void onTap(int index) {
    if (_selectedIndex != index) {
      _controller.jumpToPage(index);
      setState(() {
        _selectedIndex = index;
      });
    }
  }

  @override
  Widget build(BuildContext context) {
    return MaterialApp(
      home: Scaffold(
        body: PageView(
            controller: _controller,
            onPageChanged: onTap,
            children: list
       ),
        bottomNavigationBar: BottomNavigationBar(
            currentIndex: _selectedIndex,
            onTap: onTap,
            items: bottomNavigationBarItems),
      ),
    );
  }
}
Here, we wrap the body with PageView and pass the list of screens as children because this mixin requires the use of PageView to determine which page is currently visible by PageController and which page should be kept alive.
class _ScreenAState extends State<ScreenA> with AutomaticKeepAliveClientMixin {

  @override
  bool get wantKeepAlive => true;

  @override
  Widget build(BuildContext context) {
    super.build(context);
   ....
  }
}
It’s quite simple, right? AutomaticKeepAliveClientMixin is used on the ScreenA state, to keep the state of the widget alive even if it is not currently visible. The wantKeepAlive method is overridden and set to true to indicate that this widget should be kept alive and it is used by the framework to determine whether to keep the widget alive or not.
Finally, the super.build(context) method is called inside the build method to ensure that the state is properly built.
A mixin with convenience methods for clients of AutomaticKeepAlive. Used with State subclasses.
Let’s do the same for the ScreenB
class _ScreenBState extends State<ScreenB> with AutomaticKeepAliveClientMixin {

  @override
  bool get wantKeepAlive => true;

  @override
  Widget build(BuildContext context) {
    super.build(context);
   ....
  }
Now, Let's run the app.

Now our scroll position and text input are preserved. One of the best part of using AutomaticKeepAliveClientMixin is that it only builds tabs once when they are clicked, so it should be used where we want to call APIs in switching between tabs and don’t want to call them every time we switch to that tab.
PageStorage
PageStorage is used to save and restore values that can outlive the widget. By adding a PageStorage at the root and adding a PageStorageKey to each page, some of the page’s state (e.g. the scroll position of a Scrollable widget) will be stored automatically in its closest ancestor PageStorage, and restored when it’s switched back.
class _HomePageState extends State<HomePage> {
....
 final PageStorageBucket _bucket = PageStorageBucket();
  final screens = [
    const ScreenA(
      key: PageStorageKey<String>('Screen-A'),
    ),
    const ScreenB(
      key: PageStorageKey<String>('Screen-B'),
    )
  ];

  @override
  Widget build(BuildContext context) {
    return MaterialApp(
      home: Scaffold(
        body: PageStorage(bucket: _bucket, child: screens[_selectedIndex]),
        bottomNavigationBar: BottomNavigationBar(
            currentIndex: _selectedIndex,
            onTap: onTap,
            items: bottomNavigationBarItems
        ),
      ),
    );
  }
}
PageStorageBucket is a repository where Flutter will store our keys and their respective page state.
We have passed key parameters to each screen, the type of PageStorageKey which is a value that Flutter uses internally to store the page's state, and when the time comes to rebuild it, it’ll look for that key.
Finally, Use PageStorage widget in the body of the scaffold to synchronize the list of pages with the bucket, allowing storage and restoration of the page's state.
When we run the application, we ought to get the screen’s output like the underneath screen capture.

Great!! we can switch the tab and the Scroll position is automatically persisted, right? Hold on, You notice that the scroll position in a ListView is correctly preserved, but a TextField does not preserve its state.
Frustrated, you wonder what the problem could be. If you dive deep into documentation and discover that the PageStorage widget automatically saves and restores the state of all scrollable widgets that use ScrollConrtoller but TextEditingController is not automatically saved or restored.
To persist the state of the TextField, we have to manually save and restore the value of the TextEditingController using the PageStorage widget’s readState and writeState methods.
So let’s dive into the code.
class _ScreenBState extends State<ScreenB> {
  late final TextEditingController controller;

  @override
  void initState() {
    super.initState();
    controller = TextEditingController();

    controller.text = PageStorage.of(context)
            .readState(context, identifier: const PageStorageKey('Screen B')) ??
        '';
    controller.addListener(() {
      PageStorage.of(context).writeState(context, controller.text,
          identifier: const PageStorageKey('Screen B'));
    });
  }
....
}
In the initState method, we are using PageStorage widget’s readState method to retrieve the previously saved State of TextField in ScreenB. If there is no saved state, the default value will be an empty string. The retrieved state is then set as the initial text value of the TextEditingController.
Then we add a listener to the controller, which will be called whenever the text value is changed. Inside the listener, we are using the PageStorage widget’s writeState method to save the current text value of the TextField to the PageStorage object. We are using the same PageStorageKey identifier used in the readState method, so that the saved state can be associated with the Textfield in ScreenB.
Now, Let’s run the app.
Yeah, our TextField input text input field retains its state when we switch tabs.
PageStorage is a powerful tool for preserving the state of a widget tree between transitions in Flutter. This widget is particularly handy in scenarios where you want to preserve the state of your UI across different pages or routes, such as navigating between tabs or switching between different parts of the app.
Conclusion
In this article, we have explored methods for preserving the state in Flutter’s bottom navigation bar, you can choose the one that is best suited to your app. There are several techniques for preserving the state in Flutter, but not all of them are suitable for every situation.
Thank you for reading, Happy coding! 👋
Useful Articles