How to display text with a Color Gradient in SwiftUI
Background
Do you want to give your SwiftUI app a unique and dynamic look?
Adding a touch of color and visual interest to your SwiftUI app can make your app stand out and more attractive.
One way to achieve this is by using Color Gradients which can add depth and dimension to the text by smoothly transitioning between multiple colors.
It can create a dynamic and eye-catching look that can make our app stand out from the crowd.
When it comes to creating visually appealing apps, the Small details can make a Big difference
Text and Gradient are two powerful design elements that can be used together to create a cohesive and effective visual message.
Outline
In this article, I’ve tried to cover the use of gradients in SwiftUI to render text in TextView and also in TextFieldView by adjusting the gradient with different types.
We will explore 4 different types of gradients in this post,
- Horizontal Gradient
- Verticle Gradient
- Angular Gradient
- Radial Gradient
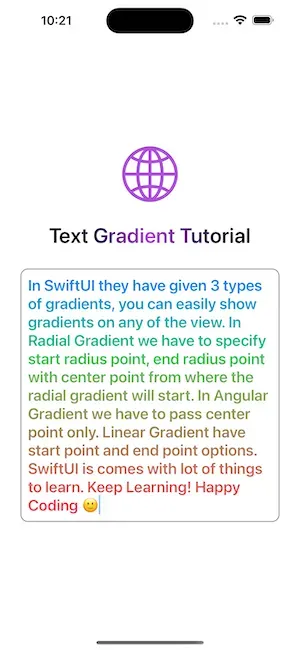
The main goal of this post is to give an idea about how can we add gradient text to the text editor or text field with SwiftUI, something like this,
Now, enough talk, let’s focus on the actual implementation.
Sponsored
Let’s Get Started!
Let me show you the default UI code.
struct ContentView: View {

    var body: some View {
        VStack(spacing: 30) {
            Image(systemName: "globe")
                .resizable()
                .imageScale(.large)
                .frame(width: 80, height: 80, alignment: .center)
                .foregroundColor(.purple)

            Text("Text Gradient Tutorial")
                .font(.system(size: 30).bold())
        }
        .padding(.top, -100)
        .padding(.horizontal, 30)
    }
}
Let’s first try to add a gradient to the title text.
For that, we’ll use the foregroundStyle(_:) method of TextView which sets a view’s foreground elements by using a given style.
Note: This method is only available for iOS 15+ devices.
Text("Text Gradient Tutorial")
    .font(.system(size: 30).bold())
    .foregroundStyle(LinearGradient(
        colors: [.black, .purple, .black],
        startPoint: .leading,
        endPoint: .trailing
    ))
As given to the code, we have added a horizontal gradient to the text as it’s just a single line string, but you can change its dimension by changing the startPoint and endPoint.
Now, let’s add a TextField view to explore a stunning text input view with all types of gradients.
1. Horizontal Gradient
According to my knowledge, we can not add foreground gradient color to the text field or the text editor view.
As a workaround, I’ve used the ZStack to provide this look by showing gradient text with the text input view.
First, we have to add one binding variable that can store added string text by the text field and reflect it in the text view.
@State var text: String = “”Now let’s add needed views.
ZStack {
    HStack {
        Text(text)
            .font(.system(size: 22).bold())
            .foregroundStyle(LinearGradient(
                colors: [.blue, .green, .brown, .pink],
                startPoint: .leading,
                endPoint: .trailing
            ))
            .padding(.leading, 10)
        Spacer()
    }

    TextField("Add your text here...", text: $text)
        .font(.system(size: 22).bold())
        .foregroundColor(.clear)
        .padding(10)
        .overlay(
            RoundedRectangle(cornerRadius: 10)
                .stroke(Color.gray, lineWidth: 1.3)
        )
}
Here, we have added a text view first, which displays added text and on top of this text view, we have placed a text field view, in order to allow the user to interact with the view by providing input to the text field.
This way the text view and text field both will be visible and the user can interact with the text field view along with being able to see the text view.
Note: As we are showing text with the user input we have to make sure that both views should be the same like their font size, padding, etc so that it does not become messy.
I have set the foreground text color of the text field to a clear color, so that the gradient text, which is behind it, is visible.
This is not enough.
Run the app and you will get an idea that the text field is not allowing us to add multiline text and the view is getting messy if we try to add text of more than 1 line.
To enable that we don’t need to set multilineTextAlignment or fixedSize modifiers. Instead, we can just specify the axis parameter of the TextField view to the dimension we want to allow to span multiple lines.
TextField(“Add your text here…”, text: $text, axis: .vertical)This will expand the text input area by adding the text in that view.
Let’s run the app and the final view will look the same as given in the above GIF.
2. Vertical Gradient
Now, for applying different gradients we just need to change the foreground style with the gradient type.
Text(text)
    .font(.system(size: 22).bold())
    .foregroundStyle(LinearGradient(
        colors: [.blue, .green, .brown, .pink],
        startPoint: .top, endPoint: .bottom))
    .padding(.leading, 10)
We have just changed the start and end points with that we can change the dimension of the gradient to verticle from horizontal.
After running the app and adding the text the screen will look like this,
3. Angular Gradient
Let’s change the gradient of the foreground style to angular and add parameter values according to our needs.
We can add any number of gradient colors to the colors array parameter.
Text(text)
    .font(.system(size: 22).bold())
    .foregroundStyle(AngularGradient(colors: [.blue, .green, .brown, .pink],
                                     center: .center))
    .padding(.leading, 10)
Now run the app, add text and the view will look like this,
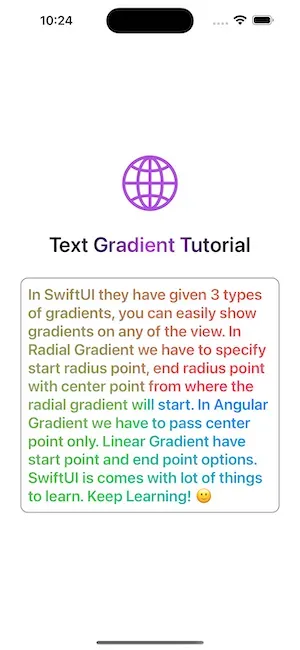
4. Radial Gradient
Let’s change the gradient of the foreground style to radial and add parameter values according to our needs.
Text(text)
    .font(.system(size: 22).bold())
    .foregroundStyle(RadialGradient(
                          colors: [.blue, .green, .brown, .pink],
                          center: .center,
                          startRadius: 50,
                          endRadius: 220))
    .padding(.leading, 10)
This gradient syntax has extra parameters for setting the start and end points of the radius.
Now run the app, add text and the view will look like this,

Refactor the code
Let’s add a common method for applying the gradient so that we don’t need to specify all the things for all views if we want to add the gradient to more than 1 view.
enum GradientType {
    case vertical
    case horizontal
    case radial(start: CGFloat, end: CGFloat)
    case angular
}

extension View {
    @ViewBuilder
    func gradientForeground(colors: [Color], type: GradientType) -> some View {
        switch type {
        case .vertical:
            self.foregroundStyle(
                LinearGradient(colors: colors,
                               startPoint: .top,
                               endPoint: .bottom))
        case .horizontal:
            self.foregroundStyle(
                LinearGradient(colors: colors,
                               startPoint: .leading,
                               endPoint: .trailing))
        case .radial(let start, let end):
            self.foregroundStyle(
                RadialGradient(colors: colors,
                               center: .center,
                               startRadius: start,
                               endRadius: end))

        case .angular:
            self.foregroundStyle(
                AngularGradient(colors: colors,
                                center: .center))
        }
    }
}
We are returning a switch…case from the gradientForeground() method, so we have to set it as @ViewBuilder to allow returning a view from the switch case.
Now you just have to call the method to view wherever you want to set the gradient,
Text(text)
    .font(.system(size: 22).bold())
    .gradientForeground(colors: [.blue, .green, .brown, .pink],
                        type: .radial(start: 50, end: 220))
    .padding(.leading, 10)
and we just need to pass the colors we want for the gradient and the type to the method and we are done.
That’s all about the gradients. 💥
Conclusion
Color gradients are a powerful tool for creating visually appealing and professional-looking apps in SwiftUI. By using the built-in LinearGradient, RadialGradient, and AngularGradient views, you can easily create gradients and customize them to your liking.
By understanding the importance and the power of color gradients, you can take your app to the next level and make it stand out from the crowd.
Whether you’re a beginner or an experienced developer, I hope this article has provided you with the knowledge and techniques that you need to create a stunning text gradient in SwiftUI.
I first tried to add this gradient to the text field view text by using the UIKit but I was not able to create it with that.
As the alternate solution, I’ve managed it using the ZStack. If you have any other way to design this same thing then feel free to add your solution in the comment.
Related Popular Articles

Let's Work Together
Not sure where to start? We also offer code and architecture reviews, strategic planning, and more.