How to Create Chatbot Using PaLM 2 Model (chat-bison@001)
Introduction
It’s good to have a friendly companion with whom we can share our feelings and get consolidation as well as suggestions for our problems. A bot can do such things for us, as we can’t wander all the time with our friends or mentors!
To implement a bot that can chat with us like our friend, I have used Google’s PaLM 2 foundation model — chat-bison.
In this blog, we will explore how to implement a Chatbot of your own, keeping Google’s PaLM 2 model under the hood. I’m assuming that you’re signed in to Google Cloud Console and set up the project already. Also, don’t forget to Enable Vertex AI API.
Google has tried its best to document things for Vertex AI, but at some point, I found it a bit confusing. Therefore come up with Vertex AI Terminologies blog that explains it in a more natural way.
Sponsored
We are what we repeatedly do. Excellence, then, is not an act, but a habit. Try out Justly and start building your habits today!
When to use chat-bison and when text-bison?
chat-bison(chat-bison@001) is a better candidate when you want…
- Customer Service Executive — responds to user queries on behalf of you
- Website companion — that gives shopping, travel, etc guidance to the users
- Query Collector — that can connect with users and forward the details to the respective person
- Any Multi-turn conversation(repetitive chat)
text-bison(text-bison@001) is suitable when you want…
- Summarization helper — that can summarize lengthy paragraphs
- Classifier — that checks for specific characteristics, For ex., which sentence from the given text is grammatically correct
- Entity Extractor — that extracts a piece of information from the given text. For example, Extracting the fruit name from the given text
- Any Single-turn conversation
Whether you need to use Vertex AI SDK or PaLM API?
You can use anything from both, Ultimately both serve the same purpose. But the blocker point is PaLM API is not yet for General Availability. So if you want to access it early, you need to join the waitlist, and that’s only allowed for the US region.
That’s why in this blog, we will implement a chatbot using Vertex AI SDK for Python.
Authentication To Google
To use Vertex AI SDK We first need to authenticate the request. That gives affirmation to the SDK from which user it’s being requested.
Google Authentication can be done by setting ADC(Application Default Credentials) in different ways according to environments:
- ADC with Google Cloud CLI — Recommended for the local environment.
- ADC with Service Account Key — Recommended for production environment.
Refer to How to Configure Gcloud CLI for more details.
NOTE — If you face an issue like gcloud: command not found , consider restarting the system once.
Setup service account key
If you haven’t set up Default Authentication(ADC) using Google Cloud CLI, Consider adding an env variable
GOOGLE_APPLICATION_CREDENTIALS, which points to the service account file.
Use existing one from the project or create new.
NOTE: Don’t assign the content of the service account key, GOOGLE_APPLICATION_CREDENTIALS expects the location of the service account key.
If you have used the service account key for authentication, Go through these steps — (No need to see it if authenticated using Google Cloud CLI).
Once you have the service account key handy, make sure you add Vertex AI User permission to it. Otherwise, the model(chat-bison) won’t allow you to interact using it and will give you an error like below.
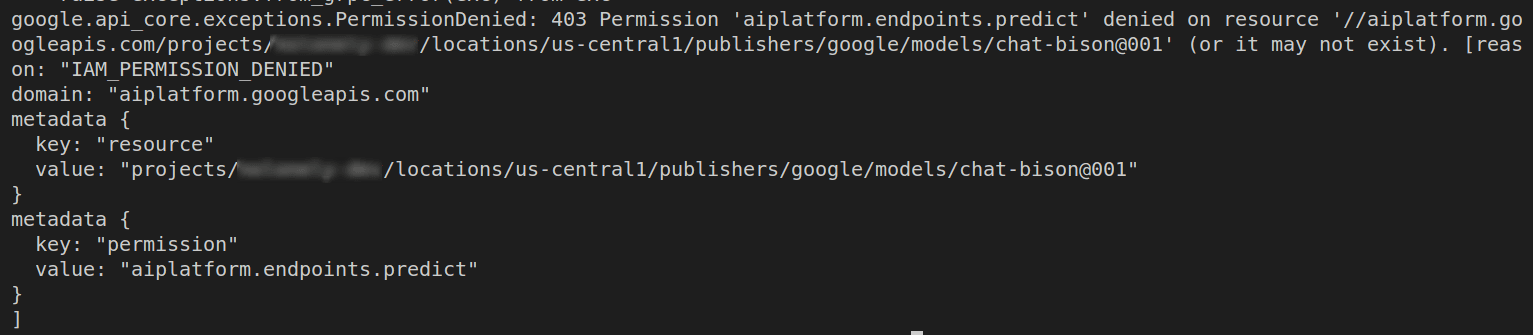
It’s because, the service account key wants to access the vertex AI service, but it doesn’t have sufficient permission for it.
Follow the below steps for adding the Vertex AI User permission.
- On Google Cloud Console, From the Left panel, Go to IAM and admin -> IAM tab
- Click on
Edit Principalof the service account you want to add permission for.

- Add Vertex AI User permission By Clicking
ADD ANOTHER ROLEbutton
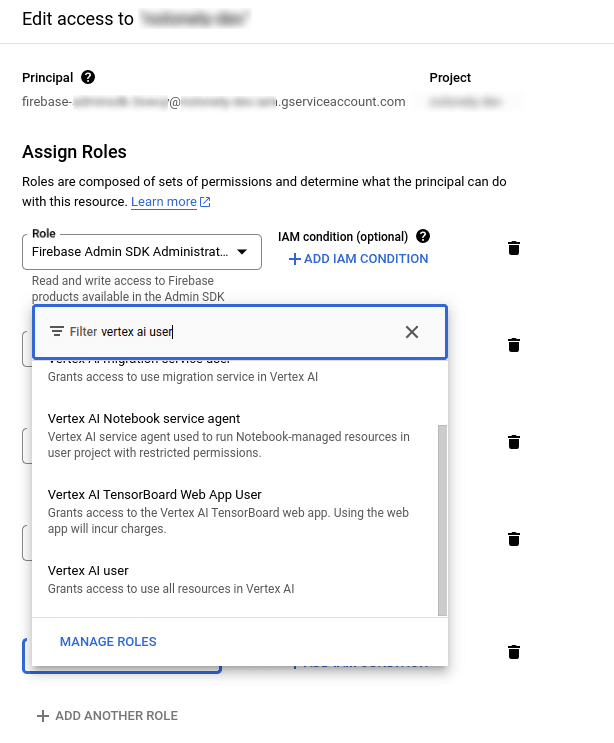
- You will find the service account key principal will be added below:

Setup Virtual Environment
Assuming you’ve already installed python3, let’s go for activating the virtual environment. However, it’s totally optional but recommended way as it makes the project isolated and will not be affected by any external dependencies.
Steps to create a virtual environment
- Press Crl+Shift+P in VSCode and select Python: Create Environment -> Venv
Activate virtual environment
- Go to your project directory
- Run command
source .venv/bin/activate
Implement Bot with Vertex AI Python SDK
Let’s first install the required libraries for vertex AI.
pip install google-cloud-aiplatformpip install vertexai- Create a file named
chat.pyand implement adoChat()function, that will communicate with the chat-bison@001 model.
import vertexai
from vertexai.preview.language_models import ChatModel

def doChat():

  return ""
- Initialize vertexai as below,
def doChat():

  # initialize vertexai
  # projectname = "my-project"
  # location = "us-central1"
  vertexai.init(project="your-project-name", location="your-project-location")

return ""- Load the chat-bison@001 model from the model garden. Add the below line after vertexai initialization.
 # load model
chat_model = ChatModel.from_pretrained("chat-bison@001")- Define model parameters as follows. These are the default values you can modify them as per the requirement.
 # model parameters
 parameters = {
        "temperature": 0.2,
        "max_output_tokens": 256,
        "top_p": 0.8,
        "top_k": 40,
}- Start a chat session with the model and send a message to the model to get the response.
 # starts a chat session with the model
 chat = chat_model.start_chat()

 # sends message to the language model and gets a response
response = chat.send_message("hi", **parameters)- The final code will look like this,
import vertexai
from vertexai.preview.language_models import ChatModel

def doChat():

    # initialize vertexai
    # projectname = "my-project"
    # location = "us-central1"
    vertexai.init(project="your-project-name", location="your-project-location")

    # load model
    chat_model = ChatModel.from_pretrained("chat-bison@001")

    # define model parameters
    parameters = {
        "temperature": 0.2,
        "max_output_tokens": 256,
        "top_p": 0.8,
        "top_k": 40,
    }

    # starts a chat session with the model
    chat = chat_model.start_chat()

    # sends message to the language model and gets a response
    response = chat.send_message("hi", **parameters) # user says "hi"

    return response

# Invoke doChat()
print(doChat()) # bot replies "Hi there! How can I help you today?"
Run python3 chat.py , you will see it prints the response received from the model.
Voila! You have just implemented your first chatbot!🎉 🎉
Final Thoughts
In this blog, we have differentiated the use cases of text-bison vs. chat-bison models.
It’s quite easy to integrate the built-in chat model provided by Google Cloud Vertex AI, with a few steps of configuration.
We have learned the basics of How to craft our own chatbot, using what is already built. We will see how we can fine-tune it as per our requirements in the upcoming blog. Stay tuned!!
Related Useful Articles


Get started today
Let's build the next
big thing!
Let's improve your business's digital strategy and implement robust mobile apps to achieve your business objectives. Schedule Your Free Consultation Now.
Get Free Consultation
Get started today
Let's build the next big thing!
Let's improve your business's digital strategy and implement robust mobile apps to achieve your business objectives. Schedule Your Free Consultation Now.
Get Free Consultation