Flutter Animations Made Fun: A Smiley That Reacts to Your Every Move
Background
By incorporating micro-interaction into your app, you can create an immersive experience that keeps users returning for more. Micro-interactions can range from simple button clicks to complex animations that provide feedback and guide users through the app.
With Flutter, we can easily create dynamic and engaging user interfaces that provide a unique user experience.
Today we will explore how to create a smiley that reacts to your every move! Imagine having a fun and interactive smiley that responds to your gestures, such as our mouse pointer movements.
In this blog, we will walk you through step-by-step instructions on how to create a smiley that follows your movements. So, let’s get started and create a smiley that will put a smile on your face!
At the end of the article what we’ll have? Nice Smiley 🙂

Sponsored
We are what we repeatedly do. Excellence, then, is not an act, but a habit. Try out Justly and start building your habits today!
Let's get started
Create a Smiley
class Smiley extends StatefulWidget {
  const Smiley({Key? key}) : super(key: key);

  @override
  State<Smiley> createState() => _SmileyState();
}

class _SmileyState extends State<Smiley> {
  @override
  Widget build(BuildContext context) {
    return MouseRegion(
      onHover: (pointerHoveEvent) {},
      child: Column(
        mainAxisAlignment: MainAxisAlignment.center,
        children: [
          Stack(
            alignment: Alignment.center,
            children: [
              CustomPaint(
                painter: Face(),
              ),
              Row(
                mainAxisAlignment: MainAxisAlignment.center,
                children: [
                  EyeBall(),
                  SizedBox(
                    width: 60,
                  ),
                  EyeBall()
                ],
              )
            ],
          ),
        ],
      ),
    );
  }
}
This code is self-explanatory, right? Here we create a basic stateful widget named Smiley and it returns a MouseRegion widget that defines a callback function onHover that gets executed when the cursor hovers over the screen. The CustomPaint widget uses a Face class to draw the face of a smiley and two EyeBall widgets that represent the eyes of Smiley.
Draw the Face
CustomPaint is a very powerful widget in Flutter that allows us to create our custom graphics and animations using the Canvas and Paint APIs.
class Face extends CustomPainter {
  @override
  void paint(Canvas canvas, Size size) {
    final center = Offset(size.width / 2, size.height / 2);

    // Draw the mouth
    final facePaint = Paint()
      ..color = Colors.yellowAccent
      ..style = PaintingStyle.fill;
    canvas.drawCircle(center.translate(0, 30), 150, facePaint);

    // Draw the nose
    final nosePaint = Paint()
      ..style = PaintingStyle.fill
      ..color = Colors.black;
    canvas.drawCircle(center.translate(0.0, 60), 15, nosePaint);

    //Draw the smile
    final smilePaint = Paint()
      ..style = PaintingStyle.stroke
      ..strokeCap = StrokeCap.round
      ..color = Colors.redAccent[700]!
      ..strokeWidth = 10;
    canvas.drawRect(
        Rect.fromCenter(
            center: center.translate(0.0, 100), width: 60, height: 5),
        smilePaint);
  }

  @override
  bool shouldRepaint(covariant CustomPainter oldDelegate) {
    return false;
  }
}
This is a custom Face class that extends CutomPainter.
- It draws a yellow circle on the canvas with a radius of 150 pixels.
- For the Nose, we created a
nosePaint()object and set its color to black, then drew a circle with a center that is offset from the center of the face by 60 units in the y-axis, and a radius of 15 units. - For the Smile, we created
smilePaint()object and set its color to a shade of red, then drew a rectangle using thecanvas.drawRect()method. The rectangle is placed at the center of the face and is offset by 100 units on the y-axis.
The shouldRepaint() method of this class returns false because we don’t want to repaint the Face every time the widget is rebuilt.
Create an EyeBall
class EyesBall extends StatelessWidget {
  const EyesBall({Key? key}) : super(key: key);

  @override
  Widget build(BuildContext context) {
    return Container(
      height: 60,
      width: 60,
      decoration: BoxDecoration(
          shape: BoxShape.circle,
          color: Colors.white,
          border: Border.all(color: Colors.black)),
      child: CustomPaint(
        painter: Pointer(7),
      ),
    );
  }
}

class Pointer extends CustomPainter {
  final double radius;

  Pointer(this.radius);

  @override
  void paint(Canvas canvas, Size size) {
    final center = Offset(size.width / 2, size.height / 2);
    final paint = Paint()
      ..color = Colors.white
      ..blendMode = BlendMode.difference;
    canvas.drawCircle(center, radius, paint);
    canvas.drawCircle(center.translate(0.0, 4.0), 2, paint);
  }

  @override
  bool shouldRepaint(covariant CustomPainter oldDelegate) {
    return false;
  }
}
Here we create a widget called EyeBall. It is a white circular container with a black border, We’re using CustomPaint to draw a little pointer- two circles inside the EyeBall.
We can achieve the same result without using the CustomPainter class. You can simply use a Container Widget with decoration that has the shape of a circle.
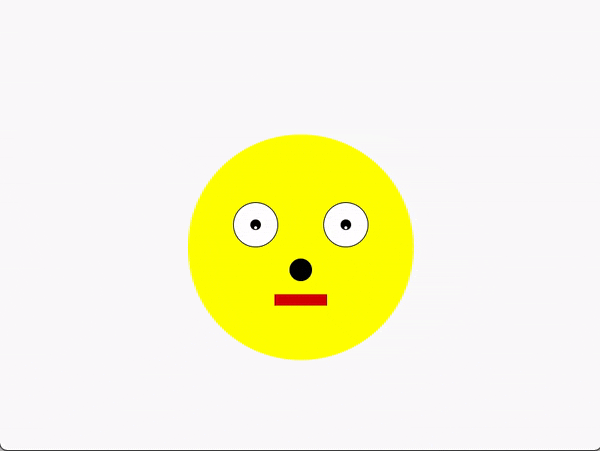
Now, Let’s run the app and see what it looks like. It displays a more realistic and expressive smiley face 😐. isn’t it??

Okay, great 👍.
Now let’s implement interaction to give life to this static face.
Updating Pointer position
Let’s incorporate some mathematical calculations to update the position of the pointer inside the EyeBall based on the user’s mouse movement.
class _SmileyState extends State<Smiley> {

  double pointerX = 0.0;
  double pointerY = 0.0;
  static const  maxEyeBallDistance=44;

  void updateLocation(PointerEvent event) {

    final mediaX = MediaQuery.of(context).size.width;
    final mediaY = MediaQuery.of(context).size.height;

    final percentPositionX = maxEyeBallDistance / mediaX;
    final percentPositionY = maxEyeBallDistance / mediaY;

    setState(() {
      pointerX = percentPositionX * event.position.dx - maxEyeBallDistance / 2;
      pointerY = percentPositionY * event.position.dy - maxEyeBallDistance / 2;
    });
  }

  @override
  Widget build(BuildContext context) {
    return Center(
      child: MouseRegion(
        onHover: updateLocation,
    ....
 }
}
It looks a bit complex initially. Under the hood,
updateLocation(): It updates the position of a pointer based on mouse events. When the user moves the mouse, this function will be called with information about the mouse’s position from the MouseRegion widget.
- First, we get the width and height of the screen using Mediaquery to know the size of the screen.
- Next, we calculate two variables:
percentPositionXandpercentPositionYto represent the percentage of the screen that the pointer can move in any given direction. here, we setmaxEyeBallDistanceto 44, so,percentPositionXwill be 44% of the screen width. - After, we set
pointerXandpointerYvariables using theevent.position, which represents the mouse's current position. we multiply these values by thepercentagePositionvariables and subtractmaxEyeBallDistance/2to center the pointer on the screen.
Finally, we use the setState method to update the state of our widget with the new position of the pointer.
Passing Mouse Offset to EyeBall
class _SmileyState extends State<Smiley> {
....
 @override
  Widget build(BuildContext context) {
    ....
              EyeBall(
                 offset: Offset(pointerX, pointerY),
              ),
             const SizedBox(
                 width: 60,
              ),
              EyeBall(
                offset: Offset(pointerX, pointerY),
              )
   }
}

class EyeBall extends StatelessWidget {
  final Offset offset;

  const EyeBall({Key? key, required this.offset}) : super(key: key);

  @override
  Widget build(BuildContext context) {
   ....
      child: Transform.translate(
        offset: offset,
        child: CustomPaint(
          painter: Pointer(7),
      ),
    );
  }
}
Nothing fancy, right? We pass the offset parameter to the EyesBall and it is used by the Transform widget to move the Pointer widget in EyeBall.
You should run the code on the web or desktop because, on mobile, we can't hover over it.
Okay, now let’s see the result.

Cool, but have you noticed? As the cursor moves towards the corners of the screen, the pointer goes slightly outside of the eyeball in the z-axis.
To fix it, we need to limit the pointer's movement so that it stays within the bound of the eyeball, even when the cursor is close to the corners of the screen.
Limit the Pointer movement
void updateLocation(PointerEvent event) {
....

  const maxPointerDistance = maxEyeBallDistance / 2;

  final pointerDistance = sqrt(pointerX * pointerX + pointerY * pointerY);

  if (pointerDistance > maxPointerDistance) {
    final angle = atan2(pointerY, pointerX);
    pointerX = cos(angle) * maxPointerDistance;
    pointerY = sin(angle) * maxPointerDistance;
  }
}
We have calculated the distance between the current position of the pointer and the center of the eyeball using the Pythagorean theorem, if this distance is greater than our eyeball radius, then we use the atan2 function to calculate the new offset for the pointer using the cosine and sine of this angle.
Okay, now let’s see the result,
Cool 👌. And we have a nice Smiley.
Adding a Smile Curve
Let’s make the Smiley even more fun by adding a final touch. We are going to make the Smile curved when we hover over a button.
class _SmileyState extends State<Smiley> {
....
  bool _isHovered = false;

  @override
  Widget build(BuildContext context) {
    return Center(
      child: MouseRegion(
        onHover: updateLocation,
        child: Column(
          mainAxisAlignment: MainAxisAlignment.spaceEvenly,
          children: [
            ....
            MouseRegion(
              onEnter: (pointerHoverEvent) {
                _isHovered = true;
              },
              onExit: (pointerHoverEvent) {
                _isHovered = false;
              },
              child: Container(
                height: 75,
                width: 200,
                decoration: BoxDecoration(
                    color: Colors.black,
                    borderRadius: BorderRadius.circular(5),
                    shape: BoxShape.rectangle),
                child: const Center(
                  child: Text(
                    'Hover over me',
                    style: TextStyle(color: Colors.white, fontSize: 25),
                  ),
                ),
              ),
            )
          ],
        ),
      ),
    );
  }
}
Here we have just created a black Container with rounded corners and text saying Hover over me in the center. When the mouse cursor enters the Container, it sets _isHoverd to true, and when exits, the variable is set to false.
To make the smile curve when the button hovers over, let’s pass this variable to Face widget.
class Face extends CustomPainter {
  final bool isHovered;

  Face({required this.isHovered});

  @override
  void paint(Canvas canvas, Size size) {
    ....

    //Draw the smile
   ....
    if (isHovered) {
      canvas.drawArc(
          Rect.fromCircle(center: center.translate(0.0, 100), radius: 30),
          0,
          3.14,
          false,
          smilePaint);
    } else {
      canvas.drawRect(
          Rect.fromCenter(
              center: center.translate(0.0, 100), width: 60, height: 5),
          smilePaint);
    }
  }
}
So, when a button has hovered, we draw an arc to create a curved smile. otherwise, we draw a rectangle to create a straight-line smile.
The drawArc() method draws an arc shape. We pass in a Rect object to specify the position and size of the arc and use smilePaint to set the style and color of the arc.
And the result is here,
That’s it, we’re done with implementation 👏.
The source code for the example project in this article is available here.
Conclusion
In this tutorial, we learned how to create a smiley face widget using CustomPainter and added some interactive features by incorporating mouse events to update the pointer inside the EyeBall.
We encourage you to experiment and make modifications to the code to create your custom widgets. Happy coding!!
Thank you !!!
Keep Smiling…😄