Firebase Authentication: Adding Google, Apple, and Phone Login to an iOS App
Introduction
Integrating Firebase Authentication into your SwiftUI app offers a secure and efficient way to manage user sign-ins. With Firebase, you can authenticate users using various login methods, like Google, Apple, Email, phone number, and many more authentications.
This integration is crucial for apps that require user identification and provides a smooth and unified login experience across platforms.
In this blog, we’ll walk you through setting up Firebase Authentication in a SwiftUI app, focusing on three key authentication providers: Google, Apple, and Phone number login.
We aim to simplify the setup and implementation process to help you build a secure, user-friendly app.
If you’d prefer to skip the detailed explanation in this blog, the complete source code is available on this GitHub Repository.
Firebase Project Setup
Before integrating Firebase Authentication into your app, you need to set up a Firebase project.
Follow these steps to set up Firebase:
1. Create an Xcode Project
- Start by creating an initial Xcode project for your app. This project will serve as the base for integrating Firebase Authentication.
- Make sure you set a proper bundle identifier. For instance, if you are building a chat app, your bundle identifier could be
com.example.FirebaseChatApp.
2. Create a Firebase Project
- Next, navigate to the Firebase Console and create a new project.
- Give your project a name (e.g.,
FirebaseChatApp), and configure any settings based on your needs. - Enable Google Analytics is optional and can be done if you plan to collect app usage data.
3. Add Your iOS App to Firebase
After setting up the Firebase project, you must connect your iOS app.
To do this:
- In the Firebase Console, go to Project Overview and click Add App.
- Select iOS and enter your app’s bundle identifier.
- Download the GoogleService-Info.plist file and drag it into your Xcode project.
4. Install Firebase SDK Using Swift Package Manager or CocoaPods
You can install Firebase SDK either using Swift Package Manager (SPM) or CocoaPods.
For Swift Package Manager, follow these steps:
- In Xcode, go to File > Add Packages.
- Enter the Firebase SDK repository URL: https://github.com/firebase/firebase-ios-sdk.
For CocoaPods, add the following dependencies to your Podfile:
pod 'GoogleSignIn'    # For Google login

pod 'FirebaseAuth'    # For Firebase Authentication
Run pod install in the terminal to install the dependencies.
Initialize the Firebase app
Once the Firebase SDK is installed, initialize it in your app to enable Firebase services, such as Authentication.
1. Create a FirebaseProvider Class
To make the initialization and authentication process smoother, create a FirebaseProvider class. This class will handle Firebase setup and provide easy access to Firebase’s Auth API.
Here’s an implementation of the FirebaseProvider class:
import FirebaseCore
import FirebaseAuth

public class FirebaseProvider {

    public static var auth: Auth = .auth()

    static public func configureFirebase() {
        FirebaseApp.configure() // Initializes Firebase with the default settings.
    }
}
2. Configure Firebase in the AppDelegate
Add the AppDelegate class to initialize Firebase when the app launches.
This class handles app-level events like application launch, backgrounding, and foregrounding.
class AppDelegate: NSObject, UIApplicationDelegate {
    func application(_ application: UIApplication, didFinishLaunchingWithOptions launchOptions: [UIApplication.LaunchOptionsKey : Any]? = nil) -> Bool {
        FirebaseProvider.configureFirebase()
        return true
    }
}
Design Login Screen
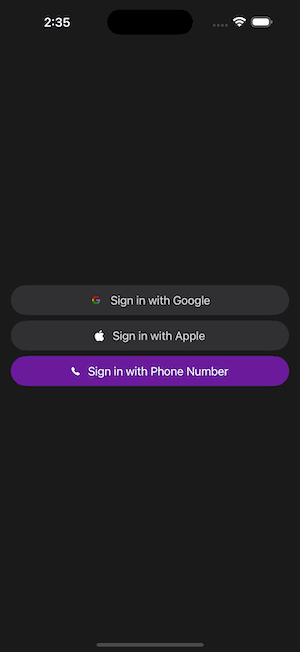
Let’s start with designing a simple login screen that provides buttons for the three authentication providers: Google, Apple, and Phone.
Login View
struct LoginView: View {

    @State var viewModel: LoginViewModel

    var body: some View {
        VStack {
            LoginOptionsView(showGoogleLoading: viewModel.showGoogleLoading, showAppleLoading: viewModel.showAppleLoading,
                             onGoogleLoginClick: viewModel.onGoogleLoginClick, onAppleLoginClick: viewModel.onAppleLoginClick,
                             onPhoneLoginClick: viewModel.onPhoneLoginClick)
        }
        .background(.surface)
    }
}

private struct LoginOptionsView: View {

    let showGoogleLoading: Bool
    let showAppleLoading: Bool

    let onGoogleLoginClick: () -> Void
    let onAppleLoginClick: () -> Void
    let onPhoneLoginClick: () -> Void

    var body: some View {
        VStack(spacing: 8) {
            LoginOptionsButtonView(image: .googleIcon, buttonName: "Sign in with Google", showLoader: showGoogleLoading,
                                   onClick: onGoogleLoginClick)
            LoginOptionsButtonView(systemImage: ("apple.logo", .primaryText, (14, 16)), buttonName: "Sign in with Apple",
                                   showLoader: showAppleLoading, onClick: onAppleLoginClick)
            LoginOptionsButtonView(systemImage: ("phone.fill", .white, (12, 12)),
                                   buttonName: "Sign in with Phone Number", bgColor: .appPrimary,
                                   buttonTextColor: .white, showLoader: false, onClick: onPhoneLoginClick)
        }
        .padding(.horizontal, 16)
        .frame(maxWidth: .infinity, maxHeight: .infinity, alignment: .center)
    }
}

private struct LoginOptionsButtonView: View {

    let image: ImageResource?
    let systemImage: (name: String, color: Color, size: (width: CGFloat, height: CGFloat))?
    let buttonName: String
    var bgColor: Color
    var buttonTextColor: Color
    let showLoader: Bool
    let onClick: () -> Void

    init(image: ImageResource? = nil,
         systemImage: (name: String, color: Color, size: (width: CGFloat, height: CGFloat))? = nil,
         buttonName: String, bgColor: Color = .container, buttonTextColor: Color = .primaryDark,
         showLoader: Bool, onClick: @escaping () -> Void) {
        self.image = image
        self.systemImage = systemImage
        self.buttonName = buttonName
        self.bgColor = bgColor
        self.buttonTextColor = buttonTextColor
        self.showLoader = showLoader
        self.onClick = onClick
    }

    public var body: some View {
        Button {
            onClick()
        } label: {
            HStack(alignment: .center, spacing: 12) {
                if showLoader {
                    ImageLoaderView(tintColor: .appPrimary)
                }

                if let image {
                    Image(image)
                        .resizable()
                        .aspectRatio(contentMode: .fit)
                        .frame(width: 18, height: 18)
                } else if let systemImage {
                    Image(systemName: systemImage.name)
                        .resizable()
                        .aspectRatio(contentMode: .fit)
                        .frame(width: systemImage.size.width, height: systemImage.size.height)
                        .foregroundStyle(systemImage.color)
                }

                Text(buttonName)
                    .lineLimit(1)
                    .foregroundStyle(buttonTextColor)
                    .frame(height: 44)
                    .minimumScaleFactor(0.5)
            }
            .padding(.horizontal, 16)
            .frame(maxWidth: .infinity, alignment: .center)
            .background(bgColor)
            .clipShape(Capsule())
        }
        .buttonStyle(.scale)
    }
}
Here, I’m not mentioning all the color codes, you can pick them from this GitHub Repo.
Main App Entry Point
In the @main entry point of your app, you will use the LoginView:
@main
struct FirebaseChatAppApp: App {

    @UIApplicationDelegateAdaptor(AppDelegate.self) var delegate

    init() {
        Injector.shared.initInjector()
    }

    var body: some Scene {
        WindowGroup {
            LoginView()
        }
    }
}
You can get the full code of the Injector class from the GitHub Repo.
Now, Let’s add the ViewModel class.
We will use the @Observable macro for the ViewModel class instead of the @ObservableObject macro in this project.
@Observable
class LoginViewModel: BaseViewModel {

    private var preference: AppPreference

    private(set) var showGoogleLoading = false
    private(set) var showAppleLoading = false

    private var currentNonce: String = ""
    private var appleSignInDelegates: SignInWithAppleDelegates?
}

func onGoogleLoginClick() { }

func onAppleLoginClick() { }

func onPhoneLoginClick() { }
For now, we are going to add just the method names, we’ll add further implementation later with each provider implementation.
Let’s run the app,
Add Firebase Authentication
Firebase Authentication allows us to integrate multiple sign-in methods into our app.
Before implementing the login functionality for each provider, ensure that the appropriate authentication methods are enabled in the Firebase Console.
You can also get a basic overview of Firebase Authentication from the official Firebase document.
Enable Authentication Providers
Navigate to Firebase Console > Authentication > Sign-in Method.
Initially, you’ll have all the providers listed below for your Firebase project.
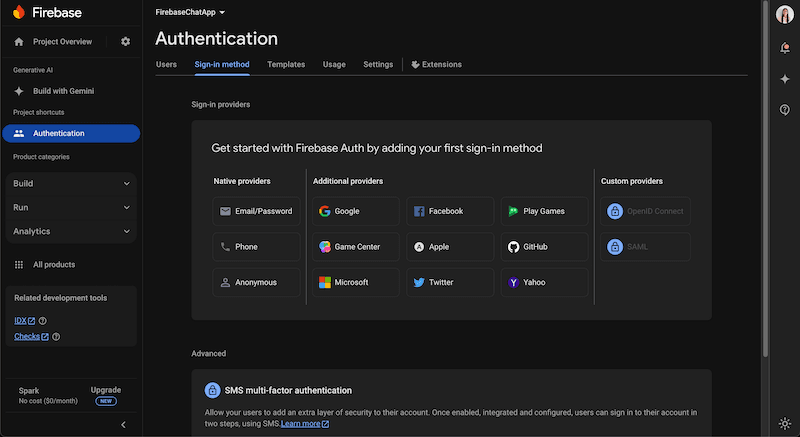
We need to enable the following providers for our current implementation:
- Google: This allows users to sign in with their Google accounts.
- Apple: This enables Apple Sign-In, mandatory for apps on iOS devices.
- Phone: This allows users to sign in using their phone numbers
Google Login Integration
Here’s a step-by-step explanation of integrating Google Login into your app using Firebase Authentication.
The process consists of enabling Google login in Firebase, configuring URL schemes in Xcode, and implementing the login logic in your app.
Enable Google Login in Firebase
In the Firebase Console, navigate to Authentication > Sign-in Method and enable the Google sign-in provider.
1. Enable Google Login in Firebase Console (if you haven’t):
- Navigate to Authentication > Sign-in Method and enable the Google sign-in provider.
2. Download GoogleService-Info.plist:
- After enabling it, download the updated
GoogleService-Info.plistfile. - Add this file to your Xcode project, and ensure it is included in your app’s target.
3. Check the clientID:
- Verify that the
clientIDis present in theGoogleService-Info.plist.
If you want to refer to the official doc for all basic setup for Google login, refer to this Firebase Doc.
Configure URL Schemes in Xcode
In Xcode,
- select your app target, go to the Info tab, and locate the URL Types section.
- Under URL Types, add a new entry and paste the
REVERSED_CLIENT_IDfrom theGoogleService-Info.plistfile into the URL Schemes field.

Implement Google Login
Now, let’s implement the Google Login functionality in your app.
Import the required frameworks in your LoginViewModel:
import GoogleSignIn
import FirebaseCore
import FirebaseAuth
Then, implement the Google login functionality:
func onGoogleLoginClick() {

    // Ensure the Firebase client ID is available; otherwise, return early.
    guard let clientID = FirebaseApp.app()?.options.clientID else { return }

    // Create a Google Sign-In configuration object with the Firebase client ID.
    let config = GIDConfiguration(clientID: clientID)
    GIDSignIn.sharedInstance.configuration = config

    // Retrieve the topmost view controller to present the Google Sign-In UI.
    guard let controller = TopViewController.shared.topViewController() else {
        print("LoginViewModel: \(#function) Top Controller not found.")
        return
    }

    // Start the Google Sign-In process, presenting it from the retrieved view controller.
    GIDSignIn.sharedInstance.signIn(withPresenting: controller) { [unowned self] result, error in
        guard error == nil else {
            print("LoginViewModel: \(#function) Google Login Error: \(String(describing: error)).")
            return
        }

        // Ensure the user and their ID token are available in the result.
        guard let user = result?.user, let idToken = user.idToken?.tokenString else { return }

        // Extract user details like first name, last name, and email from the profile.
        let firstName = user.profile?.givenName ?? ""
        let lastName = user.profile?.familyName ?? ""
        let email = user.profile?.email ?? ""

        // Create a Firebase authentication credential using the Google ID token.
        let credential = GoogleAuthProvider.credential(withIDToken: idToken, accessToken:

        // Set loading state to true while performing Firebase login.
        self.showGoogleLoading = true

        // Call the helper function to authenticate with Firebase using the credential.
        self.performFirebaseLogin(showGoogleLoading: showGoogleLoading, credential: credential,
                                  loginType: .Google, userData: (firstName, lastName, email))
    }
}
The onGoogleLoginClick() function initializes Google Sign-In with Firebase's client ID, displays the sign-in UI, and retrieves user details and a Firebase credential upon success. It then calls performFirebaseLogin().
Handle Firebase Authentication
Now, let’s implement the performFirebaseLogin() function to manage the Firebase authentication process:
private func performFirebaseLogin(showGoogleLoading: Bool = false, credential: AuthCredential,
                                  loginType: LoginType, userData: (String, String,

    // Show the loading indicator while logging in.
    self.showGoogleLoading = showGoogleLoading

    // Sign in to Firebase using the provided credential.
    FirebaseProvider.auth
        .signIn(with: credential) { [weak self] result, error in
            guard let self else { return }

            // Handle errors during Firebase sign-in.
            if let error {
                self.showGoogleLoading = false
                print("LoginViewModel: \(#function) Firebase Error: \(error), with type Apple login.")
                self.alert = .init(message: "Server error")
                self.showAlert = true
            } else if let result {
                // On successful sign-in, stop loading and create a user object.
                self.showGoogleLoading = false
                let user = User(id: result.user.uid, firstName: userData.0, lastName: userData.1,
                                   emailId: userData.2, phoneNumber: nil, loginType: loginType)

                // Save user preferences and mark the user as verified.
                self.preference.user = user
                self.preference.isVerifiedUser = true
                print("LoginViewModel: \(#function) Logged in User: \(result.user)")
            } else {
                self.alert = .init(message: "Contact Support")
                self.showAlert = true
            }
        }
}
This function authenticates the user with Firebase, updates user preferences upon success, and manages errors by logging them and showing alerts.
AppPreference Class:
@Observable
class AppPreference {

    enum Key: String {
        case isVerifiedUser = "is_verified_user"
        case user           = "user"
    }

    private let userDefaults: UserDefaults

    init() {
        self.userDefaults = UserDefaults.standard
        self.isVerifiedUser = userDefaults.bool(forKey: Key.isVerifiedUser.rawValue)
    }

    public var isVerifiedUser: Bool {
        didSet {
            userDefaults.set(isVerifiedUser, forKey: Key.isVerifiedUser.rawValue)
        }
    }

    public var user: User? {
        get {
            do {
                let data = userDefaults.data(forKey: Key.user.rawValue)
                if let data {
                    let user = try JSONDecoder().decode(User.self, from: data)
                    return user
                }
            } catch let error {
                print("Preferences \(#function) json decode error: \(error).")
            }
            return nil
        } set {
            do {
                let data = try JSONEncoder().encode(newValue)
                userDefaults.set(data, forKey: Key.user.rawValue)
            } catch let error {
                print("Preferences \(#function) json encode error: \(error).")
            }
        }
    }
}
User Data Class:
public struct User: Identifiable, Codable, Hashable {

    public var id: String
    public var firstName: String?
    public var lastName: String?
    public var emailId: String?
    public var phoneNumber: String?
    public let loginType: LoginType

    enum CodingKeys: String, CodingKey {
        case id
        case firstName = "first_name"
        case lastName = "last_name"
        case emailId = "email_id"
        case phoneNumber = "phone_number"
        case loginType = "login_type"
    }
}

public enum LoginType: String, Codable {
    case Apple = "apple"
    case Google = "google"
    case Phone = "phone"
}
Handle Callback URL in AppDelegate
For Google Sign-In to work correctly, you must handle the callback URL when the user completes the sign-in process.
You can manage this to the AppDelegate by overriding the application(_:open:options:) method.
Here is the updated AppDelegate class:
class AppDelegate: NSObject, UIApplicationDelegate {

    func application(_ application: UIApplication, didFinishLaunchingWithOptions launchOptions: [UIApplication.LaunchOptionsKey : Any]? = nil) -> Bool {
        FirebaseProvider.configureFirebase()
        return true
    }

    // Add this method to handle the Google Sign-In callback URL
    func application(_ app: UIApplication, open url: URL, options: [UIApplication.OpenURLOptionsKey: Any] = [:]) -> Bool {
        return GIDSignIn.sharedInstance.handle(url)
    }
}
This ensures that Google Sign-In can be completed and returned to the app.
Test the Integration
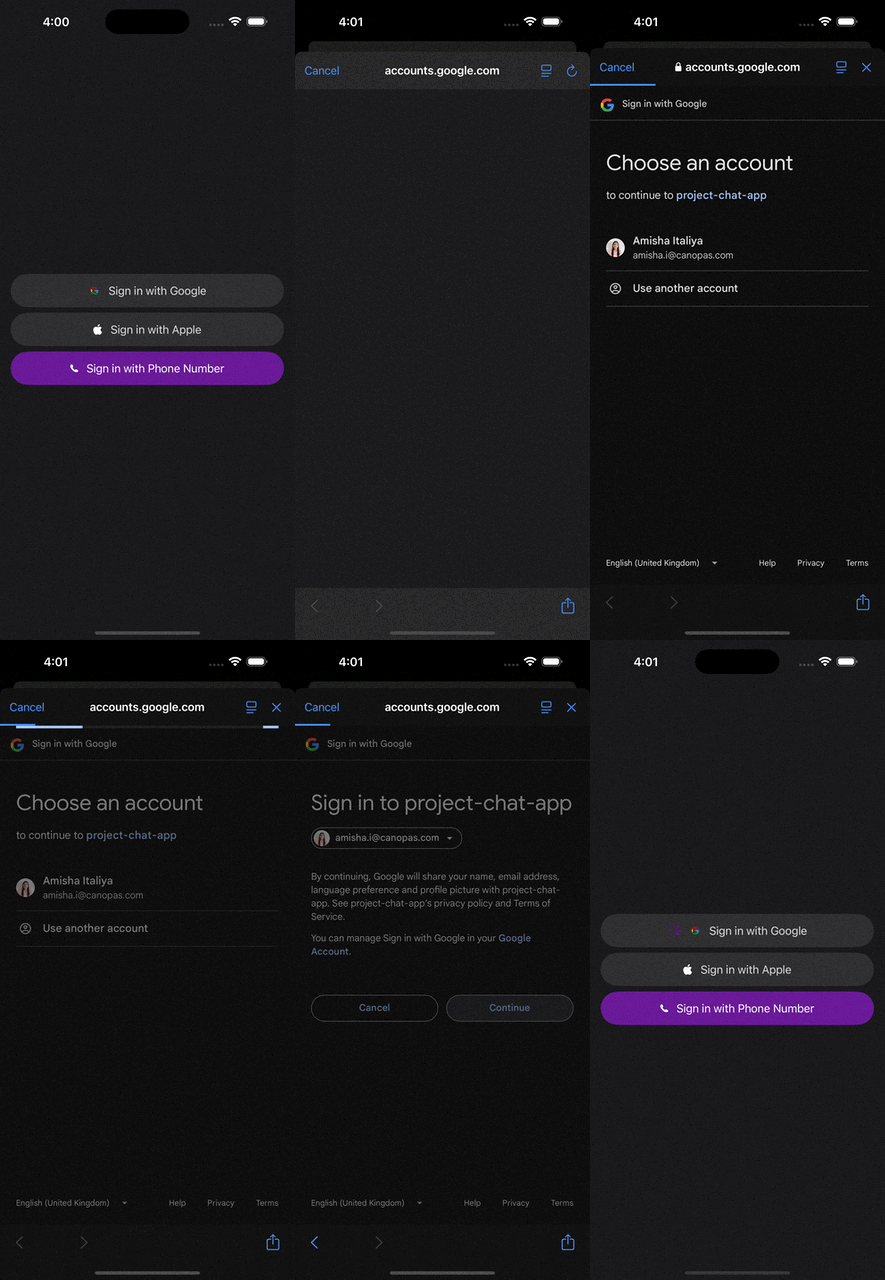
Once everything is set up, run the app and try logging in with Google. You should see the Google login flow, and upon successful authentication, you will be logged into Firebase.
Apple Login Integration
Apple Sign-In with Firebase allows users to log in securely using their Apple ID. Below is a comprehensive guide for integrating Apple Sign-In into your app.
Pre-requisites
1. Apple Developer Account Configuration:
- Register your app in the Apple Developer portal.
- Set up the “Sign in with Apple” capability to the provisioning profile.
2. Firebase Console:
- Enable the Apple sign-in provider in your Firebase project.
3. Xcode Setup:
- Add the Apple Sign-In capability to your Xcode project.
If you want to refer to the official doc for all basic setup for Sign in with Apple, refer to this Firebase Doc.
Steps to Configure the Apple Developer Portal
1. Create an App ID:
- Log in to your Apple Developer Account and navigate to Certificates, Identifiers & Profiles > Identifiers.
- Click the + button to create a new App ID and enable Sign in with Apple for your app’s Bundle ID.
2. Generate Certificates & Provisioning Profiles:
- Create and download the necessary Development and Distribution certificates.
- Generate and install provisioning profiles for both environments.
Xcode Project Configuration
1. Add Apple Sign-In Capability:
- Open your project in Xcode.
- Go to Signing & Capabilities and add the Sign in with Apple capability.

2. Update the Info.plist:
- Add necessary permissions and configurations for Apple Sign-In in your
Info.plistas follows: - Go to the app target > Signing & capabilities > click + > search for
Sign in with Appleand add it.
Generate and Use a Nonce for Secure Authentication
Nonce Generator Class: This class generates a secure random string (nonce) and hashes it using the SHA-256 algorithm. It ensures that the authentication process is safe and helps to prevent replay attacks.
import CryptoKit
import Foundation

// A class for generating a secure random string (nonce) and hashing strings using SHA-256.
class NonceGenerator {

    // Generates a random nonce string of specified length (default is 32).
    static public func randomNonceString(length: Int = 32) -> String {

        var result = "" // Final nonce string to be returned.
        var remainingLength = length // Tracks how many characters are still needed.
        let charset: [Character] = Array("0123456789ABCDEFGHIJKLMNOPQRSTUVXYZabcdefghijklmnopqrstuvwxyz-._") // Allowed characters for the nonce.

        // Ensures the requested length is valid (greater than 0).
        precondition(length > 0)

        // Generate characters until the required length is met.
        while remainingLength > 0 {

            // Generate an array of 16 random bytes.
            let randoms: [UInt8] = (0 ..< 16).map { _ in
                var random: UInt8 = 0

                // Use a secure random number generator to generate each byte.
                let errorCode = SecRandomCopyBytes(kSecRandomDefault, 1, &random)
                if errorCode != errSecSuccess {
                    fatalError("Unable to generate nonce. SecRandomCopyBytes failed with OSStatus \(errorCode)")
                }
                return random
            }

            // Map each random byte to a character in the charset if within bounds.
            randoms.forEach { random in
                if remainingLength == 0 { // Stop if the required length is reached.
                    return
                }

                if random < charset.count { // Ensure the random value maps to the charset range.
                    result.append(charset[Int(random)])
                    remainingLength -= 1 // Decrease the remaining length.
                }
            }
        }
        return result // Return the generated nonce string.
    }

    // Hashes a given input string using the SHA-256 algorithm.
    public static func sha256(_ input: String) -> String {
        let inputData = Data(input.utf8) // Convert the input string to Data.
        let hashedData = SHA256.hash(data: inputData) // Generate the SHA-256 hash.
        let hashString = hashedData.compactMap {
            return String(format: "%02x", $0) // Convert each byte of the hash to a hexadecimal string.
        }.joined() // Join all hexadecimal values into a single string.
        return hashString // Return the hash string.
    }
}
This code snippet helps generate a nonce and hash it for safe and secure Apple Sign-In authentication.
This NonceGenerator class provides two main utilities:
1. randomNonceString(length: Int):
- Generates a cryptographically secure random string (nonce) of a specified length.
- The generated string uses a predefined set of characters (0–9, A-Z, a-z, -, _) and ensures unpredictability by using the SecRandomCopyBytes function for randomness.
2. sha256(_ input: String):
- It takes a string as input and returns its SHA-256 hash as a hexadecimal string.
- This can be used to securely hash data for comparison or storage.
The class is useful in scenarios requiring secure, unpredictable values (e.g., for authentication, cryptographic protocols) and hashing operations.
Handle the Apple Sign-In Flow
We’ll break down the process into two parts:
— Triggering the Apple Sign-In Process
— Handling the Apple Sign-In Response
1. Triggering the Apple Sign-In Process
To initiate the Apple Sign-In flow, we must create a request and delegate its handling to a custom class. This ensures that the sign-in process is managed separately, making the code easier to maintain.
Step 1: Create a Separate Delegate Class
In our project, we handle Apple Sign-In’s delegate methods in a separate class, SignInWithAppleDelegates.swift to keep the logic isolated.
Here's the structure of the delegate class:
class SignInWithAppleDelegates: NSObject {

    private let signInSucceeded: (String, String, String, String) -> Void

    init(signInSucceeded: @escaping (String, String, String, String) -> Void) {
        self.signInSucceeded = signInSucceeded
    }
}
Step 2: Handling Apple Sign-In Button Click
When the user clicks the Apple Sign-In button, we generate a nonce (a random string) and start the authorization request. The nonce is hashed using SHA-256 for security.
Let’s update LoginViewModel’s method for the Apple login action.
Here’s how you can set up the button action:
func onAppleLoginClick() {
    // Generate a random nonce to use during the Apple Sign-In process for security.
    self.currentNonce = NonceGenerator.randomNonceString()

    // Create a new Apple ID authorization request.
    let request = ASAuthorizationAppleIDProvider().createRequest()

    // Specify the user information that the app wants to access (full name and email).
    request.requestedScopes = [.fullName, .email]

    // Hash the generated nonce using SHA-256 and assign it to the request for verification.
    request.nonce = NonceGenerator.sha256(currentNonce)

    // Initialize the delegate to handle the Apple Sign-In process's callbacks.
    // The delegate is responsible for managing the successful authentication and passing the user data.
    appleSignInDelegates = SignInWithAppleDelegates { (token, fName, lName, email)  in

        // Create an OAuth credential for Firebase using the token received from Apple.
        let credential = OAuthProvider.credential(providerID: AuthProviderID.apple, idToken: token, rawNonce:
        self.showAppleLoading = true

        // Call a separate method to complete the Firebase login using the created credential.
        self.performFirebaseLogin(showAppleLoading: self.showAppleLoading, credential: credential,
                                  loginType: .Apple, userData: (fName, lName, email))
    }

    // Create an authorization controller to manage the Apple Sign-In flow.
    let authorizationController = ASAuthorizationController(authorizationRequests: [request])

    // Assign the delegate to handle the authorization callbacks.
    authorizationController.delegate = appleSignInDelegates

    // Start the Apple Sign-In process by presenting the authorization request to the user.
    authorizationController.performRequests()
}
Step 3: Firebase Login Integration
Next, we update our Firebase login method to handle both Google and Apple logins. We pass in the credential (from Apple Sign-In) and user data (name, email) to Firebase for authentication:
private func performFirebaseLogin(showGoogleLoading: Bool = false, showAppleLoading: Bool = false,
                                  credential: AuthCredential, loginType: LoginType, userData: (String, String,

    // Set the loading states for Google and Apple login to indicate the process has started.
    self.showGoogleLoading = showGoogleLoading
    self.showAppleLoading = showAppleLoading

    // Attempt to sign in with Firebase using the provided credentials.
    FirebaseProvider.auth
        .signIn(with: credential) { [weak self] result, error in
            guard let self else { return }

            // Handle any errors during the Firebase sign-in process.
            if let error {
                self.showGoogleLoading = false
                self.showAppleLoading = false
                print("LoginViewModel: \(#function) Firebase Error: \(error), with type Apple login.")
                self.alert = .init(message: "Server error")
                self.showAlert = true
            } else if let result {
                // Reset the loading states as the login process is complete.
                self.showGoogleLoading = false
                self.showAppleLoading = false

                // Create a User object using the signed-in user's details.
                let user = User(id: result.user.uid, firstName: userData.0, lastName: userData.1,
                                emailId: userData.2, phoneNumber: nil, loginType: loginType)

                // Save the user object and mark the user as verified in preferences.
                self.preference.user = user
                self.preference.isVerifiedUser = true
                print("LoginViewModel: \(#function) Logged in User: \(result.user)")
            } else {
                // Handle unexpected cases where neither error nor result is present.
                self.alert = .init(message: "Contact Support")
                self.showAlert = true
            }
        }
}
Sign in to Firebase using the OAuthProvider.credential generated during the Apple Sign-In process.
2. Handle the Apple Sign-In Response
Once the user completes the Apple Sign-In process, we must handle the response, including errors or successful sign-ins.
Apple Sign-In Delegate Methods
We extend the SignInWithAppleDelegates class to implement the ASAuthorizationControllerDelegate methods.
Here's how we manage the successful sign-in:
// Extend the `SignInWithAppleDelegates` class to handle Apple Sign-In responses.
extension SignInWithAppleDelegates: ASAuthorizationControllerDelegate {

    // Method called when the authorization process completes successfully.
    func authorizationController(controller: ASAuthorizationController, didCompleteWithAuthorization authorization: ASAuthorization) {

        // Attempt to retrieve the Apple ID credentials from the authorization response.
        if let appleIDCredential = authorization.credential as? ASAuthorizationAppleIDCredential {

            // Fetch the identity token from the Apple ID credential.
            guard let appleIDToken = appleIDCredential.identityToken else {
                print("SignInWithAppleDelegates: \(#function) Unable to fetch identity token.")
                return
            }

            // Convert the identity token to a String format for further processing.
            guard let idTokenString = String(data: appleIDToken, encoding: .utf8) else {
                print("SignInWithAppleDelegates: \(#function) Unable to serialize token string from data: \(appleIDToken.debugDescription).")
                return
            }

            // Extract additional user information (first name, last name, email) from the Apple ID credential.
            let firstName = appleIDCredential.fullName?.givenName ?? ""
            let lastName = appleIDCredential.fullName?.familyName ?? ""
            let email = appleIDCredential.email ?? ""

            // Call a custom method to handle successful sign-in, passing the token and user information.
            self.signInSucceeded(idTokenString, firstName, lastName, email)
        }
    }

    // Method called when the authorization process fails.
    func authorizationController(controller: ASAuthorizationController, didCompleteWithError error: Error) {
        print("SignInWithAppleDelegates: \(#function) Apple login complete with error: \(error).")
    }
}
This delegate method extracts the user data (first name, last name, email) and the identity token, which is then used to authenticate the user with Firebase.
It provides a robust mechanism for managing the Apple Sign-In process, ensuring both user data extraction and error handling are addressed efficiently.
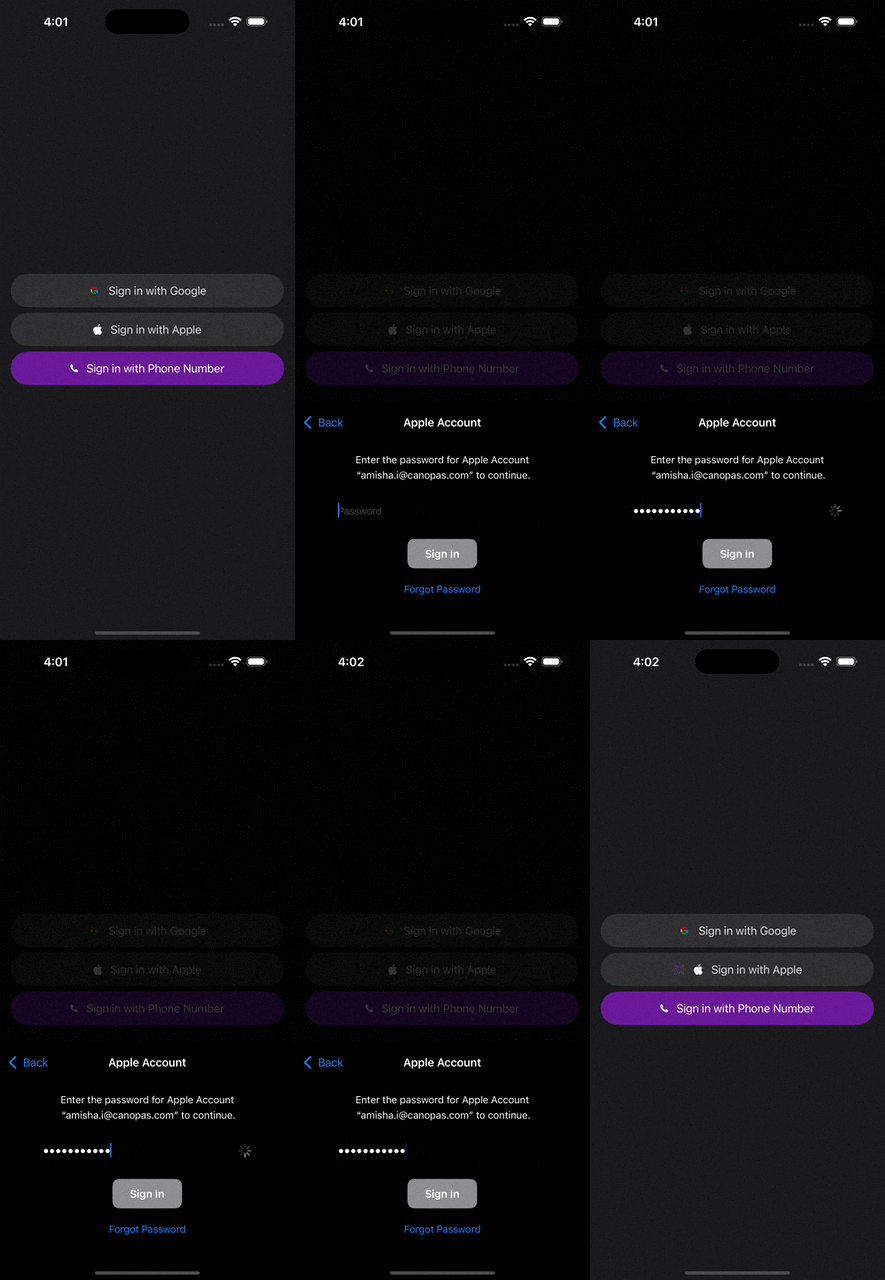
Now, Let’s run the app,
Phone Login Integration
Phone authentication is a popular choice for verifying users, offering convenience and security.
In this section, we’ll cover everything from configuring your Firebase project to setting up the phone number verification flow and handling OTP verification.
Pre-requisites
Before getting started, ensure the following prerequisites are met:
1. Firebase Project: In the Firebase console, set up a Firebase project with Firebase Authentication enabled for phone login.
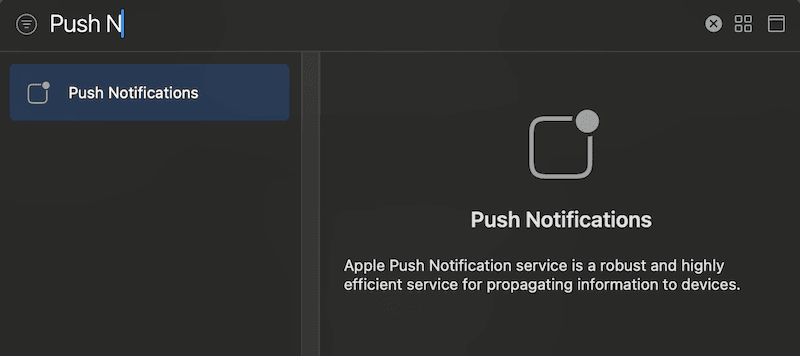
2. Xcode Capabilities: Enable the “Push Notifications” capability in your Xcode project’s target settings.
3. Provisioning Profile: Verify that your provisioning profile supports push notifications. This can be checked and configured in the Apple Developer Center.

Firebase Phone Login Setup
Here’s a step-by-step guide to implementing Firebase phone login in your SwiftUI app:
If you want to refer to the official doc for all basic setup for phone login, refer to this Firebase Doc.
1. Configure Firebase Authentication for Phone Login
- Enable Phone Authentication:
- Go to Firebase console > Authentication > Sign-in method.
- Enable the Phone authentication provider. - Switch to the Blaze (pay-as-you-go) plan to enable full phone authentication functionality.
- If you’re testing without the Firebase Blaze plan, add test phone numbers under the Testing section and define static verification codes.

Note: Without the Blaze plan, Firebase does not send OTPs to real phone numbers. Use test numbers with static codes for development.
- Example: Add a test number like
+919988776655with a static OTP such as123456.
2. Enable Push Notifications
Firebase phone authentication requires your app to support push notifications. Follow these steps to enable them:
- Enable Push Notifications in your Xcode project.
- Go to Xcode > Signing & Capabilities tab.
- Add the Push Notifications capability. - Ensure that your provisioning profile is configured to support push notifications. You can verify this in the Apple Developer Center.

3. Configure APNs (Apple Push Notification Service)
Firebase relies on the Apple Push Notification Service (APNs) to enable specific functionalities required for phone authentication.
An APNs key is essential to allow Firebase to communicate with Apple’s servers to send silent push notifications, which are crucial for OTP auto-retrieval.
Without this key, the authentication process will not work correctly for phone numbers.
- Generate an APNs Key:
- In the Apple Developer Center, navigate to Certificates, Identifiers & Profiles > Keys.
- Create an APNs key and download it.
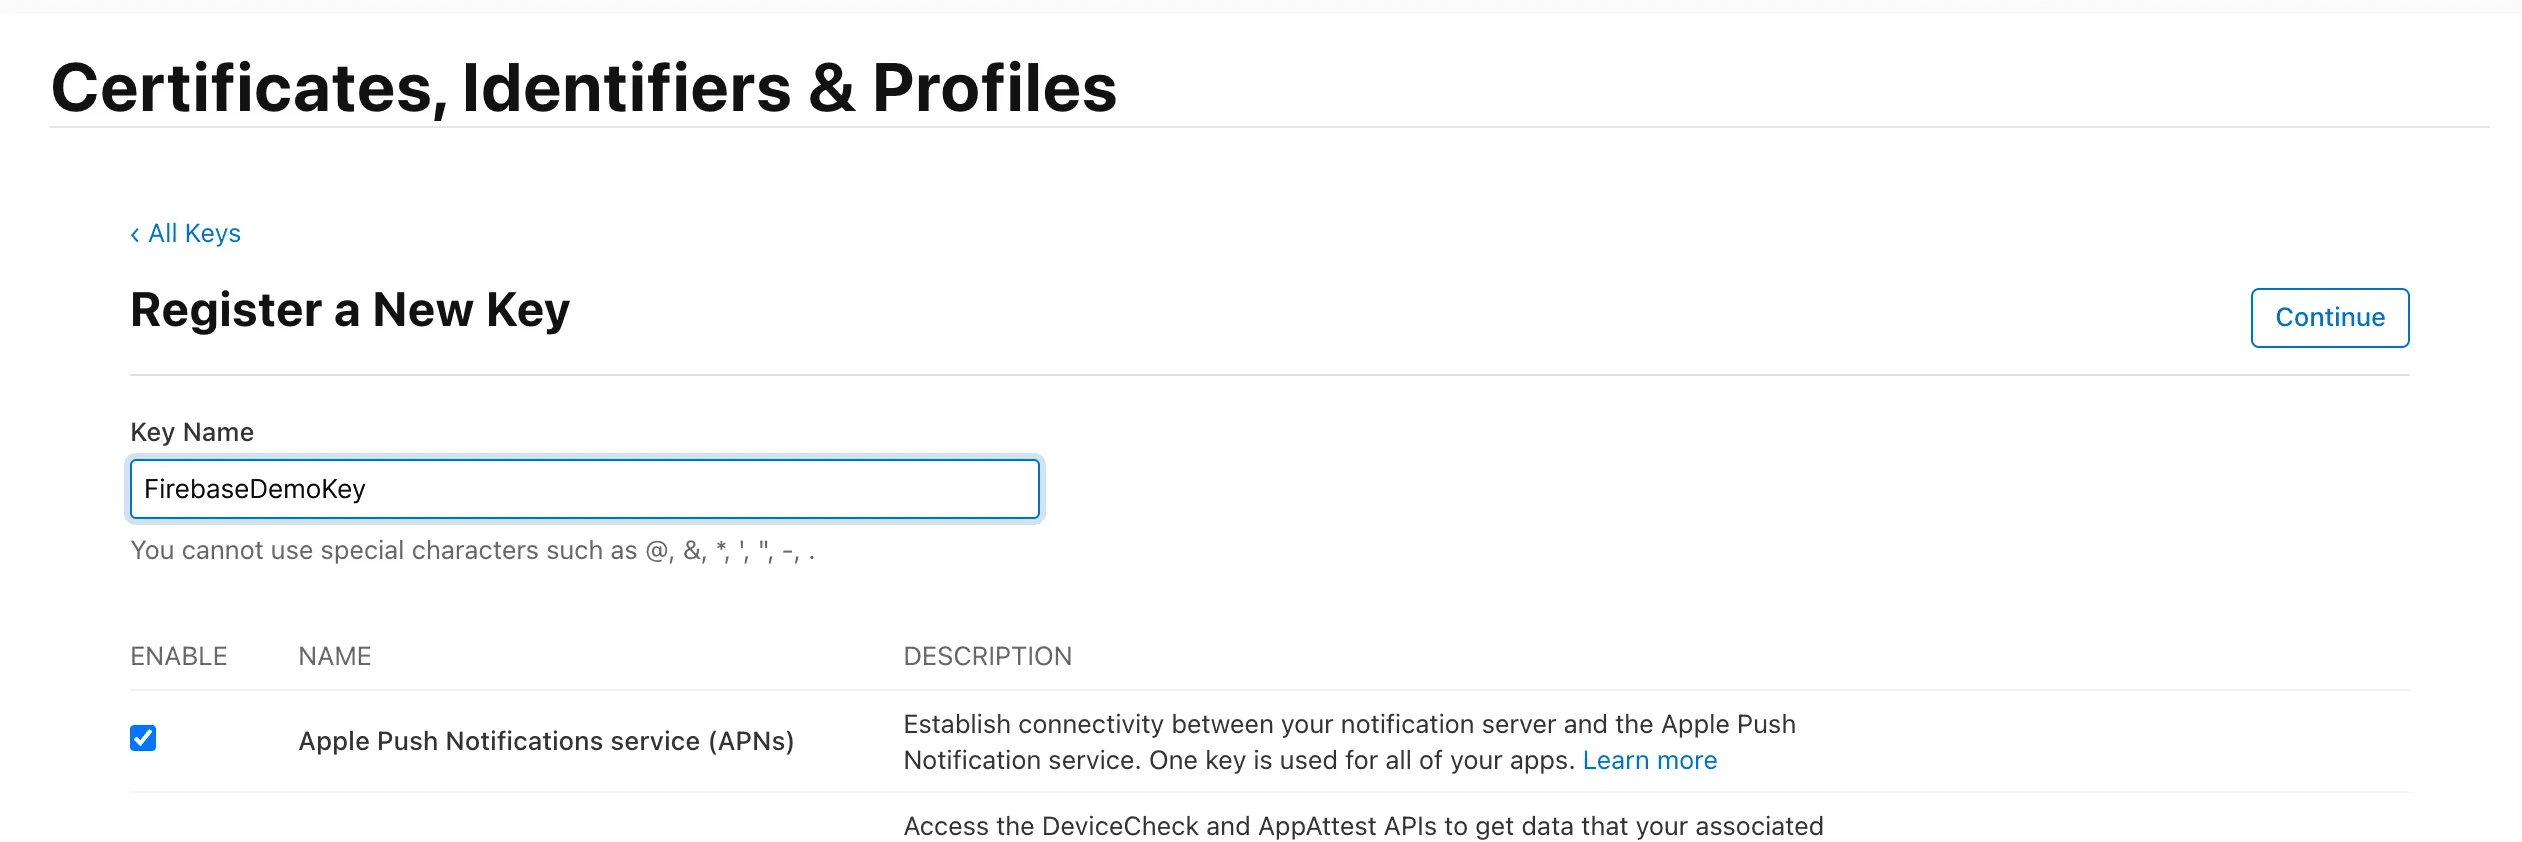
Note: Without the APNs key, you will not receive OTPs for the added phone number, as Firebase relies on silent push notifications for OTP auto-retrieval.
- Upload the APNs Key to Firebase:
- Go to Project Settings > Cloud Messaging in Firebase Console.
- Upload your APNs key to enable Firebase messaging capabilities.

- Request Push Notification Permissions:
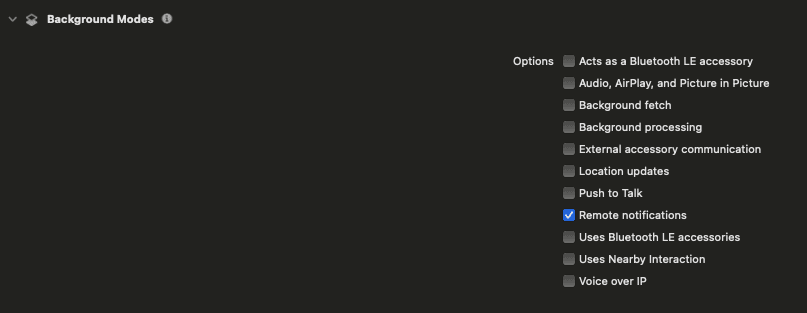
— Ensure the app requests user permission for notifications during onboarding. - In Xcode, enable the Background Modes capability for your project, and then select the checkboxes for the Background fetch and Remote notifications modes.
Implement Phone Login
We will now implement the phone login feature, focusing on two key components:
- Phone Login ViewModel: Handles phone number input, phone verification, and OTP sending.
- Verify OTP ViewModel: Manages OTP input, verification with Firebase, and login success or failure with resend OTP option.
Note: This guide focuses on functionality rather than UI. For UI code, refer to this GitHub repository.
We are going to implement the below feature with the same UI,
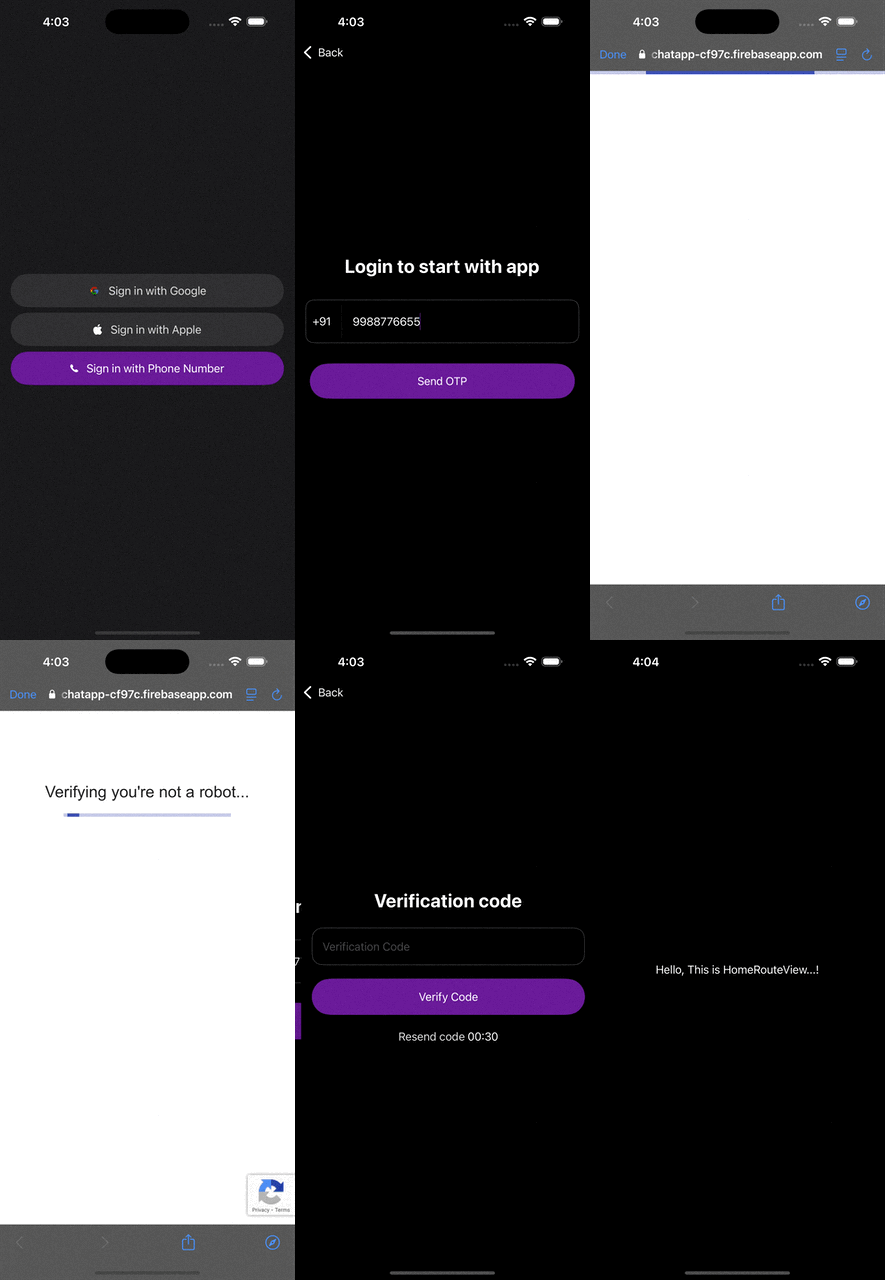
I’ve added the country selection to add phone numbers of different countries. For that, I’ve added a Countries.json file that contains the country name with its dial code and its flag icon.
PhoneLoginViewModel:
Let’s start with the PhoneLoginViewModel class, which is responsible for managing the phone number input, sending the OTP, and navigating to the OTP verification screen.
import FirebaseAuth

@Observable
class PhoneLoginViewModel {

    // Array to store the list of countries.
    var countries = [Country]()

    // Current country that the user is in, used for dialing code.
    var currentCountry: Country

    // The verification ID obtained after sending the OTP to the user's phone number.
    private(set) var verificationId = ""

    // User's phone number entered. It is validated to ensure it is not too long.
    var phoneNumber = "" {
        didSet {
            // Ensures that the phone number does not exceed the maximum length.
            guard phoneNumber.count < MAX_NUMBER_LENGTH else {
                // If the number exceeds the max length, revert to the old value.
                phoneNumber = oldValue
                return
            }
        }
    }

    init() {
        // Reads the list of countries from a local JSON file.
        let allCountries = JSONUtils.readJSONFromFile(fileName: "Countries", type: [Country].self) ?? []

        // Fetches the region identifier from the device locale.
        let currentLocal = Locale.current.region?.identifier

        // Sets the list of countries from the JSON file.
        self.countries = allCountries

        // Sets the current country based on the user's region or defaults to India if not found.
        self.currentCountry = allCountries.first(where: {$0.isoCode == currentLocal}) ?? (allCountries.first ?? Country(name: "India", dialCode: "+91", isoCode: "IN"))
        super.init()
    }

    // MARK: - Handle user action of button tap to verify phone number and send OTP
   func verifyAndSendOtp() {
        showLoader = true

        // Calls Firebase to send the OTP to the phone number (with the country dialing code).
        FirebaseProvider.phoneAuthProvider
            .verifyPhoneNumber((currentCountry.dialCode + phoneNumber.getNumbersOnly()), uiDelegate: nil) { [weak self] (verificationID, error) in
                self?.showLoader = false
                if let error {
                    self?.handleFirebaseAuthErrors(error)
                } else {
                    // If no error, store the verification ID and navigate to the OTP verification screen.
                    self?.verificationId = verificationID ?? ""
                    self?.openVerifyOtpView()
                }
            }
    }

    // MARK: - Helper Methods
    // This function handles different types of errors returned by Firebase Authentication.
    private func handleFirebaseAuthErrors(_ error: Error) {
        if (error as NSError).code == FirebaseAuth.AuthErrorCode.webContextCancelled.rawValue {
            // If the request was cancelled, notify the user.
            showAlertFor(message: "Something went wrong! Please try after some time.")
        } else if (error as NSError).code == FirebaseAuth.AuthErrorCode.tooManyRequests.rawValue {
            // If too many requests were made, notify the user.
            showAlertFor(message: "Too many attempts, please try after some time.")
        } else if (error as NSError).code == FirebaseAuth.AuthErrorCode.missingPhoneNumber.rawValue {
            // If the phone number is missing, prompt the user to enter a valid phone number.
            showAlertFor(message: "Enter a valid phone number.")
        } else if (error as NSError).code == FirebaseAuth.AuthErrorCode.invalidPhoneNumber.rawValue {
            // If the phone number is invalid, prompt the user to enter a valid phone number.
            showAlertFor(message: "Enter a valid phone number.")
        } else {
            // For any other error, display a generic error message.
            print("PhoneLoginViewModel: \(#function) Phone login fail with error: \(error).")
            showAlertFor(title: "Authentication failed", message: "Apologies, we were not able to complete the authentication process. Please try again later.")
        }
    }
}
The PhoneLoginViewModel manages phone authentication with Firebase, handling country selection, phone number validation, and OTP verification.
It sends an OTP on button tap, handles authentication errors, and displays messages, while also managing the verification ID and loading state.
Once the OTP is sent successfully, we push the OTPView onto the navigation stack to navigate to the OTP verification view.
Note: I haven’t added the full code here, you can refer to the original Github repo for full code where I tried to follow some best practices for managing files and code with a simple app architecture.
VerifyOtpViewModel:
The VerifyOtpViewModel is responsible for handling the OTP input and verifying it with Firebase to authenticate the user.
import FirebaseAuth

@Observable
class VerifyOtpViewModel {

    // Stores user preferences
    var preference: AppPreference

    var otp = "" // User-entered OTP
    var resendOtpCount: Int = 30  // Countdown for resend OTP button
    private(set) var resendTimer: Timer?  // Timer for resend OTP countdown

    // Format the phone number for display (last 4 digits visible)
    var hiddenPhoneNumber: String {
        let count = phoneNumber.count
        guard count > 4 else { return phoneNumber }
        let middleNumbers = String(repeating: "*", count: count - 4)
        return "\(phoneNumber.prefix(2))\(middleNumbers)\(phoneNumber.suffix(2))"
    }

    private let dialCode: String // Country's dial code
    private var phoneNumber: String  // User's phone number
    private var verificationId: String // Firebase verification ID

    init(phoneNumber: String, dialCode: String = "",
         verificationId: String, onLoginSuccess: ((String) -> Void)? = nil) {
        self.router = router
        self.phoneNumber = phoneNumber
        self.dialCode = dialCode
        self.verificationId = verificationId
        self.onLoginSuccess = onLoginSuccess
        self.preference = appResolve(serviceType: AppPreference.self)

        super.init()

        runTimer()
    }

    // MARK: - Handle user action of button tap to verify code
    func verifyOTP() {
        // Ensure OTP is not empty
        guard !otp.isEmpty else { return }

        let credential = FirebaseProvider.phoneAuthProvider.credential(withVerificationID: verificationId,
                                                                       verificationCode: otp)
        showLoader = true
        FirebaseProvider.auth.signIn(with: credential) {[weak self] (result, _) in
            self?.showLoader = false
            if let result {
                guard let self else { return }

                // Stop the timer if OTP is verified
                self.resendTimer?.invalidate()

                let user = User(id: result.user.uid, firstName: nil, lastName: nil, emailId: nil,
                                   phoneNumber: result.user.phoneNumber, loginType: .Phone)
                self.preference.user = user
                self.preference.isVerifiedUser = true // Mark user as verified
                self.onVerificationSuccess()
            } else {
                self?.onLoginError()
            }
        }
    }

    // Handle user action on resend OTP button tap
    func resendOtp() {
        showLoader = true
        FirebaseProvider.phoneAuthProvider.verifyPhoneNumber((dialCode + phoneNumber), uiDelegate: nil) { [weak self] (verificationID, error) in
            guard let self else { return }
            self.showLoader = false
            if error != nil {
                if (error! as NSError).code == FirebaseAuth.AuthErrorCode.webContextCancelled.rawValue {
                    self.showAlertFor(message: "Something went wrong! Please try after some time.")
                } else if (error! as NSError).code == FirebaseAuth.AuthErrorCode.tooManyRequests.rawValue {
                    self.showAlertFor(title: "Warning !!!", message: "Too many attempts, please try after some time.")
                } else if (error! as NSError).code == FirebaseAuth.AuthErrorCode.missingPhoneNumber.rawValue || (error! as NSError).code == FirebaseAuth.AuthErrorCode.invalidPhoneNumber.rawValue {
                    self.showAlertFor(message: "Enter a valid phone number")
                } else {
                    print("VerifyOtpViewModel: \(#function) Phone login fail with error: \(error.debugDescription)")
                    self.showAlertFor(title: "Authentication failed",
                                      message: "Apologies, we were not able to complete the authentication process. Please try again later.")
                }
            } else {
                // Update verification ID
                self.verificationId = verificationID ?? ""
                // Restart resend timer
                self.runTimer()
            }
        }
    }
}

// MARK: - Helper Methods
extension VerifyOtpViewModel {
    private func runTimer() {
        resendOtpCount = 30
        resendTimer = Timer.scheduledTimer(timeInterval: 1, target: self, selector: #selector(update), userInfo: nil, repeats: true)
    }

    @objc func update() {
        if resendOtpCount > 0 {
            resendOtpCount -= 1 // Decrease timer
        } else {
            resendTimer?.invalidate() // Stop the timer when it reaches zero
        }
    }

    private func onLoginError() {
        showAlertFor(title: "Invalid OTP", message: "Please, enter a valid OTP code.")
    }
}
This class handles OTP verification and resend functionality using Firebase. It stores user phone information, manages OTP input, and handles authentication success or failure.
It also manages the countdown for resending OTP and provides appropriate error messages in case of failure.
Now, you can run the app and test it.
That’s it !!!
Thank you for reading.
Conclusion
Following this guide, you’ve successfully implemented a scalable and secure phone login feature in your SwiftUI app using Firebase Authentication. The app is ready for real-world use of Google, Apple, and Phone Login.
The modular structure and MVVM architecture ensure maintainability and ease of future extensions.
Stay tuned for the next part of my planned series, where we’ll dive into advanced Firebase features for building robust and scalable SwiftUI apps!
Happy Coding 😄.
Popular Articles


Get started today
Let's build the next
big thing!
Let's improve your business's digital strategy and implement robust mobile apps to achieve your business objectives. Schedule Your Free Consultation Now.
Get Free Consultation
Get started today
Let's build the next big thing!
Let's improve your business's digital strategy and implement robust mobile apps to achieve your business objectives. Schedule Your Free Consultation Now.
Get Free Consultation