
Dagger 2- Annotations
Introduction
Dagger is the fastest compile-time dependency injection framework. It provides a simple way to obtain references to shared instances. Not only you can easily manage instances that can last the entire application lifecycle, you can also define instances with shorter lifetimes (i.e. bound to a user session, activity lifecycle, etc.)
Sponsored
We are what we repeatedly do. Excellence, then, is not an act, but a habit. Try out Justly and start building your habits today!
Let’s see the main annotation one by one!
@Inject
the @Inject annotation will tell the Dagger what all the dependencies needed to be transferred to the dependent. Can be used in constructor, field or method.
Constructor injection is used with class constructor. For example,
class LoginPresenter @Inject constructor(
     private val userService: UserService,
     private val userManager: UserManager)
: BasePresenter<View>{ ... }
Field injection is used with field in class. Field injection is mainly used to inject variables into Android framework types that the system instantiates and on which we can’t do constructor injection, like activities, BroadcastReceivers and fragments. Note that we can’t inject final and static private field as the value of final can never change.
class LoginActivity : AppCompatActivity(){
     @Inject lateinit var loginPresenter: LoginPresenter
}
Method injection is used to inject method of class. Injected method will be called automatically after class creation. This type of injection rarely used.
lateinit var user: User
@Inject
internal fun loadFromPreferences() {
   user = userPreferences.user
}
@Module
In short, @Module annotation, marks the modules/classes. Module provides the instance of dependencies.
For example, We can have a module called ContextModule and this module can provide Application Context and Context dependencies to other classes. So we need to mark the class ContextModule with @Module.
@Module
class ContextModule {
  @Provides
  @Singleton
  fun provideContext(application: Application): Context {
     return application;
  }
}
@Provides
This annotation tells the dagger how to provide classes that your project doesn’t own or it tells Dagger how to create instances of the type that this function returns.
@Module
class NetworkModule {
  @Provides
  @Singleton
  fun provideApiService(): ApiService {
        return Retrofit.Builder()
              .baseUrl("https://jsonplaceholder.typicode.com")
              .addConverterFactory(GsonConverterFactory.create())
              .build()
              .create(ApiService.class);
    }
}
@Binds
@Binds is equivalent to @Provides. It is mainly used to bind interfaces and abstract classes.
@Module
abstract class MainActivityModule {
@Binds
abstract fun bindMainPresenter(
         presenter: MainPresenter): LoginContract.Presenter
}
@Component
This annotation tells Dagger what Modules to include when building the graph for providing dependencies.
@Component(modules = [ContextModule::class,NetworkModule::class])
interface ApplicationComponent: AndroidInjector<MyApplication> {
     @Component.Builder
     interface Builder
      {
            @BindsInstance
            fun application(application: Application): Builder
            fun build(): AppComponent
      }
}
Here, using these two annotations @Component.Builder and @BindsInstance we can pass our application context, so dagger can use it in any module which requires our application context.
@BindsInstance will allow client/factory to pass their own instance. Here, in our case we pass application context.
@Component.Builder a builder of our component. As per documentation,
Components may have a single nested static abstract class or interface annotated with
@Component.Builder. If they do, then the component’s generated builder will match the API in the type. — source
@ContributesAndroidInjector
This annotation tells Dagger to generate Subcomponent of activity, fragment, service etc. @ContributesAndroidInjector is the replacement of old @subComponent where we create our own sub-component manually.
@ActivityScoped
@ContributesAndroidInjector(modules = MainActivityModule.class)
abstract MainActivity bindMainActivity();
In this example, Dagger generates sub-component for our mainActivity.
@Scope
You can use scope annotations to limit the lifetime of an object to the lifetime of its component. This means that the same instance of a dependency is used every time that type needs to be provided as per its lifetime.
@Module
class NetworkModule {
  @Provides
  @Singleton
  fun provideApiService(): ApiService {...}
}
Here, we will provide single instance of our dependency by using @Singleton, so dagger provides same instance of ApiService whenever required through out the app lifecycle.
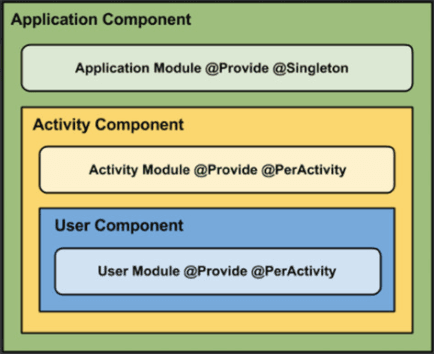
By default dagger has only one inbuilt scope @Singleton and used to annotate the application component , but we can create our own custom scopes by using @Scope annotation(e.g. @FragmentScope).
// Creates ActivityScope
@Scope
@MustBeDocumented
@Retention(value = AnnotationRetention.RUNTIME)
annotation class ActivityScope
@Named
The @Named annotation is good for identifying which provider to be used when we are trying to inject the dependency of the same type.
@Module
class NetworkModule {
@Provides
@Named("AuthClient")
@Singleton
fun provideAuthClient(): OkHttpClient {
  return OkHttpClient.Builder()
      .readTimeout(30, TimeUnit.SECONDS).build()
}
@Provides
@Named("APIClient")
@Singleton
fun provideApiClient(interceptor:APIRequestInterceptor):OkHttpClient    {
  return OkHttpClient.Builder().cache(cache)
          .addInterceptor(interceptor)
          .readTimeout(30, TimeUnit.SECONDS)
          .build()
  }
}
Here we have two function and both provides the instance of OkHttpClient . To clarify which instance of OkHttpClient needs to provide whenever required, we’ll use @Named so dagger can identify required instance by its name.
@Provides
@Singleton
internal fun provideRetrofit(@Named("APIClient") okHttpClient: OkHttpClient, @Named("ApiServerUrl") apiUrl: String): Retrofit {
   return Retrofit.Builder()
           .baseUrl(apiUrl)
           .client(okHttpClient)
           .addConverterFactory(GsonConverterFactory.create())
           .build()
}
Let’s see one simple example in which we will fetch user by using Json Placeholder API . We are going to use Dagger with Retrofit, RxJava and MVP architecture.
Step 1: Add required dependencies in app gradle file.
//Dagger
implementation "com.google.dagger:dagger-android-support:$daggerVersion"
kapt "com.google.dagger:dagger-compiler:$daggerVersion"
kapt "com.google.dagger:dagger-android-processor:$daggerVersion"
//Retrofit
implementation "com.squareup.retrofit2:retrofit:$retrofitVersion"
//RxJava & RxAndroid
implementation "io.reactivex.rxjava2:rxjava:$rxjava2Version"
implementation "io.reactivex.rxjava2:rxandroid:$rxandroidVersion"
Step 2: Create service class
interface UserService {
    @GET("users")
    fun getUsers(): Observable<User>
}
Step 3: Create Module classes
@Module
class NetworkModule {
@Provides
@Singleton
fun provideClient(): OkHttpClient {
  return OkHttpClient.Builder()
      .readTimeout(30, TimeUnit.SECONDS).build()
}
@Provides
@Singleton
fun provideUserService(okHttpClient: OkHttpClient): UserService{
     return Retrofit.Builder()
             .baseUrl("https://jsonplaceholder.typicode.com")
             .addConverterFactory(GsonConverterFactory.create())
             .client(okHttpClient)
             .build()
             .create(UserService::class.java);
  }
}
//AppModule
@Module
class AppModule {
    @Provides
    @Singleton
    fun provideContext(application: Application): Context {
          return application;
    }
}
//AppActivityBinderModule
@Module
abstract class AppActivityBinderModule {
   @ActivityScoped
   @ContributesAndroidInjector
   abstract fun bindMainActivity(): MainActivity
}
Step 4: Create Component class
@Singleton
@Component(
      modules = [
              AppModule::class,
              NetworkModule::class,
              AppActivityBinderModule::class])
interface AppComponent : AndroidInjector<UseApplication> {
   @Component.Builder
   interface Builder {
       @BindsInstance
       fun application(application: Application): Builder
       fun build(): AppComponent
   }
}
Step 5: Generate Dagger graph
class UserApplication : DaggerApplication()
{
  //…
  override fun applicationInjector(): AndroidInjector<out DaggerApplication> {
     return DaggerAppComponent.builder().application(this).build()
  }
  // …
}
Step 6: Create presenter
class UserPresenter @Inject constructor(
          private val userService: UserService):BasePresenter<View>{

  private var view: View? = null
  override fun attachView(view: View) {
     this.view = view
     fetchUser()
  }
 fun fetchUser() {
   compositeDisposable.add(
           userService.getUser()
               .subscribeOn(Schedulers.io())
               .observeOn(AndroidSchedulers.mainThread())
               .subscribe({
                   view?.setUser(it)
               }, {
                   view?.showError(it.localizedMessage)
               })
       )}
interface View
{
  fun setUser(users: List<User>)
  fun showError(message: String)
}
Step 7: Create Adapter
class UserAdapter : RecyclerView.Adapter<UserVH>() {
   var users = emptyList<User>()
       set(value) {
           field = value
           notifyDataSetChanged()
       }
   override fun onCreateViewHolder(parent: ViewGroup, viewType: Int): UserVH {
       val binding = ItemUserBinding.inflate(LayoutInflater.from(parent.context))
       return UserVH(binding)
   }
   override fun getItemCount(): Int {
       return users.size
   }
   override fun onBindViewHolder(holder: UserVH, position: Int) {
       val user = users[position]
       holder.bind(user)
   }
}
class UserVH(private val binding: ItemUserBinding) : RecyclerView.ViewHolder(binding.root) {
   fun bind(user: User) {
       binding.userName.text = user.name
       binding.userEmail.text = user.email
       binding.userInitial.text = user.name.substring(0, 1)
   }
}
Step 8: Create Activity
class UsersActivity : AppCompatActivity(), UserPresenter.View {

     @Inject lateinit var presenter: UserPresenter
     private var adapter: UserAdapter?= null

     override fun onStart() {
         super.onStart()
         presenter.attachView(this)
     }

     override fun setUser(user:List<User>) {
        adapter?.users = user
     }
}
Pretty simple. Isn’t it?
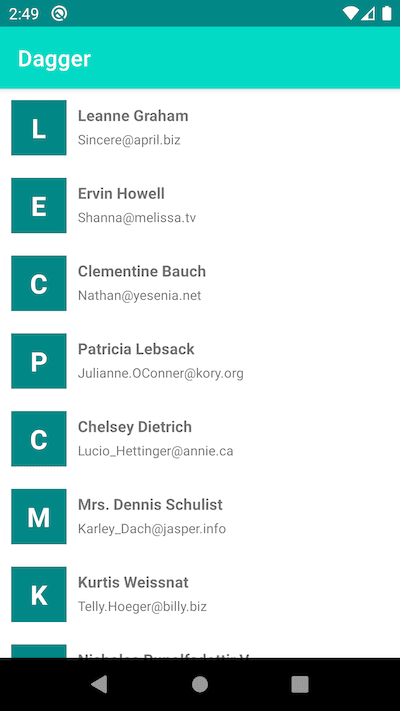
When you run your application you will see users in your emulator or phone’s screen.
You can find source code of this example HERE.
Related Useful Articles

'%3e%3crect%20opacity='0.3'%20width='253.333'%20height='256.667'%20rx='10'%20transform='matrix(0.898794%200.438371%20-0.425364%200.905022%20109.961%20230.004)'%20fill='%23F2709C'%20fill-opacity='0.2'/%3e%3crect%20opacity='0.3'%20width='211.667'%20height='188.333'%20rx='15'%20transform='matrix(0.987688%200.156434%20-0.151006%200.988533%20-40.0391%201715)'%20fill='%23FF9472'%20fill-opacity='0.2'/%3e%3crect%20opacity='0.3'%20width='150'%20height='150'%20rx='10'%20transform='matrix(0.669131%200.743145%20-0.730788%200.682605%202111.64%201603.34)'%20fill='%23F2709C'%20fill-opacity='0.2'/%3e%3crect%20opacity='0.3'%20width='165'%20height='165'%20rx='15'%20transform='matrix(-0.669131%20-0.743145%20-0.730788%200.682605%201998.3%20643.336)'%20fill='%236CCAFF'%20fill-opacity='0.2'/%3e%3crect%20opacity='0.3'%20width='128.333'%20height='128.333'%20rx='50'%20transform='matrix(0.669131%200.743145%20-0.730788%200.682605%20379.961%20958.336)'%20fill='%23B66CFF'%20fill-opacity='0.2'/%3e%3crect%20opacity='0.3'%20width='128.333'%20height='128.333'%20rx='50'%20transform='matrix(0.669131%200.743145%20-0.730788%200.682605%201859.97%202311.67)'%20fill='%23B66CFF'%20fill-opacity='0.2'/%3e%3crect%20opacity='0.3'%20width='156.667'%20height='158.333'%20rx='10'%20transform='matrix(0.891007%200.453991%20-0.440801%200.897605%20938.312%202176.67)'%20fill='%23B66CFF'%20fill-opacity='0.2'/%3e%3c/g%3e%3c/svg%3e)
